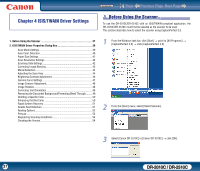
Canon imageFORMULA DR-2010C Compact Color Scanner User Manual - Page 39
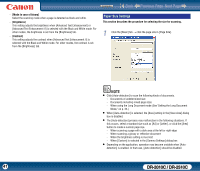
Scan Mode Settings, This describes the procedure for setting the scan mode to suit your
 |
View all Canon imageFORMULA DR-2010C Compact Color Scanner manuals
Add to My Manuals
Save this manual to your list of manuals |
Page 39 highlights
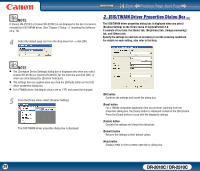
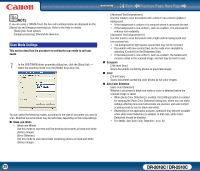
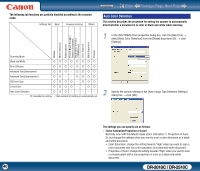
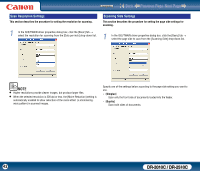
Contents Back Previous Page Next Page NOTE If you are using a TWAIN driver, the two extra settings below are displayed on the [Basic] tab and [Image processing] tab. Refer to the Help for details. -[Basic] tab: Scan options -[Image processing]: Black/white reversion Scan Mode Settings This section describes the procedure for setting the scan mode to suit your needs. 1 In the ISIS/TWAIN driver properties dialog box, click the [Basic] tab → select the scanning mode from the [Mode] drop-down list. You can select the following modes, according to the type of document you want to scan. Note that some functions may be restricted, depending on the mode settings. „ Black-and-White - [Black and White] Use this mode to scan text and line drawing documents as black-and-white (binary) images. - [Error Diffusion] Use this mode to scan documents containing photos as black-and-white (binary) images. - [Advanced Text Enhancement] Use this mode to scan documents with a dark or non-uniform (pattern) background. y If the background is uniform it is removed where it surrounds the text. y If the background is non-uniform, such as a pattern, it is processed to enhance text readability. - [Advanced Text Enhancement II] Use this mode to scan documents with a light uniform background and low-contrast text. y The background in tight spaces around text may not be removed. y Documents with low-contrast text can be made more readable by adjusting [Contrast] on the [Brightness] tab. y If the background is non-uniform, such as a pattern, the background remains visible in the scanned image, and text may be hard to read. „ Grayscale - [256-level Gray] Scans documents containing photos as grayscale images. „ Color - [24-bit Color] Scans documents containing color photos as full-color images. „ Auto Color Detection - [Auto Color Detection] Whether a document is black-and-white or color is detected before the scanned image is saved. y When [Auto Color Detection] is enabled, the [Setting] button is enabled for opening the [Auto Color Detection] dialog box, where you can make settings affecting how color documents are scanned, and select which scanning mode to use for black-and-white. y Depending on the application program, operation may become unstable when [Auto Color Detection] is enabled. In that case, [Auto Color Detection] should be disabled. y For details, See "Auto Color Detection," on p. 40. 39 DR-2010C / DR-2510C
-
 1
1 -
2
-
3
-
4
-
5
-
6
-
7
-
8
-
9
-
10
-
11
-
12
-
13
-
14
-
15
-
16
-
17
-
18
-
19
-
20
-
21
-
22
-
23
-
24
-
25
-
26
-
27
-
28
-
29
-
30
-
31
-
32
-
33
-
 34
34 -
 35
35 -
 36
36 -
 37
37 -
 38
38 -
 39
39 -
 40
40 -
 41
41 -
 42
42 -
 43
43 -
 44
44 -
45
-
46
-
47
-
48
-
49
-
50
-
51
-
52
-
53
-
54
-
55
-
56
-
57
-
58
-
59
-
60
-
61
-
62
-
63
-
64
-
65
-
66
-
67
-
68
-
69
-
70
-
71
-
72
-
73
-
74
-
75
-
76
-
77
-
78
-
79
-
80
-
81
-
82
 |
 |
