Casio EX S100 Owners Manual - Page 167
then press, Select the Set Up tab, select USB,
 |
UPC - 079767673741
View all Casio EX S100 manuals
Add to My Manuals
Save this manual to your list of manuals |
Page 167 highlights
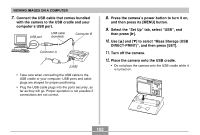
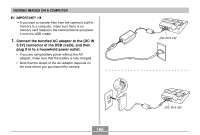
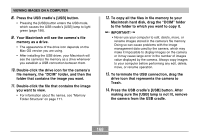
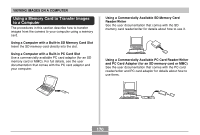
VIEWING IMAGES ON A COMPUTER 2. Connect the USB cable that comes bundled with the camera to the USB cradle and your computer's USB port. USB port USB cable (bundled) Connector B Connector A [USB] • Take care when connecting the USB cable to the USB cradle or your computer. USB ports and cable plugs are shaped for proper positioning. • Plug the USB cable plugs into the ports securely, as far as they will go. Proper operation is not possible if connections are not correct. 3. Press the camera's power button to turn it on, and then press its [MENU] button. 4. Select the "Set Up" tab, select "USB", and then press [̈]. 5. Use [̆] and [̄] to select "Mass Storage (USB DIRECT-PRINT)", and then press [SET]. 6. Turn off the camera. 7. Place the camera onto the USB cradle. • Do not place the camera onto the USB cradle while it is turned on. [USB] button [USB] lamp 167
-
 1
1 -
2
-
3
-
4
-
5
-
6
-
7
-
8
-
9
-
10
-
11
-
12
-
13
-
14
-
15
-
16
-
17
-
18
-
19
-
20
-
21
-
22
-
23
-
24
-
25
-
26
-
27
-
28
-
29
-
30
-
31
-
32
-
33
-
34
-
35
-
36
-
37
-
38
-
39
-
40
-
41
-
42
-
43
-
44
-
45
-
46
-
47
-
48
-
49
-
50
-
51
-
52
-
53
-
54
-
55
-
56
-
57
-
58
-
59
-
60
-
61
-
62
-
63
-
64
-
65
-
66
-
67
-
68
-
69
-
70
-
71
-
72
-
73
-
74
-
75
-
76
-
77
-
78
-
79
-
80
-
81
-
82
-
83
-
84
-
85
-
86
-
87
-
88
-
89
-
90
-
91
-
92
-
93
-
94
-
95
-
96
-
97
-
98
-
99
-
100
-
101
-
102
-
103
-
104
-
105
-
106
-
107
-
108
-
109
-
110
-
111
-
112
-
113
-
114
-
115
-
116
-
117
-
118
-
119
-
120
-
121
-
122
-
123
-
124
-
125
-
126
-
127
-
128
-
129
-
130
-
131
-
132
-
133
-
134
-
135
-
136
-
137
-
138
-
139
-
140
-
141
-
142
-
143
-
144
-
145
-
146
-
147
-
148
-
149
-
150
-
151
-
152
-
153
-
154
-
155
-
156
-
157
-
158
-
159
-
160
-
161
-
 162
162 -
 163
163 -
 164
164 -
 165
165 -
 166
166 -
 167
167 -
 168
168 -
 169
169 -
 170
170 -
 171
171 -
 172
172 -
173
-
174
-
175
-
176
-
177
-
178
-
179
-
180
-
181
-
182
-
183
-
184
-
185
-
186
-
187
-
188
-
189
-
190
-
191
-
192
-
193
-
194
-
195
-
196
-
197
-
198
-
199
-
200
-
201
-
202
-
203
-
204
-
205
-
206
-
207
 |
 |
