Casio EX S100 Owners Manual - Page 32
Turn off the camera., Set the camera onto, the USB cradle., After charging is complete, remove the,
 |
UPC - 079767673741
View all Casio EX S100 manuals
Add to My Manuals
Save this manual to your list of manuals |
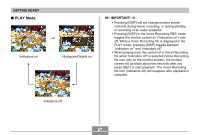
Page 32 highlights
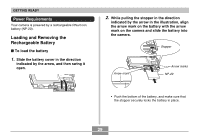
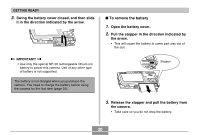
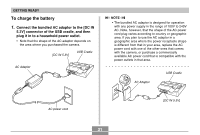
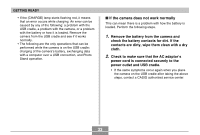
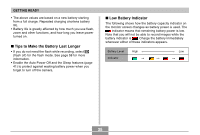
GETTING READY NOTE • The AC adaptor is designed for operation on power ranging from 100V AC to 240V AC. Note, however, that the shape of the power cord plug varies according to country or geographic area. It is up to you to find out if the shape of the AC adaptor power cord plug is compatible with local power outlets when traveling abroad. 2. Turn off the camera. 3. Set the camera onto the USB cradle. • Do not place the camera onto the USB cradle while it is turned on. • The [CHARGE] lamp on the USB cradle should turn red, indicating that charging has started. When charging is complete, the [CHARGE] lamp will turn green. [CHARGE] lamp • It takes about 140 minutes to achieve a full charge. Actual charging time depends on current battery capacity and charging conditions. 4. After charging is complete, remove the camera from the USB cradle. IMPORTANT! • Use only the USB cradle (CA-25) that comes with the camera or the optionally available charger (BC-10L) to charge the special NP-20 rechargeable lithium ion battery. Never use any other charging device. • Use only the bundled AC adaptor. Never use any other type of AC adaptor. Do not use optionally available AD-C40, AD-C620 and AD-C630 AC adaptors with this camera. • Make sure that the camera connector of the USB cradle is securely inserted into the camera's connector as far as it will go. • The [CHARGE] lamp may remain amber colored and the charge operation may not start right away if you try to charge immediately after using the camera (which causes battery to become warm) or when it is too hot or too cold where you are performing the charge operation. If this happens, simply wait until the battery reaches normal temperature. The [CHARGE] lamp will turn red and charging will start when the battery temperature returns to the allowable charging temperature range. 32
-
 1
1 -
2
-
3
-
4
-
5
-
6
-
7
-
8
-
9
-
10
-
11
-
12
-
13
-
14
-
15
-
16
-
17
-
18
-
19
-
20
-
21
-
22
-
23
-
24
-
25
-
26
-
 27
27 -
 28
28 -
 29
29 -
 30
30 -
 31
31 -
 32
32 -
 33
33 -
 34
34 -
 35
35 -
 36
36 -
 37
37 -
38
-
39
-
40
-
41
-
42
-
43
-
44
-
45
-
46
-
47
-
48
-
49
-
50
-
51
-
52
-
53
-
54
-
55
-
56
-
57
-
58
-
59
-
60
-
61
-
62
-
63
-
64
-
65
-
66
-
67
-
68
-
69
-
70
-
71
-
72
-
73
-
74
-
75
-
76
-
77
-
78
-
79
-
80
-
81
-
82
-
83
-
84
-
85
-
86
-
87
-
88
-
89
-
90
-
91
-
92
-
93
-
94
-
95
-
96
-
97
-
98
-
99
-
100
-
101
-
102
-
103
-
104
-
105
-
106
-
107
-
108
-
109
-
110
-
111
-
112
-
113
-
114
-
115
-
116
-
117
-
118
-
119
-
120
-
121
-
122
-
123
-
124
-
125
-
126
-
127
-
128
-
129
-
130
-
131
-
132
-
133
-
134
-
135
-
136
-
137
-
138
-
139
-
140
-
141
-
142
-
143
-
144
-
145
-
146
-
147
-
148
-
149
-
150
-
151
-
152
-
153
-
154
-
155
-
156
-
157
-
158
-
159
-
160
-
161
-
162
-
163
-
164
-
165
-
166
-
167
-
168
-
169
-
170
-
171
-
172
-
173
-
174
-
175
-
176
-
177
-
178
-
179
-
180
-
181
-
182
-
183
-
184
-
185
-
186
-
187
-
188
-
189
-
190
-
191
-
192
-
193
-
194
-
195
-
196
-
197
-
198
-
199
-
200
-
201
-
202
-
203
-
204
-
205
-
206
-
207
 |
 |
