Casio EX S100 Owners Manual - Page 76
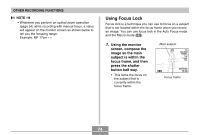
change the exposure, compensation value, and then press [SET]., Record the image.
 |
UPC - 079767673741
View all Casio EX S100 manuals
Add to My Manuals
Save this manual to your list of manuals |
Page 76 highlights
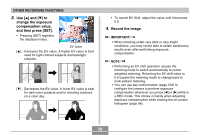
OTHER RECORDING FUNCTIONS 3. Use [̆] and [̄] to change the exposure compensation value, and then press [SET]. • Pressing [SET] registers the displayed value. EV value [̆] : Increases the EV value. A higher EV value is best used for light-colored subjects and backlight subjects. [̄] : Decreases the EV value. A lower EV value is best for dark-color subjects and for shooting outdoors on a clear day. • To cancel EV Shift, adjust the value until it becomes 0.0. 4. Record the image. IMPORTANT! • When shooting under very dark or very bright conditions, you may not be able to obtain satisfactory results even after performing exposure compensation. NOTE • Performing an EV shift operation causes the metering mode to switch automatically to center weighted metering. Returning the EV shift value to 0.0 causes the metering mode to change back to multi-pattern metering. • You can use key customization (page 103) to configure the camera to perform exposure compensation whenever you press [̇] or [̈] while in a REC mode. This comes in handy when adjusting exposure compensation while viewing the on-screen histogram (page 96). 76
-
 1
1 -
2
-
3
-
4
-
5
-
6
-
7
-
8
-
9
-
10
-
11
-
12
-
13
-
14
-
15
-
16
-
17
-
18
-
19
-
20
-
21
-
22
-
23
-
24
-
25
-
26
-
27
-
28
-
29
-
30
-
31
-
32
-
33
-
34
-
35
-
36
-
37
-
38
-
39
-
40
-
41
-
42
-
43
-
44
-
45
-
46
-
47
-
48
-
49
-
50
-
51
-
52
-
53
-
54
-
55
-
56
-
57
-
58
-
59
-
60
-
61
-
62
-
63
-
64
-
65
-
66
-
67
-
68
-
69
-
70
-
 71
71 -
 72
72 -
 73
73 -
 74
74 -
 75
75 -
 76
76 -
 77
77 -
 78
78 -
 79
79 -
 80
80 -
 81
81 -
82
-
83
-
84
-
85
-
86
-
87
-
88
-
89
-
90
-
91
-
92
-
93
-
94
-
95
-
96
-
97
-
98
-
99
-
100
-
101
-
102
-
103
-
104
-
105
-
106
-
107
-
108
-
109
-
110
-
111
-
112
-
113
-
114
-
115
-
116
-
117
-
118
-
119
-
120
-
121
-
122
-
123
-
124
-
125
-
126
-
127
-
128
-
129
-
130
-
131
-
132
-
133
-
134
-
135
-
136
-
137
-
138
-
139
-
140
-
141
-
142
-
143
-
144
-
145
-
146
-
147
-
148
-
149
-
150
-
151
-
152
-
153
-
154
-
155
-
156
-
157
-
158
-
159
-
160
-
161
-
162
-
163
-
164
-
165
-
166
-
167
-
168
-
169
-
170
-
171
-
172
-
173
-
174
-
175
-
176
-
177
-
178
-
179
-
180
-
181
-
182
-
183
-
184
-
185
-
186
-
187
-
188
-
189
-
190
-
191
-
192
-
193
-
194
-
195
-
196
-
197
-
198
-
199
-
200
-
201
-
202
-
203
-
204
-
205
-
206
-
207
 |
 |