Casio EX S100 Owners Manual - Page 64
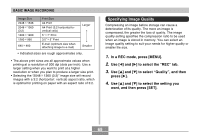
Specifying Image Size, In a REC mode, press [MENU]., to select the REC tab., to select Size
 |
UPC - 079767673741
View all Casio EX S100 manuals
Add to My Manuals
Save this manual to your list of manuals |
Page 64 highlights
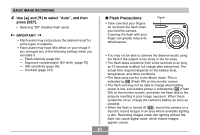
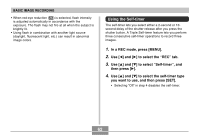
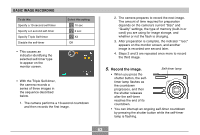
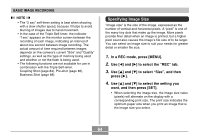
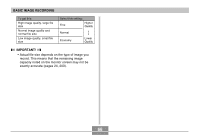
BASIC IMAGE RECORDING NOTE • The "2 sec" self-timer setting is best when shooting with a slow shutter speed, because it helps to avoid blurring of images due to hand movement. • In the case of the Triple Self-timer, the indicator "1sec" appears on the monitor screen between the recording of each image, indicating an interval of about one second between image recording. The actual amount of time required between images depends on the camera's current "Size" and "Quality" settings, as well as the type of memory being used and whether or not the flash is being used. • The following functions are not available for use in combination with the Triple Self-timer. Coupling Shot (page 84), Pre-shot (page 86), Business Shot (page 88) Specifying Image Size "Image size" is the size of the image, expressed as the number of vertical and horizontal pixels. A "pixel" is one of the many tiny dots that make up the image. More pixels provide finer detail when an image is printed, but a higher pixel count also causes the image's file size of to be larger. You can select an image size to suit your needs for greater detail or smaller file size. 1. In a REC mode, press [MENU]. 2. Use [̇] and [̈] to select the " REC" tab. 3. Use [̆] and [̄] to select " Size" , and then press [̈]. 4. Use [̆] and [̄] to select the setting you want, and then press [SET]. • When selecting the image size, the image size value (pixels) will alternate on the display with a corresponding print size. The print size indicates the optimum paper size when you print an image that is the image size you select. 64
-
 1
1 -
2
-
3
-
4
-
5
-
6
-
7
-
8
-
9
-
10
-
11
-
12
-
13
-
14
-
15
-
16
-
17
-
18
-
19
-
20
-
21
-
22
-
23
-
24
-
25
-
26
-
27
-
28
-
29
-
30
-
31
-
32
-
33
-
34
-
35
-
36
-
37
-
38
-
39
-
40
-
41
-
42
-
43
-
44
-
45
-
46
-
47
-
48
-
49
-
50
-
51
-
52
-
53
-
54
-
55
-
56
-
57
-
58
-
 59
59 -
 60
60 -
 61
61 -
 62
62 -
 63
63 -
 64
64 -
 65
65 -
 66
66 -
 67
67 -
 68
68 -
 69
69 -
70
-
71
-
72
-
73
-
74
-
75
-
76
-
77
-
78
-
79
-
80
-
81
-
82
-
83
-
84
-
85
-
86
-
87
-
88
-
89
-
90
-
91
-
92
-
93
-
94
-
95
-
96
-
97
-
98
-
99
-
100
-
101
-
102
-
103
-
104
-
105
-
106
-
107
-
108
-
109
-
110
-
111
-
112
-
113
-
114
-
115
-
116
-
117
-
118
-
119
-
120
-
121
-
122
-
123
-
124
-
125
-
126
-
127
-
128
-
129
-
130
-
131
-
132
-
133
-
134
-
135
-
136
-
137
-
138
-
139
-
140
-
141
-
142
-
143
-
144
-
145
-
146
-
147
-
148
-
149
-
150
-
151
-
152
-
153
-
154
-
155
-
156
-
157
-
158
-
159
-
160
-
161
-
162
-
163
-
164
-
165
-
166
-
167
-
168
-
169
-
170
-
171
-
172
-
173
-
174
-
175
-
176
-
177
-
178
-
179
-
180
-
181
-
182
-
183
-
184
-
185
-
186
-
187
-
188
-
189
-
190
-
191
-
192
-
193
-
194
-
195
-
196
-
197
-
198
-
199
-
200
-
201
-
202
-
203
-
204
-
205
-
206
-
207
 |
 |