Casio EX S100 Owners Manual - Page 87
your picture, using, the semi-transparent
 |
UPC - 079767673741
View all Casio EX S100 manuals
Add to My Manuals
Save this manual to your list of manuals |
Page 87 highlights
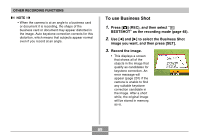
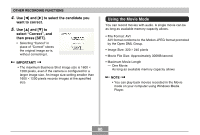
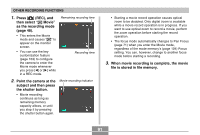
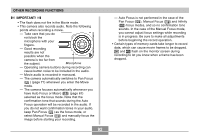
OTHER RECORDING FUNCTIONS 1. Press [ ] (REC), and then select " BESTSHOT" as the recording mode (page 48). 2. Use [̇] and [̈] to select " Pre-shot" , and then press [SET]. 3. Compose the background you want on the monitor screen, and then press the shutter button to temporarily record it as a reference image. • This operation causes a semi-transparent image of the background to appear on the monitor screen, but the displayed image is not actually saved in camera memory. • The focus, exposure, white balance, zoom, and flash settings are fixed for this type of image. 4. Now you can stand in front of the background and ask someone else to snap your picture, using the semi-transparent background on the monitor screen as a composition guide. Semi-transparent background • You can press [MENU] at this point to clear the semitransparent background from the monitor screen. Then you can repeat step 3 to record a new background. 5. After composing the final image (using the semi-transparent background as a guide), the person with the camera should press the shutter button to record. • Note that the semi-transparent background image you temporarily record in step 3 is for composition purposes only. The final image contains only what is in front of the camera when the shutter button is pressed in step 5. 87
-
 1
1 -
2
-
3
-
4
-
5
-
6
-
7
-
8
-
9
-
10
-
11
-
12
-
13
-
14
-
15
-
16
-
17
-
18
-
19
-
20
-
21
-
22
-
23
-
24
-
25
-
26
-
27
-
28
-
29
-
30
-
31
-
32
-
33
-
34
-
35
-
36
-
37
-
38
-
39
-
40
-
41
-
42
-
43
-
44
-
45
-
46
-
47
-
48
-
49
-
50
-
51
-
52
-
53
-
54
-
55
-
56
-
57
-
58
-
59
-
60
-
61
-
62
-
63
-
64
-
65
-
66
-
67
-
68
-
69
-
70
-
71
-
72
-
73
-
74
-
75
-
76
-
77
-
78
-
79
-
80
-
81
-
 82
82 -
 83
83 -
 84
84 -
 85
85 -
 86
86 -
 87
87 -
 88
88 -
 89
89 -
 90
90 -
 91
91 -
 92
92 -
93
-
94
-
95
-
96
-
97
-
98
-
99
-
100
-
101
-
102
-
103
-
104
-
105
-
106
-
107
-
108
-
109
-
110
-
111
-
112
-
113
-
114
-
115
-
116
-
117
-
118
-
119
-
120
-
121
-
122
-
123
-
124
-
125
-
126
-
127
-
128
-
129
-
130
-
131
-
132
-
133
-
134
-
135
-
136
-
137
-
138
-
139
-
140
-
141
-
142
-
143
-
144
-
145
-
146
-
147
-
148
-
149
-
150
-
151
-
152
-
153
-
154
-
155
-
156
-
157
-
158
-
159
-
160
-
161
-
162
-
163
-
164
-
165
-
166
-
167
-
168
-
169
-
170
-
171
-
172
-
173
-
174
-
175
-
176
-
177
-
178
-
179
-
180
-
181
-
182
-
183
-
184
-
185
-
186
-
187
-
188
-
189
-
190
-
191
-
192
-
193
-
194
-
195
-
196
-
197
-
198
-
199
-
200
-
201
-
202
-
203
-
204
-
205
-
206
-
207
 |
 |