Cisco SRW224G4P User Guide - Page 18
Configuration using the, Console Interface - serial
 |
UPC - 745883578535
View all Cisco SRW224G4P manuals
Add to My Manuals
Save this manual to your list of manuals |
Page 18 highlights
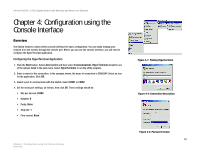
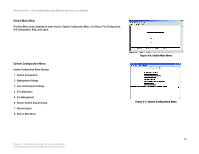
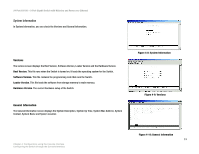
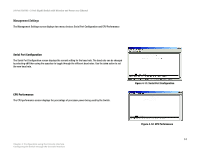
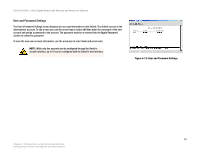
24-Port 10/100 + 2-Port Gigabit Switch with Webview and Power over Ethernet Chapter 4: Configuration using the Console Interface Overview The Switch features a menu-driven console interface for basic configuration. You can easily manage your network from the screens through the console port. Before you can use the console interface, you will need to configure the HyperTerminal application. Configuring the HyperTerminal Application 1. Click the Start button. Select Accessories and then select Communications. HyperTerminal should be one of the options listed in the next menu. Select HyperTerminal to run the utility program. 2. Enter a name for this connection. In the example shown, the name of connection is SRW224P. Select an icon for the application. Click OK. 3. Select a port to communicate with the Switch. Select COM1 or COM2. 4. Set the serial port settings, as follows, then click OK. These settings should be: • Bits per Second: 38400 • Databits: 8 • Parity: None • Stop bits: 1 • Flow control: None Chapter 4: Configuration using the Console Interface Overview Figure 4-1: Finding Hyperterminal Figure 4-2: Connection Description Figure 4-3: Password Screen 10
-
 1
1 -
2
-
3
-
4
-
5
-
6
-
7
-
8
-
9
-
10
-
11
-
12
-
 13
13 -
 14
14 -
 15
15 -
 16
16 -
 17
17 -
 18
18 -
 19
19 -
 20
20 -
 21
21 -
 22
22 -
 23
23 -
24
-
25
-
26
-
27
-
28
-
29
-
30
-
31
-
32
-
33
-
34
-
35
-
36
-
37
-
38
-
39
-
40
-
41
-
42
-
43
-
44
-
45
-
46
-
47
-
48
-
49
-
50
-
51
-
52
-
53
-
54
-
55
-
56
-
57
-
58
-
59
-
60
-
61
-
62
-
63
-
64
-
65
-
66
-
67
-
68
-
69
-
70
-
71
-
72
-
73
-
74
-
75
-
76
-
77
-
78
-
79
-
80
-
81
-
82
-
83
-
84
-
85
-
86
-
87
-
88
-
89
-
90
-
91
-
92
-
93
-
94
-
95
-
96
-
97
-
98
-
99
-
100
-
101
-
102
-
103
-
104
 |
 |
