Cisco SRW224G4P User Guide - Page 37
Time Synchronization - default ip
 |
UPC - 745883578535
View all Cisco SRW224G4P manuals
Add to My Manuals
Save this manual to your list of manuals |
Page 37 highlights
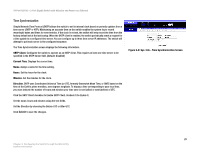
24-Port 10/100 + 2-Port Gigabit Switch with Webview and Power over Ethernet Time Synchronization Simple Network Time Protocol (SNTP) allows the switch to set its internal clock based on periodic updates from a time server (SNTP or NTP). Maintaining an accurate time on the switch enables the system log to record meaningful dates and times for event entries. If the clock is not set, the switch will only record the time from the factory default set at the last bootup. When the SNTP client is enabled, the switch periodically sends a request for a time update to a configured time server. You can configure up to three time server IP addresses. The switch will attempt to poll each server in the configured sequence. The Time Synchronization screen displays the following information. SNTP Client. Configures the switch to operate as an SNTP client. This requires at least one time server to be specified in the SNTP Server field. (Default: Disabled) Current Time. Displays the current time. Name. Assign a name for the time setting. Hours. Set the hours for the clock. Minutes. Set the minutes for the clock. Direction. SNTP uses Coordinated Universal Time (or UTC, formerly Greenwich Mean Time, or GMT) based on the time at the Earth's prime meridian, zero degrees longitude. To display a time corresponding to your local time, you must indicate the number of hours and minutes your time zone is east (after) or west (before) of UTC. Click the SNTP Client checkbox to Enable SNTP Client. Uncheck it to disable it. Set the name, hours and minutes using the text fields. Set the Direction by choosing the Before-UTC or After-UTC. Click Submit to save the changes. Figure 5-9: Sys. Info - Time Synchronization Screen 29 Chapter 5: Configuring the Switch through the Web Utility System Information
-
 1
1 -
2
-
3
-
4
-
5
-
6
-
7
-
8
-
9
-
10
-
11
-
12
-
13
-
14
-
15
-
16
-
17
-
18
-
19
-
20
-
21
-
22
-
23
-
24
-
25
-
26
-
27
-
28
-
29
-
30
-
31
-
 32
32 -
 33
33 -
 34
34 -
 35
35 -
 36
36 -
 37
37 -
 38
38 -
 39
39 -
 40
40 -
 41
41 -
 42
42 -
43
-
44
-
45
-
46
-
47
-
48
-
49
-
50
-
51
-
52
-
53
-
54
-
55
-
56
-
57
-
58
-
59
-
60
-
61
-
62
-
63
-
64
-
65
-
66
-
67
-
68
-
69
-
70
-
71
-
72
-
73
-
74
-
75
-
76
-
77
-
78
-
79
-
80
-
81
-
82
-
83
-
84
-
85
-
86
-
87
-
88
-
89
-
90
-
91
-
92
-
93
-
94
-
95
-
96
-
97
-
98
-
99
-
100
-
101
-
102
-
103
-
104
 |
 |
