Cisco SRW224G4P User Guide - Page 45
Create VLAN
 |
UPC - 745883578535
View all Cisco SRW224G4P manuals
Add to My Manuals
Save this manual to your list of manuals |
Page 45 highlights
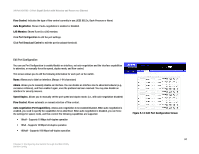
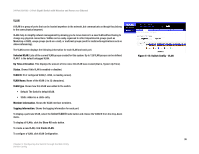
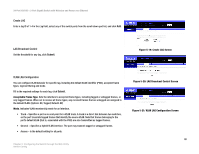
24-Port 10/100 + 2-Port Gigabit Switch with Webview and Power over Ethernet Create VLAN To create a VLAN, enter the VLAN ID and VLAN name, up to 32 characters long. Mark the Enable checkbox to activate the VLAN, and click Create VLAN. To edit a VLAN, select a VLAN ID and click the Edit icon (which resembles a pen). Modify the VLAN name and status if required. Select the membership type by marking the appropriate radio button in the list of ports or lags. Click Submit. Membership Type. Select VLAN membership for each interface by marking the appropriate radio button for a port or LAG: • Tagged. Interface is a member of the VLAN. All packets transmitted by the port will be tagged, that is, carry a tag and therefore carry VLAN or CoS information. • Untagged. Interface is a member of the VLAN. All packets transmitted by the port will be untagged, that is, not carry a tag and therefore not carry VLAN or CoS information. Note that an interface must be assigned to at least one group as an untagged port. • None. Interface is not a member of the VLAN. Packets associated with this VLAN will not be transmitted by the interface. Figure 5-16: Adding/Editing VLAN Screen 37 Chapter 5: Configuring the Switch through the Web Utility Switch Config
-
 1
1 -
2
-
3
-
4
-
5
-
6
-
7
-
8
-
9
-
10
-
11
-
12
-
13
-
14
-
15
-
16
-
17
-
18
-
19
-
20
-
21
-
22
-
23
-
24
-
25
-
26
-
27
-
28
-
29
-
30
-
31
-
32
-
33
-
34
-
35
-
36
-
37
-
38
-
39
-
 40
40 -
 41
41 -
 42
42 -
 43
43 -
 44
44 -
 45
45 -
 46
46 -
 47
47 -
 48
48 -
 49
49 -
 50
50 -
51
-
52
-
53
-
54
-
55
-
56
-
57
-
58
-
59
-
60
-
61
-
62
-
63
-
64
-
65
-
66
-
67
-
68
-
69
-
70
-
71
-
72
-
73
-
74
-
75
-
76
-
77
-
78
-
79
-
80
-
81
-
82
-
83
-
84
-
85
-
86
-
87
-
88
-
89
-
90
-
91
-
92
-
93
-
94
-
95
-
96
-
97
-
98
-
99
-
100
-
101
-
102
-
103
-
104
 |
 |
