Cisco SRW224G4P User Guide - Page 50
LACP Membership
 |
UPC - 745883578535
View all Cisco SRW224G4P manuals
Add to My Manuals
Save this manual to your list of manuals |
Page 50 highlights
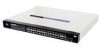
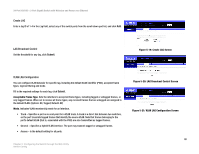
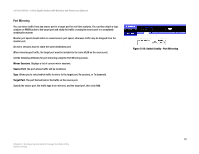
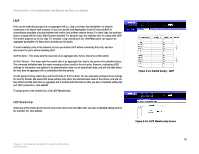
24-Port 10/100 + 2-Port Gigabit Switch with Webview and Power over Ethernet LACP Ports can be statically grouped into an aggregate link (i.e., lag) to increase the bandwidth of a network connection or to ensure fault recovery. Or you can use the Link Aggregation Control Protocol (LACP) to automatically negotiate a lag link between this switch and another network device. For static lags, the switches have to comply with the Cisco EtherChannel standard. For dynamic lags, the switches have to comply with LACP. This switch supports up to four lags. For example, a lag consisting of two 1000 Mbps ports can support an aggregate bandwidth of 4 Gbps when operating at full duplex. To avoid creating a loop in the network, be sure you enable LACP before connecting the ports, and also disconnect the ports before disabling LACP. Set Port Actor - This menu sets the local side of an aggregate link; that is, the ports on this switch. Set Port Partner - This menu sets the remote side of an aggregate link; that is, the ports on the attached device. The command attributes have the same meaning as those used for the port actor. However, configuring LACP settings for the partner only applies to its administrative state, not its operational state, and will only take effect the next time an aggregate link is established with the partner. Set the System Priority, Admin Key, and Port Priority for the Port Actor. You can optionally configure these settings for the Port Partner. (Be aware that these settings only affect the administrative state of the partner, and will not take effect until the next time an aggregate link is formed with this device.) After you have completed setting the port LACP parameters, click submit. To assign ports to the member list, click LACP Membership. LACP Membership Select any of the switch ports from the drop-down menu and click Add. After you have completed adding ports to the member list, click submit. Figure 5-23: Switch Config - LACP Figure 5-24: LACP Membership Screen 42 Chapter 5: Configuring the Switch through the Web Utility Switch Config
-
 1
1 -
2
-
3
-
4
-
5
-
6
-
7
-
8
-
9
-
10
-
11
-
12
-
13
-
14
-
15
-
16
-
17
-
18
-
19
-
20
-
21
-
22
-
23
-
24
-
25
-
26
-
27
-
28
-
29
-
30
-
31
-
32
-
33
-
34
-
35
-
36
-
37
-
38
-
39
-
40
-
41
-
42
-
43
-
44
-
 45
45 -
 46
46 -
 47
47 -
 48
48 -
 49
49 -
 50
50 -
 51
51 -
 52
52 -
 53
53 -
 54
54 -
 55
55 -
56
-
57
-
58
-
59
-
60
-
61
-
62
-
63
-
64
-
65
-
66
-
67
-
68
-
69
-
70
-
71
-
72
-
73
-
74
-
75
-
76
-
77
-
78
-
79
-
80
-
81
-
82
-
83
-
84
-
85
-
86
-
87
-
88
-
89
-
90
-
91
-
92
-
93
-
94
-
95
-
96
-
97
-
98
-
99
-
100
-
101
-
102
-
103
-
104
 |
 |
