Cisco SRW224G4P User Guide - Page 44
Selected VLAN, Up Time at Creation, Status, VLAN ID, VLAN Name, VLAN type, Member Information,
 |
UPC - 745883578535
View all Cisco SRW224G4P manuals
Add to My Manuals
Save this manual to your list of manuals |
Page 44 highlights
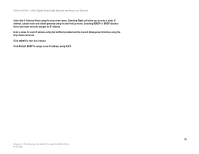
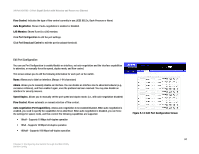
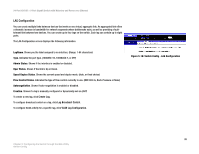
24-Port 10/100 + 2-Port Gigabit Switch with Webview and Power over Ethernet VLAN A VLAN is a group of ports that can be located anywhere in the network, but communicate as though they belong to the same physical segment. VLANs help to simplify network management by allowing you to move devices to a new VLAN without having to change any physical connections. VLANs can be easily organized to reflect departmental groups (such as Marketing or R&D), usage groups (such as e-mail), or multicast groups (used for multimedia applications such as videoconferencing). The VLAN screen displays the following information for each VLAN and each port. Selected VLAN. Lists all the current VLAN groups created for this system. Up to 128 VLAN groups can be defined. VLAN 1 is the default untagged VLAN. Up Time at Creation. This displays the amount of time since this VLAN was created (that is, System Up Time). Status. Shows if this VLAN is enabled or disabled. VLAN ID. ID of configured VLAN (1-4094, no leading zeroes). VLAN Name. Name of the VLAN (1 to 32 characters). VLAN type. Shows how this VLAN was added to the switch. • Default: The Switch's default VLAN. • Static: Added as a static entry. Member Information. Shows the VLAN interface members. Tagging Information. Shows the tagging information for each port. To display a particular VLAN, select the Select VLAN ID radio button and choose the VLAN ID from the drop-down menu. To display all VLANs, click the Show All radio button. To create a new VLAN, click Create VLAN. To configure a VLAN, click VLAN Configuration. Chapter 5: Configuring the Switch through the Web Utility Switch Config Figure 5-15: Switch Config - VLAN 36
-
 1
1 -
2
-
3
-
4
-
5
-
6
-
7
-
8
-
9
-
10
-
11
-
12
-
13
-
14
-
15
-
16
-
17
-
18
-
19
-
20
-
21
-
22
-
23
-
24
-
25
-
26
-
27
-
28
-
29
-
30
-
31
-
32
-
33
-
34
-
35
-
36
-
37
-
38
-
 39
39 -
 40
40 -
 41
41 -
 42
42 -
 43
43 -
 44
44 -
 45
45 -
 46
46 -
 47
47 -
 48
48 -
 49
49 -
50
-
51
-
52
-
53
-
54
-
55
-
56
-
57
-
58
-
59
-
60
-
61
-
62
-
63
-
64
-
65
-
66
-
67
-
68
-
69
-
70
-
71
-
72
-
73
-
74
-
75
-
76
-
77
-
78
-
79
-
80
-
81
-
82
-
83
-
84
-
85
-
86
-
87
-
88
-
89
-
90
-
91
-
92
-
93
-
94
-
95
-
96
-
97
-
98
-
99
-
100
-
101
-
102
-
103
-
104
 |
 |
