D-Link DSR-250v2 Product Manual - Page 41
Captive Portal Configuration
 |
View all D-Link DSR-250v2 manuals
Add to My Manuals
Save this manual to your list of manuals |
Page 41 highlights
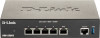
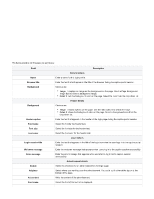
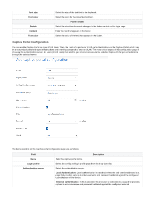
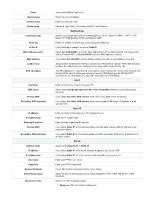
Font size Font color Enable Content Font color Select the size of the text font to be displaced. Select the color for the advertisement text. Footer details Select the checkbox to enable changes to the footer content on the login page. Enter the text that appears in the footer. Select the color of the text that appears in the footer. Captive Portal Configuration You can enable Captive Portal on a per-VLAN basis. Then, the hosts of a particular VLAN get authentication via the Captive Portal, which may be a customized portal with special instructions and branding compared to another VLAN. The most critical aspect of this configuration page is choosing the authentication server. All users (VLAN hosts) that want to gain internet access via the selected Captive Portal get authentication through the selected server. The fields available on the Captive portal configuration page are as follows: Field Name Login profile Authentication server Description Enter the captive portal name. Select the configured login profile page from the drop-down list. Select the authentication server. Local Authentication: Local authentication is a method where the end-user is redirected to a page that provides options to enter username and password validated against the configured user database of the device. External authentication :If this is selected, the end-user is redirected to a page that provides options to enter username and password validated against the configured external
-
 1
1 -
2
-
3
-
4
-
5
-
6
-
7
-
8
-
9
-
10
-
11
-
12
-
13
-
14
-
15
-
16
-
17
-
18
-
19
-
20
-
21
-
22
-
23
-
24
-
25
-
26
-
27
-
28
-
29
-
30
-
31
-
32
-
33
-
34
-
35
-
 36
36 -
 37
37 -
 38
38 -
 39
39 -
 40
40 -
 41
41 -
 42
42 -
 43
43 -
 44
44 -
 45
45 -
 46
46 -
47
-
48
-
49
-
50
-
51
-
52
-
53
-
54
-
55
-
56
-
57
-
58
-
59
-
60
-
61
-
62
-
63
-
64
-
65
-
66
-
67
-
68
-
69
-
70
-
71
-
72
-
73
-
74
-
75
-
76
-
77
-
78
-
79
-
80
-
81
-
82
-
83
-
84
-
85
-
86
-
87
-
88
-
89
-
90
-
91
-
92
-
93
-
94
-
95
-
96
-
97
-
98
-
99
-
100
-
101
-
102
-
103
-
104
-
105
-
106
-
107
-
108
-
109
-
110
-
111
-
112
 |
 |
