Dell Fabric Manager Dell Fabric Manager Deployment Guide 1.0.0 - Page 19
Using the Core Design Wizard, Core Design – Step 1: Welcome
 |
View all Dell Fabric Manager manuals
Add to My Manuals
Save this manual to your list of manuals |
Page 19 highlights
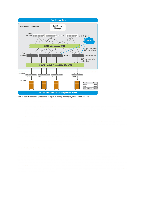
3 Using the Core Design Wizard Use the Core Design Wizard at the Home > Getting Started screen or the Cores > Core Deployment > Design > New Core screen to design a two-tier distributed core (spine and leaf architecture) based on your workload requirements for your current and future needs. The design consists of a wiring plan, network topology information, summary of the inventory requirement, and a design specification. Before you begin, review the Getting Started and Designing a Distributed Core sections. For information about a distributed core, see Conventional Core Vs Distributed Core. To design a distributed core, complete the following tasks using the Core Design Wizard. 1. Core Design - Step 1: Welcome Page 2. Core Design - Step 2: Core Name, Type, OS Ratio, and Description 3. Core Design - Step 3: Port Count 4. Core Design - Step 4: Interlink Configuration 5. Core Design - Step 5: Uplink Configuration 6. Core Design - Step 6: Downlink Configuration 7. Core Design - Step 7: Output 8. Core Design - Step 8: Summary NOTE: When you are finished designing the distributed core, prepare the core for deployment at the Core Deployment > Pre-Deployment screen. For more information, see Preparing the Core for Deployment. Core Design - Step 1: Welcome Page Use the Core Design Wizard at the Home > Getting Started or Cores > Design > New Core screen to design a two-tier distributed core (spine and leaf architecture) based on your workload requirements for your current and future needs. Use the following screens to design a distributed core: 1. Core Name and Type - The core name, type, interlink-oversubscription ratio, and description. 2. Port Count - The number of edge port uplinks and downlinks required for the initial deployment as well as for future expansion. 3. Interlink Configuration - The interconnect links (the links that connect the leaves and spines) using the OSPF routing protocol. 4. Uplink - The uplink connects to the WAN connection. 5. Downlink - The downlink connects to the servers, ToR, or switches. 6. Output view - Displays wiring, tabular, and topology diagrams. 7. Summary - Displays a summary of your distributed core design. This profile is then applied to the distributed core design. 19
-
 1
1 -
2
-
3
-
4
-
5
-
6
-
7
-
8
-
9
-
10
-
11
-
12
-
13
-
 14
14 -
 15
15 -
 16
16 -
 17
17 -
 18
18 -
 19
19 -
 20
20 -
 21
21 -
 22
22 -
 23
23 -
 24
24 -
25
-
26
-
27
-
28
-
29
-
30
-
31
-
32
-
33
-
34
-
35
-
36
-
37
-
38
-
39
-
40
-
41
-
42
-
43
-
44
-
45
-
46
-
47
-
48
-
49
-
50
-
51
-
52
-
53
-
54
-
55
-
56
-
57
-
58
-
59
-
60
-
61
-
62
-
63
-
64
-
65
 |
 |
