Dell Fabric Manager Dell Fabric Manager Deployment Guide 1.0.0 - Page 23
Core Design – Step 5: Uplink Configuration, Core Design – Step 7: Output - installation guide
 |
View all Dell Fabric Manager manuals
Add to My Manuals
Save this manual to your list of manuals |
Page 23 highlights
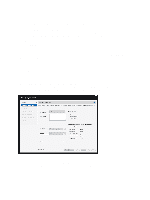
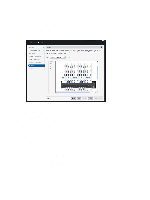
Core Design - Step 5: Uplink Configuration The Uplink Configuration page displays the port bandwidth (a read-only field) and the number of specified ports entered on the Core Name and Type and Port Count screens. Use the Uplink Configuration screen to configure the uplink protocol for the edge port uplinks to the WAN. NOTE: The uplinks or interlinks must be in area 0 for OSPF. To configure the uplink protocol for the edge port uplinks to the WAN: 1. From the Protocol Settings pull-down menu, select a routing protocol (OSPF, IBGP, or eBGP) for the edge port uplinks. The number of uplinks are specified in the Port Count screen. The Configure Uplink Protocol is displayed. The range of IP addresses belong to the /30 subnet. a) For OSPF, for each specified uplink, enter the local IP address, remote neighbor IP address, and area ID. A valid area ID area is 0 to 65535. b) For iBGP, for each specified uplink, enter the AS number, local IP address, and remote neighbor IP address. For the AS number, enter a value from 1 to 4294967295. c) For eBGP, for each specified uplink, enter the local AS number, local IP, remote neighbor IP address, and remote AS number. For the AS number, enter a value from 1 to 4294967295. 2. Click Next to go the Downlinks Configuration screen. Core Design - Step 6: Downlink Configuration Downlinks are edge port links which connect to servers, switches, or ToRs. When you enable the ToR configuration, the leaves function as a ToR. When you disable the ToR configuration, the leaves function as a switch. To configure the edge port downlinks. 1. In the Starting VLAN ID field, enter a starting VLAN ID. Range: 2 and 4094. 2. Enter the number of ports to be grouped for the VLAN and VRRP configuration. Range: 1 to 16. 3. If you have a Type 2: Medium Core or Type 3: Small Core design and you want to enable the leaves to act as a ToR, check the Enable Leaves as Top-of-Rack Switch box and then select the VLAN or VLAN and LAG protocol setting. 4. If the leaves are acting as a leaf switch (the switches are directly connected to the server) , select the VLAN and VRRP and LAG protocol setting. 5. In the Start IP Address Range/Prefix field, enter the starting IP address and prefix. Enter a valid IP address and a prefix from 8 to 23. 6. Click on the Preview Range of IP Addresses that will be used link to view this information. 7. Click Next to go the Output screen. Core Design - Step 7: Output Use the Output screen to view the graphical wiring, tabular wiring, and network topology wiring plans for your core design. Use the wiring plan as a guide for installing your equipment into the distributed core. Based on the configuration, the DFM calculates the number of leaf and spine switches required for the design and displays the physical wiring plan which you can export and print in PDF. The wiring plans display the cabling maps (the connections between the spines and leaves). 23
-
 1
1 -
2
-
3
-
4
-
5
-
6
-
7
-
8
-
9
-
10
-
11
-
12
-
13
-
14
-
15
-
16
-
17
-
 18
18 -
 19
19 -
 20
20 -
 21
21 -
 22
22 -
 23
23 -
 24
24 -
 25
25 -
 26
26 -
 27
27 -
 28
28 -
29
-
30
-
31
-
32
-
33
-
34
-
35
-
36
-
37
-
38
-
39
-
40
-
41
-
42
-
43
-
44
-
45
-
46
-
47
-
48
-
49
-
50
-
51
-
52
-
53
-
54
-
55
-
56
-
57
-
58
-
59
-
60
-
61
-
62
-
63
-
64
-
65
 |
 |