Dell Fabric Manager Dell Fabric Manager Deployment Guide 1.0.0 - Page 29
Pre-deployment – Step 2: Assign Switch Identities, Pre-Deployment – Step 3: Management IP
 |
View all Dell Fabric Manager manuals
Add to My Manuals
Save this manual to your list of manuals |
Page 29 highlights
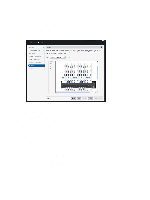
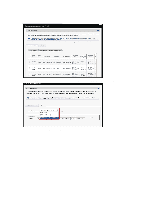
• Summary - Displays the core name, location of the software image, and DHCP configuration file. Pre-deployment - Step 2: Assign Switch Identities Use the Assign Switch Identities page to associate the chassis MAC addresses to the switches in the distributed core. Entering the serial numbers and service tags are recommend but not required. Load the CSV file that contains the chassis MAC addresses, serial numbers, and service tags for the switches in the distributed core. To get a sample CSV file, go to the webapps/dfm/conf directory. NOTE: Before you begin, obtain the CSV file that contains the chassis MAC addresses, service tag, and serials numbers for each switch provided from Dell manufacturing or manually enter this information. To assign switch identities: 1. Locate the CSV file that contains the chassis MAC addresses, serial numbers, and service tags for the switches in the distributed core. If you do not have this file, manually enter this information. 2. Navigate to the Cores > Core Deployment > Deploy > Pre-deployment Configuration > Assign Switch Identifies screen. 3. In the Default Gateway field, enter the IP address of the default gateway and then the prefix-length. 4. In the route management, enter a static route that points to the management interface or a forwarding router. forwarding-router-address-Enter an IPv4 or IPv6 address of a forwarding router and then the prefix-length for the IP address of the management interface. management ethernet-Enter a static route that points to the management interface. 5. Click the Browse button and specify the path of the CSV file. 6. Click the Upload button. 7. Click the Action icon in each row to associate the switch name with the MAC address, serial number, and service tags. 8. Map the chassis MAC address, serial number, and service tag to each switch. 9. Click Next to the go to the Assign Management IP Addresses screen. Pre-Deployment - Step 3: Management IP Use the Management IP screen to assign a management IP address to each switch in the distributed core. NOTE: Before you begin, gather the pool of address for the management port for all the switches in the distributed core. To assign a management IP address to the switches: 1. Navigate to the Cores > Core Deployment > Deploy > Pre-deployment Configuration > Management IP screen. 2. In the Default Gateway field, enter the address of the default gateway for the management interface. 3. In the Management Route field, enter the route and prefix of the management interface. 4. In the Start Management IP Address/Prefix fields, enter the starting management IP address and prefix. 5. Select the switches that you want to assign a management IP address. 6. Click the Autofill Selected IP Addresses button. The system automatically assigns a management IP address to all the selected switches in the distributed core. 7. Click Next to go to the Software Images screen. 29
-
 1
1 -
2
-
3
-
4
-
5
-
6
-
7
-
8
-
9
-
10
-
11
-
12
-
13
-
14
-
15
-
16
-
17
-
18
-
19
-
20
-
21
-
22
-
23
-
 24
24 -
 25
25 -
 26
26 -
 27
27 -
 28
28 -
 29
29 -
 30
30 -
 31
31 -
 32
32 -
 33
33 -
 34
34 -
35
-
36
-
37
-
38
-
39
-
40
-
41
-
42
-
43
-
44
-
45
-
46
-
47
-
48
-
49
-
50
-
51
-
52
-
53
-
54
-
55
-
56
-
57
-
58
-
59
-
60
-
61
-
62
-
63
-
64
-
65
 |
 |
