Dell Fabric Manager Dell Fabric Manager Deployment Guide 1.0.0 - Page 22
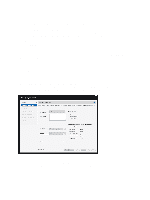
Core Design – Step 4: Interlink Configuration, Specify the OSPF area ID.
 |
View all Dell Fabric Manager manuals
Add to My Manuals
Save this manual to your list of manuals |
Page 22 highlights
CAUTION: If you do not specify any additional links in the core design for future expansion: • Any future expansion requires rewiring the hardware. • IP addresses are not reserved. • You might have to bring down currently deployed switches to expand the core. For information on how to expand the core, see Expanding the Core. To specify the number of edge port uplinks and downlinks for initial deployment and for future expansion: 1. In the Enter the number of edge ports required by the core (to be assigned to leaf switches area): a) Enter an even number of uplink ports (connections to the WAN) required by the distributed core for initial deployment. b) Enter an even number of downlink ports (connections to the servers, switches, or ToR) required by the distributed core for initial deployment. 2. In the Number of additional edge ports for future expansion a) Enter an even number of uplink ports (connections to the WAN) required by the distributed core for future deployment. b) Enter an even number of downlink ports (connections to the servers, switches, or ToR) required by the distributed core for future deployment. 3. Click Next to go the Interlink Configuration screen. Core Design - Step 4: Interlink Configuration Use the Interlink Configuration screen to configure the interconnect links (the links that connect the leaves and spines) using the OSPF routing protocol. The port bandwidth (a read-only field) is automatically determined by the selected core type and interlink-oversubscription rate. NOTE: The uplinks or interlinks must be in area 0 for OSPF. To configure the interlink: 1. In Protocol Settings, click Configure Protocol Settings. The Interlink Protocol Settings screen is displayed. 2. Specify the OSPF area ID. The area ID can be a value between 0 and 65535. CAUTION: The area ID for the interconnect link must not be the same as the area ID specified for the uplink. 3. Enter the starting IP address and prefix for the interconnect links in the Starting IP address/Prefix field. Enter a valid IP address and prefix from 8 to 29. 4. Click on the Preview range of IP addresses link to view this information. 5. Enter the loopback address and prefix in the Loopback IP Address/Prefix: fields. Enter a valid IP address and prefix from 8 to 29. 6. Click on the Preview range of IP addresses link to view this information. 7. Click Next to go to the Uplink Configuration screen. 22
-
 1
1 -
2
-
3
-
4
-
5
-
6
-
7
-
8
-
9
-
10
-
11
-
12
-
13
-
14
-
15
-
16
-
 17
17 -
 18
18 -
 19
19 -
 20
20 -
 21
21 -
 22
22 -
 23
23 -
 24
24 -
 25
25 -
 26
26 -
 27
27 -
28
-
29
-
30
-
31
-
32
-
33
-
34
-
35
-
36
-
37
-
38
-
39
-
40
-
41
-
42
-
43
-
44
-
45
-
46
-
47
-
48
-
49
-
50
-
51
-
52
-
53
-
54
-
55
-
56
-
57
-
58
-
59
-
60
-
61
-
62
-
63
-
64
-
65
 |
 |
