Dell PowerConnect Brocade M6505 Hardware Reference Manual - Page 23
Installing the SAN I/O Module, Items included with the SAN I/O Module, In
 |
View all Dell PowerConnect Brocade M6505 manuals
Add to My Manuals
Save this manual to your list of manuals |
Page 23 highlights
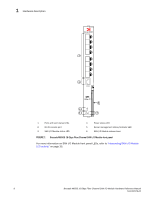
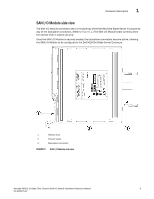
Chapter Installing the SAN I/O Module 2 In this chapter •Unpacking the SAN I/O Module 11 •Items included with the SAN I/O Module 11 •System reliability guidelines 12 •Handling static-sensitive devices 12 •Preparing the Blade Server Enclosure for the SAN I/O Module 12 •Inserting the SAN I/O Module in the Blade Server Enclosure 13 •Handling SFP+ transceivers 15 •Inserting an SFP+ transceiver in the SAN I/O Module port 15 •Cabling guidelines 16 •Data transmission ranges 17 Unpacking the SAN I/O Module Perform the following steps to remove the Brocade Product Name from its shipping package: 1. Open the shipping box and inspect the contents for damage. 2. Remove the foam layer that sits on top of the SAN I/O Module. 3. Remove the switch from the surrounding protective foam. 4. After ensuring that standard electrostatic discharge (ESD) precautions have been taken, slide the SAN I/O Module from the antistatic sleeve. Items included with the SAN I/O Module • SFP+ transceivers: Each SAN I/O Module includes pre-installed SFP+ transceivers. The number of pre-installed SFP+ transceivers varies based on the SAN I/O Module. The transceivers can be activated directly out of the box. - Base model: Two 16 Gbps SFP+ transceivers - Full model: Four 16 Gbps SFP+ transceivers - ENT (Enterprise) model: Eight 16 Gbps SFP+ transceivers • Brocade M6505 16 Gbps Fibre Channel SAN I/O Module QuickStart Guide Brocade M6505 16 Gbps Fibre Channel SAN I/O Module Hardware Reference Manual 11 53-1002576-02
-
 1
1 -
2
-
3
-
4
-
5
-
6
-
7
-
8
-
9
-
10
-
11
-
12
-
13
-
14
-
15
-
16
-
17
-
 18
18 -
 19
19 -
 20
20 -
 21
21 -
 22
22 -
 23
23 -
 24
24 -
 25
25 -
 26
26 -
 27
27 -
 28
28 -
29
-
30
-
31
-
32
-
33
-
34
-
35
-
36
-
37
-
38
-
39
-
40
-
41
-
42
-
43
-
44
-
45
-
46
-
47
-
48
-
49
-
50
-
51
-
52
-
53
-
54
-
55
-
56
-
57
-
58
-
59
-
60
-
61
-
62
-
63
-
64
-
65
-
66
-
67
-
68
-
69
-
70
 |
 |