Dell PowerConnect Brocade M6505 Hardware Reference Manual - Page 32
Modifying the SAN I/O Module IP address, Using the CMC GUI to set the IP address
 |
View all Dell PowerConnect Brocade M6505 manuals
Add to My Manuals
Save this manual to your list of manuals |
Page 32 highlights
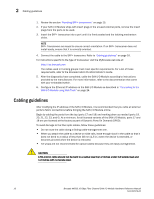
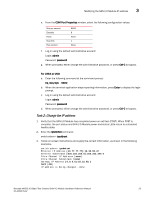
3 Modifying the SAN I/O Module IP address • Access to the following publications: - Dell PowerEdge M1000e Enclosure Owner's Manual - Dell Chassis Management Controller Firmware Version 4.x User Guide - Brocade Fabric OS Command Reference - Brocade Fabric OS Message Reference - Brocade SAN TECH NOTE - Preparing to Install the Brocade Access Gateway - Brocade Access Gateway Administrator's Guide - Brocade Web Tools Administrator's Guide - Release notes for the Fabric OS version running on the SAN I/O Module - Release notes specific to the SAN I/O Module Modifying the SAN I/O Module IP address By default, the IP address for the SAN I/O Module is configured as 10.77.77.77 with a default Ethernet subnetmask of 255.255.255.0. Reset the IP address using any of the following three methods. The IP address values are stored on the SAN I/O Module. • "Using the CMC GUI to set the IP address" on page 20 • "Using the CMC CLI to set the IP address" on page 21 • "Using the SAN I/O Module CLI to set the IP address" on page 22 NOTE It is recommended that you set the IP address using the Dell M1000e Blade Server Chassis Management Controller (CMC). From the CMC, you can set the IP address using either the GUI or the CLI. Using the CMC GUI to set the IP address To modify the SAN I/O Module IP address using the CMC GUI, perform the following steps: 1. Select I/O Module Overview from the left navigation panel. 2. Click the Setup tab. 3. Enter the new information in the IP Address, Subnet Mask, and Gateway fields as appropriate, then click Apply. 4. To enable DHCP, select DHCP Enabled, then click Apply. Refer to Figure 5 on page 21. 20 Brocade M6505 16 Gbps Fibre Channel SAN I/O Module Hardware Reference Manual 53-1002576-02
-
 1
1 -
2
-
3
-
4
-
5
-
6
-
7
-
8
-
9
-
10
-
11
-
12
-
13
-
14
-
15
-
16
-
17
-
18
-
19
-
20
-
21
-
22
-
23
-
24
-
25
-
26
-
 27
27 -
 28
28 -
 29
29 -
 30
30 -
 31
31 -
 32
32 -
 33
33 -
 34
34 -
 35
35 -
 36
36 -
 37
37 -
38
-
39
-
40
-
41
-
42
-
43
-
44
-
45
-
46
-
47
-
48
-
49
-
50
-
51
-
52
-
53
-
54
-
55
-
56
-
57
-
58
-
59
-
60
-
61
-
62
-
63
-
64
-
65
-
66
-
67
-
68
-
69
-
70
 |
 |