Dell PowerConnect Brocade M6505 Hardware Reference Manual - Page 25
Inserting the SAN I/O Module in the Blade Server Enclosure
 |
View all Dell PowerConnect Brocade M6505 manuals
Add to My Manuals
Save this manual to your list of manuals |
Page 25 highlights
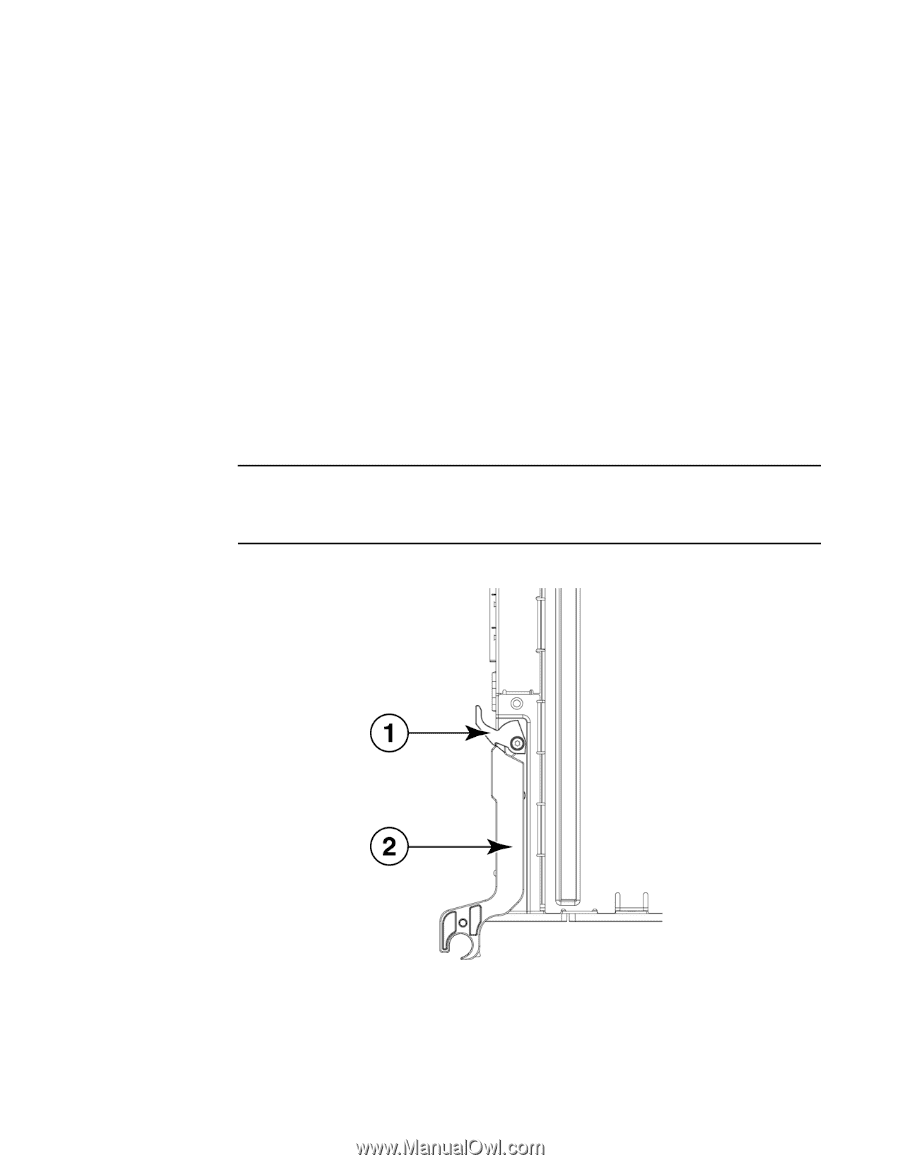
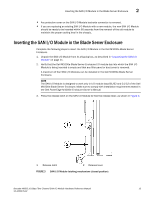
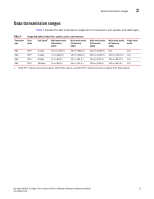
Inserting the SAN I/O Module in the Blade Server Enclosure 2 • Any protective cover on the SAN I/O Module backside connector is removed. • If you are replacing an existing SAN I/O Module with a new module, the new SAN I/O Module should be ready to be inserted within 60 seconds from the removal of the old module to maintain the proper cooling level in the chassis. Inserting the SAN I/O Module in the Blade Server Enclosure Complete the following steps to insert the SAN I/O Module in the Dell M1000e Blade Server Enclosure. 1. Unpack the SAN I/O Module from its shipping box, as described in "Unpacking the SAN I/O Module" on page 11. 2. Verify that the Dell M1000e Blade Server Enclosure I/O module bay into which the SAN I/O Module is being inserted is empty and that any filler panel or dust cover is removed. A maximum of four SAN I/O Modules can be installed in the Dell M1000e Blade Server Enclosure. NOTE The SAN I/O Module is designed to work only in I/O module bays B1/B2 and C1/C2 of the Dell M1000e Blade Server Enclosure. Make sure to comply with installation requirements stated in the Dell PowerEdge M1000e Enclosure Owner's Manual. 3. Press the release latch on the SAN I/O Module to free the release lever, as shown in Figure 3. 1 Release latch 2 Release lever FIGURE 3 SAN I/O Module latching mechanism (closed position) Brocade M6505 16 Gbps Fibre Channel SAN I/O Module Hardware Reference Manual 13 53-1002576-02
-
 1
1 -
2
-
3
-
4
-
5
-
6
-
7
-
8
-
9
-
10
-
11
-
12
-
13
-
14
-
15
-
16
-
17
-
18
-
19
-
 20
20 -
 21
21 -
 22
22 -
 23
23 -
 24
24 -
 25
25 -
 26
26 -
 27
27 -
 28
28 -
 29
29 -
 30
30 -
31
-
32
-
33
-
34
-
35
-
36
-
37
-
38
-
39
-
40
-
41
-
42
-
43
-
44
-
45
-
46
-
47
-
48
-
49
-
50
-
51
-
52
-
53
-
54
-
55
-
56
-
57
-
58
-
59
-
60
-
61
-
62
-
63
-
64
-
65
-
66
-
67
-
68
-
69
-
70
 |
 |