Dell PowerConnect Brocade M6505 Hardware Reference Manual - Page 34
Using the SAN I/O Module CLI to set the IP address
 |
View all Dell PowerConnect Brocade M6505 manuals
Add to My Manuals
Save this manual to your list of manuals |
Page 34 highlights
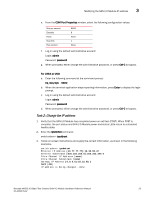
3 Modifying the SAN I/O Module IP address Fibre Channel IP Addresss [none]: Fibre Channel Subnetmask [none]: Gateway IP Address [0.0.0.0]:10.32.48.1 DHCP [Off]: IP address is being changed...Done. 7. Enter ipAddrShow to verify the IP address was correctly set. switch:admin> ipaddrshow Ethernet IP Address: 10.32.53.47 Ethernet Subnetmask: 255.255.240.0 Fibre Channel IP Addresss: none Fibre Channel Subnetmask: none Gateway IP Address 10.32.48.1 DHCP: Off Refer to the Dell PowerEdge M1000e Enclosure Owner's Manual that comes with your Blade Server Enclosure for information on using the CMC connect command. Using the SAN I/O Module CLI to set the IP address Perform the following tasks to change the IP address on the Brocade M6505 16 Gbps Fibre Channel SAN I/O Module using the SAN I/O Module's CLI. Task 1: Establish a terminal session with the SAN I/O Module Complete the following steps to establish a terminal emulation session between the SAN I/O Module and a management workstation used for managing the SAN I/O Module. Once this session is established, you can log in to the SAN I/O Module and use its CLI commands to manage the module. 1. Connect a serial cable between the serial console port on the SAN I/O Module and the management workstation that can establish a terminal emulation session with the SAN I/O Module. 2. Disable any serial communication programs that are running on the workstation. 3. Using a terminal emulator application (such as HyperTerminal or PuTTY connection manager on a PC or TERM in a LINUX or UNIX environment), establish a terminal session to the SAN I/O Module from the management workstation. You will use this connection if you want to reset the IP address of the SAN I/O Module using CLI commands and perform other configuration tasks. For Windows 2003, 2008 a. Click Start and select Programs > Accessories > Communications. b. Select HyperTerminal and enter a name for the connection. c. From the HyperTerminal window, click the Connect menu and select an available COM port. d. Click OK. 22 Brocade M6505 16 Gbps Fibre Channel SAN I/O Module Hardware Reference Manual 53-1002576-02
-
 1
1 -
2
-
3
-
4
-
5
-
6
-
7
-
8
-
9
-
10
-
11
-
12
-
13
-
14
-
15
-
16
-
17
-
18
-
19
-
20
-
21
-
22
-
23
-
24
-
25
-
26
-
27
-
28
-
 29
29 -
 30
30 -
 31
31 -
 32
32 -
 33
33 -
 34
34 -
 35
35 -
 36
36 -
 37
37 -
 38
38 -
 39
39 -
40
-
41
-
42
-
43
-
44
-
45
-
46
-
47
-
48
-
49
-
50
-
51
-
52
-
53
-
54
-
55
-
56
-
57
-
58
-
59
-
60
-
61
-
62
-
63
-
64
-
65
-
66
-
67
-
68
-
69
-
70
 |
 |
