Dell PowerEdge M640 EMC for VRTX enclosure Installation and Service Manual - Page 99
Installing the rSPI card
 |
View all Dell PowerEdge M640 manuals
Add to My Manuals
Save this manual to your list of manuals |
Page 99 highlights
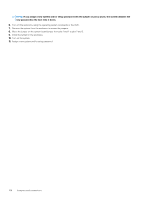
Installing the rSPI card Prerequisites Follow the safety guidelines listed in Safety instructions on page 45. CAUTION: To prevent damage to the rSPI card, you must hold the card only by its edges. Steps 1. Align the screw hole on the rSPI card with the standoff on the system board. 2. Using the Torx #8 screwdriver, replace the screw to secure the rSPI card to the system board. Figure 59. Installing the rSPI card Next steps 1. Install the system board 2. Follow the procedure listed in After working inside your system on page 46. Installing and removing system components 99
-
 1
1 -
2
-
3
-
4
-
5
-
6
-
7
-
8
-
9
-
10
-
11
-
12
-
13
-
14
-
15
-
16
-
17
-
18
-
19
-
20
-
21
-
22
-
23
-
24
-
25
-
26
-
27
-
28
-
29
-
30
-
31
-
32
-
33
-
34
-
35
-
36
-
37
-
38
-
39
-
40
-
41
-
42
-
43
-
44
-
45
-
46
-
47
-
48
-
49
-
50
-
51
-
52
-
53
-
54
-
55
-
56
-
57
-
58
-
59
-
60
-
61
-
62
-
63
-
64
-
65
-
66
-
67
-
68
-
69
-
70
-
71
-
72
-
73
-
74
-
75
-
76
-
77
-
78
-
79
-
80
-
81
-
82
-
83
-
84
-
85
-
86
-
87
-
88
-
89
-
90
-
91
-
92
-
93
-
 94
94 -
 95
95 -
 96
96 -
 97
97 -
 98
98 -
 99
99 -
 100
100 -
 101
101 -
 102
102 -
 103
103 -
 104
104 -
105
-
106
 |
 |

Installing the rSPI card
Prerequisites
Follow the safety guidelines listed in
Safety instructions
on page 45.
CAUTION:
To prevent damage to the rSPI card, you must hold the card only by its edges.
Steps
1.
Align the screw hole on the rSPI card with the standoff on the system board.
2.
Using the Torx #8 screwdriver, replace the screw to secure the rSPI card to the system board.
Figure 59. Installing the rSPI card
Next steps
1.
Install the system board
2.
Follow the procedure listed in
After working inside your system
on page 46.
Installing and removing system components
99