Dell PowerEdge R440 EMC Installation and Service Manual - Page 128
Power interposer board
 |
View all Dell PowerEdge R440 manuals
Add to My Manuals
Save this manual to your list of manuals |
Page 128 highlights
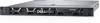
Power interposer board Removing power interposer board Prerequisites 1. Follow the safety guidelines listed in Safety instructions. 2. Follow the procedure listed in Before working inside your system on page 59. 3. Remove the air shroud 4. Disconnect all the cables connected from the PIB to the system board. NOTE: Ensure that you note the routing of the cables as you remove them from the system board. 5. Remove the PSU. Steps 1. Using a Phillips #2 screwdriver, remove the two screws securing the Power Interposer Board (PIB) to the system. 2. Lift the board and slide it out at an angle to disengage the guide pins on the board. Figure 103. Removing power interposer board 3. Lift the board away for the system. Next steps 1. Install the power interposer board. Installing power interposer board Prerequisites Follow the safety guidelines listed in Safety instructions. Steps 1. Align the slots on the PIB with the guides on the system. 2. Using a Phillips #2 screwdriver, replace the two screws to secure the PIB to the system. 3. Route the cables and connect it to the system board. 128 Installing and removing system components
-
 1
1 -
2
-
3
-
4
-
5
-
6
-
7
-
8
-
9
-
10
-
11
-
12
-
13
-
14
-
15
-
16
-
17
-
18
-
19
-
20
-
21
-
22
-
23
-
24
-
25
-
26
-
27
-
28
-
29
-
30
-
31
-
32
-
33
-
34
-
35
-
36
-
37
-
38
-
39
-
40
-
41
-
42
-
43
-
44
-
45
-
46
-
47
-
48
-
49
-
50
-
51
-
52
-
53
-
54
-
55
-
56
-
57
-
58
-
59
-
60
-
61
-
62
-
63
-
64
-
65
-
66
-
67
-
68
-
69
-
70
-
71
-
72
-
73
-
74
-
75
-
76
-
77
-
78
-
79
-
80
-
81
-
82
-
83
-
84
-
85
-
86
-
87
-
88
-
89
-
90
-
91
-
92
-
93
-
94
-
95
-
96
-
97
-
98
-
99
-
100
-
101
-
102
-
103
-
104
-
105
-
106
-
107
-
108
-
109
-
110
-
111
-
112
-
113
-
114
-
115
-
116
-
117
-
118
-
119
-
120
-
121
-
122
-
 123
123 -
 124
124 -
 125
125 -
 126
126 -
 127
127 -
 128
128 -
 129
129 -
 130
130 -
 131
131 -
 132
132 -
 133
133 -
134
-
135
-
136
-
137
-
138
-
139
-
140
-
141
-
142
-
143
-
144
-
145
 |
 |
