Dell PowerVault DR6000 Owners Manual - Page 30
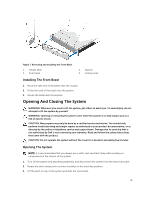
Front Bezel (Optional), Removing The Front Bezel
 |
View all Dell PowerVault DR6000 manuals
Add to My Manuals
Save this manual to your list of manuals |
Page 30 highlights
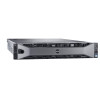
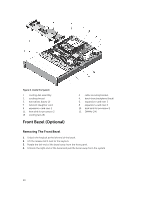
Figure 6. Inside the System 1. cooling-fan assembly 3. cooling shroud 5. hard drives (back) (2) 7. network daughter card 9. expansion-card riser 1 11. heat sink for processor 2 13. cooling fans (6) Front Bezel (Optional) 2. cable securing bracket 4. hard-drive backplane (back) 6. expansion-card riser 3 8. expansion-card riser 2 10. heat sink for processor 1 12. DIMMs (24) Removing The Front Bezel 1. Unlock the keylock at the left end of the bezel. 2. Lift the release latch next to the keylock. 3. Rotate the left end of the bezel away from the front panel. 4. Unhook the right end of the bezel and pull the bezel away from the system. 30
-
 1
1 -
2
-
3
-
4
-
5
-
6
-
7
-
8
-
9
-
10
-
11
-
12
-
13
-
14
-
15
-
16
-
17
-
18
-
19
-
20
-
21
-
22
-
23
-
24
-
 25
25 -
 26
26 -
 27
27 -
 28
28 -
 29
29 -
 30
30 -
 31
31 -
 32
32 -
 33
33 -
 34
34 -
 35
35 -
36
-
37
-
38
-
39
-
40
-
41
-
42
-
43
-
44
-
45
-
46
-
47
-
48
-
49
-
50
-
51
-
52
-
53
-
54
-
55
-
56
-
57
-
58
-
59
-
60
-
61
-
62
-
63
-
64
-
65
-
66
-
67
-
68
-
69
-
70
-
71
-
72
-
73
-
74
-
75
-
76
-
77
-
78
-
79
-
80
-
81
-
82
-
83
-
84
-
85
-
86
-
87
-
88
-
89
-
90
-
91
-
92
-
93
-
94
-
95
-
96
-
97
-
98
-
99
-
100
-
101
-
102
-
103
-
104
-
105
-
106
-
107
-
108
-
109
-
110
-
111
-
112
-
113
-
114
-
115
-
116
-
117
-
118
-
119
-
120
-
121
-
122
-
123
-
124
 |
 |

Figure 6. Inside the System
1.
cooling-fan assembly
2.
cable securing bracket
3.
cooling shroud
4.
hard-drive backplane (back)
5.
hard drives (back) (2)
6.
expansion-card riser 3
7.
network daughter card
8.
expansion-card riser 2
9.
expansion-card riser 1
10.
heat sink for processor 1
11.
heat sink for processor 2
12.
DIMMs (24)
13.
cooling fans (6)
Front Bezel (Optional)
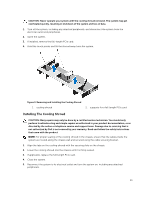
Removing The Front Bezel
1.
Unlock the keylock at the left end of the bezel.
2.
Lift the release latch next to the keylock.
3.
Rotate the left end of the bezel away from the front panel.
4.
Unhook the right end of the bezel and pull the bezel away from the system.
30