Dell PowerVault DR6000 Owners Manual - Page 74
Removing and Installing the 3.5 Inch x12 SAS Backplane, SAS cables 3
 |
View all Dell PowerVault DR6000 manuals
Add to My Manuals
Save this manual to your list of manuals |
Page 74 highlights
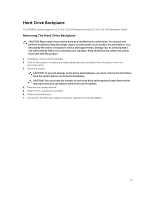
8. Press the release tabs and slide the backplane upward. Figure 40. Removing and Installing the 3.5 Inch (x12) SAS Backplane 1. release tabs (2) 3. left control panel cable 5. power cable A 7. SAS cables (3) 9. front I/O cable 11. x12 hard-drive backplane 2. pass-through I2C cable 4. I2C cable 6. USB cable 8. power cable B 10. right control panel cable 12. hard-drive backplane connectors (12) 74
-
 1
1 -
2
-
3
-
4
-
5
-
6
-
7
-
8
-
9
-
10
-
11
-
12
-
13
-
14
-
15
-
16
-
17
-
18
-
19
-
20
-
21
-
22
-
23
-
24
-
25
-
26
-
27
-
28
-
29
-
30
-
31
-
32
-
33
-
34
-
35
-
36
-
37
-
38
-
39
-
40
-
41
-
42
-
43
-
44
-
45
-
46
-
47
-
48
-
49
-
50
-
51
-
52
-
53
-
54
-
55
-
56
-
57
-
58
-
59
-
60
-
61
-
62
-
63
-
64
-
65
-
66
-
67
-
68
-
 69
69 -
 70
70 -
 71
71 -
 72
72 -
 73
73 -
 74
74 -
 75
75 -
 76
76 -
 77
77 -
 78
78 -
 79
79 -
80
-
81
-
82
-
83
-
84
-
85
-
86
-
87
-
88
-
89
-
90
-
91
-
92
-
93
-
94
-
95
-
96
-
97
-
98
-
99
-
100
-
101
-
102
-
103
-
104
-
105
-
106
-
107
-
108
-
109
-
110
-
111
-
112
-
113
-
114
-
115
-
116
-
117
-
118
-
119
-
120
-
121
-
122
-
123
-
124
 |
 |

8.
Press the release tabs and slide the backplane upward.
Figure 40. Removing and Installing the 3.5 Inch (x12) SAS Backplane
1.
release tabs (2)
2.
pass-through I2C cable
3.
left control panel cable
4.
I2C cable
5.
power cable A
6.
USB cable
7.
SAS cables (3)
8.
power cable B
9.
front I/O cable
10.
right control panel cable
11.
x12 hard-drive backplane
12.
hard-drive backplane connectors (12)
74