Epson DS-30 Users Guide - Page 18
Address, User Name, Password, Options, Apply job separation, Separation, Settings
 |
View all Epson DS-30 manuals
Add to My Manuals
Save this manual to your list of manuals |
Page 18 highlights
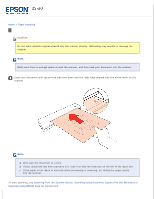
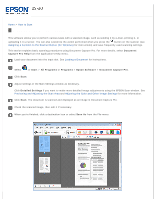
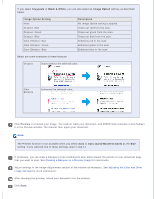
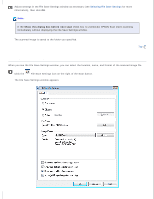
Adjust settings in the Save As window or the Print Settings window as necessary, then click OK. Depending on the destination you selected, you may also be prompted to enter additional information such as a server's Address, a User Name, or a Password. Note: If you are scanning to a PDF file, click Options for PDF related features such as document security and search functionality. See Selecting PDF Options for more information. If you want the software to detect blank pages or bar codes and split your scanned documents into separate files based on these markers, click Apply job separation. Then click Separation Settings to select your preferences. The scanned image is saved or uploaded to the location you specified.
-
 1
1 -
2
-
3
-
4
-
5
-
6
-
7
-
8
-
9
-
10
-
11
-
12
-
 13
13 -
 14
14 -
 15
15 -
 16
16 -
 17
17 -
 18
18 -
 19
19 -
 20
20 -
 21
21 -
 22
22 -
 23
23 -
24
-
25
-
26
-
27
-
28
-
29
-
30
-
31
-
32
-
33
-
34
-
35
-
36
-
37
-
38
-
39
-
40
-
41
-
42
-
43
-
44
-
45
-
46
-
47
-
48
-
49
-
50
-
51
-
52
-
53
-
54
-
55
-
56
-
57
-
58
-
59
-
60
-
61
-
62
-
63
 |
 |
Adjust settings in the Save As window or the Print Settings window as necessary, then click
OK
.
Depending on the destination you selected, you may also be prompted to enter additional information such as a
server's
Address
, a
User Name
, or a
Password
.
Note:
If you are scanning to a PDF file, click
Options
for PDF related features such as document
security and search functionality. See
Selecting PDF Options
for more information.
If you want the software to detect blank pages or bar codes and split your scanned documents
into separate files based on these markers, click
Apply job separation
. Then click
Separation
Settings
to select your preferences.
The scanned image is saved or uploaded to the location you specified.