Epson Stylus Pro 3800 Professional Edition Printer Guide - Page 109
Solving Problems, Message, Explanation, Response
 |
View all Epson Stylus Pro 3800 Professional Edition manuals
Add to My Manuals
Save this manual to your list of manuals |
Page 109 highlights
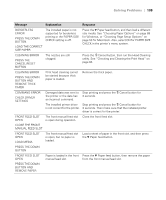
Solving Problems | 109 Message Explanation Response BORDERLESS ERROR PRESS THE DOWN BUTTON. LOAD THE CORRECT SIZE PAPER The installed paper is not supported for borderless printing or the PAPER SIZE CHECK setting is off. Press the d Paper feed button, and then load a different size media. See "Choosing Paper Options" on page 68 for Windows, or "Choosing Page Setup Options" on page 50 for Macintosh. Also, select ON for PAPER SIZE CHECK in the printer's menu system. CLEANING ERROR PRESS THE CANCEL/RESET BUTTON The nozzles are still clogged. Press the + Cancel button, then run the Head Cleaning utility. See "Checking and Cleaning the Print Head" on page 84. CLEANING ERROR PRESS THE DOWN BUTTON AND REMOVE THICK PAPER Print head cleaning cannot be started because thick paper is loaded. Remove the thick paper. COMMAND ERROR CHECK DRIVER SETTINGS Damaged data was sent to Stop printing and press the + Cancel button for the printer or the data has 3 seconds. an incorrect command. The installed printer driver Stop printing and press the + Cancel button for is not correct for the printer. 3 seconds. Then make sure that the installed printer driver is correct for the printer. FRONT FEED SLOT OPEN The front manual feed slot Close the front feed slot. is open during operation. CLOSE THE FRONT MANUAL FEED SLOT FRONT FEED SLOT OPEN LOAD MEDIA The front manual feed slot is open, but no paper is loaded. Load a sheet of paper in the front slot, and then press the d Paper feed button. PRESS THE DOWN BUTTON FRONT FEED SLOT OPEN Paper is loaded in the front Press the d Paper feed button, then remove the paper manual feed slot. from the front manual feed slot. PRESS THE DOWN BUTTON AND REMOVE PAPER 6-109
-
 1
1 -
2
-
3
-
4
-
5
-
6
-
7
-
8
-
9
-
10
-
11
-
12
-
13
-
14
-
15
-
16
-
17
-
18
-
19
-
20
-
21
-
22
-
23
-
24
-
25
-
26
-
27
-
28
-
29
-
30
-
31
-
32
-
33
-
34
-
35
-
36
-
37
-
38
-
39
-
40
-
41
-
42
-
43
-
44
-
45
-
46
-
47
-
48
-
49
-
50
-
51
-
52
-
53
-
54
-
55
-
56
-
57
-
58
-
59
-
60
-
61
-
62
-
63
-
64
-
65
-
66
-
67
-
68
-
69
-
70
-
71
-
72
-
73
-
74
-
75
-
76
-
77
-
78
-
79
-
80
-
81
-
82
-
83
-
84
-
85
-
86
-
87
-
88
-
89
-
90
-
91
-
92
-
93
-
94
-
95
-
96
-
97
-
98
-
99
-
100
-
101
-
102
-
103
-
 104
104 -
 105
105 -
 106
106 -
 107
107 -
 108
108 -
 109
109 -
 110
110 -
 111
111 -
 112
112 -
 113
113 -
 114
114 -
115
-
116
-
117
-
118
-
119
-
120
-
121
-
122
-
123
-
124
-
125
-
126
-
127
-
128
-
129
-
130
-
131
-
132
-
133
-
134
 |
 |