Epson Stylus Pro 3800 Professional Edition Printer Guide - Page 16
Configuring the Network Interface, Setting Up the Printer On a Network
 |
View all Epson Stylus Pro 3800 Professional Edition manuals
Add to My Manuals
Save this manual to your list of manuals |
Page 16 highlights
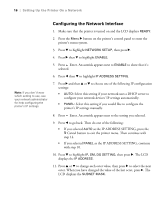
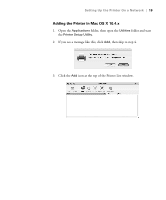
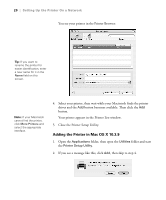
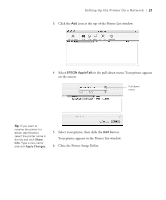
16 | Setting Up the Printer On a Network Configuring the Network Interface 1. Make sure that the printer is turned on and the LCD displays READY. 2. Press the Menu r button on the printer's control panel to enter the printer's menu system. 3. Press d to highlight NETWORK SETUP, then press r. 4. Press r then d to highlight ENABLE. 5. Press Enter. An asterisk appears next to ENABLE to show that it's selected. 6. Press l then d to highlight IP ADDRESS SETTING. Note: If you don't know which setting to use, see your network administrator for help configuring the printer's IP settings. 7. Press r and then u or d to choose one of the following IP configuration settings: • AUTO: Select this setting if your network uses a DHCP server to configure your network devices' IP settings automatically. • PANEL: Select this setting if you would like to configure the printer's IP settings manually. 8. Press Enter. An asterisk appears next to the setting you selected. 9. Press l to go back. Then do one of the following: • If you selected AUTO as the IP ADDRESS SETTING, press the + Cancel button to exit the printer menu. Then continue with step 14. • If you selected PANEL as the IP ADDRESS SETTING, continue with step 10. 10. Press d to highlight IP, SM, DG SETTING, then press r. The LCD displays the IP ADDRESS. 11. Press u or d to change each octet value, then press r to select the next octet. When you have changed the value of the last octet, press r. The LCD displays the SUBNET MASK. 1-16
-
 1
1 -
2
-
3
-
4
-
5
-
6
-
7
-
8
-
9
-
10
-
 11
11 -
 12
12 -
 13
13 -
 14
14 -
 15
15 -
 16
16 -
 17
17 -
 18
18 -
 19
19 -
 20
20 -
 21
21 -
22
-
23
-
24
-
25
-
26
-
27
-
28
-
29
-
30
-
31
-
32
-
33
-
34
-
35
-
36
-
37
-
38
-
39
-
40
-
41
-
42
-
43
-
44
-
45
-
46
-
47
-
48
-
49
-
50
-
51
-
52
-
53
-
54
-
55
-
56
-
57
-
58
-
59
-
60
-
61
-
62
-
63
-
64
-
65
-
66
-
67
-
68
-
69
-
70
-
71
-
72
-
73
-
74
-
75
-
76
-
77
-
78
-
79
-
80
-
81
-
82
-
83
-
84
-
85
-
86
-
87
-
88
-
89
-
90
-
91
-
92
-
93
-
94
-
95
-
96
-
97
-
98
-
99
-
100
-
101
-
102
-
103
-
104
-
105
-
106
-
107
-
108
-
109
-
110
-
111
-
112
-
113
-
114
-
115
-
116
-
117
-
118
-
119
-
120
-
121
-
122
-
123
-
124
-
125
-
126
-
127
-
128
-
129
-
130
-
131
-
132
-
133
-
134
 |
 |