Fluke 1586A/2DS Product Manual - Page 40
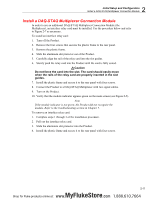
Install a DAQ-STAQ Multiplexer Connection Module
 |
View all Fluke 1586A/2DS manuals
Add to My Manuals
Save this manual to your list of manuals |
Page 40 highlights
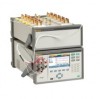
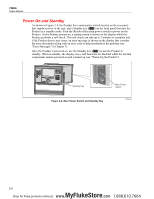
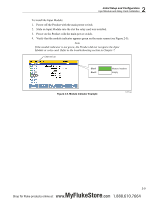
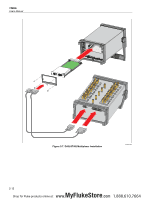
2 Initial Setup and Configuration Install a DAQ-STAQ Multiplexer Connection Module Install a DAQ-STAQ Multiplexer Connection Module In order to use an additional DAQ-STAQ Multiplexer Connection Module (the Multiplexer), an interface relay card must be installed. Use the procedure below and refer to Figure 2-7 as necessary. To install an interface relay card: 1. Turn off the Product. 2. Remove the four screws that secures the plastic frame to the rear panel. 3. Remove the plastic frame. 4. Slide the aluminum slot protector out of the Product. 5. Carefully align the rail of the relay card into the slot guides. 6. Slowly push the relay card into the Product until the card is fully seated. Caution Do not force the card into the slot. The card should easily move when the rails of the relay card are properly inserted in the slot guides. 7. Install the plastic frame and secure it to the rear panel with four screws. 8. Connect the Product to a DAQ-STAQ Multiplexer with two signal cables. 9. Turn on the Product. 10. Verify that the module indicator appears green on the main screen (see Figure 2-5). Note If the module indicator is not green, the Product did not recognize the module. Refer to the troubleshooting section in Chapter 7. To remove an interface relay card: 1. Complete steps 1 through 3 of the installation procedure. 2. Pull out the interface relay card. 3. Slide the aluminum slot protector into the Product. 4. Install the plastic frame and secure it to the rear panel with four screws. 2-11 MyFlukeStore Shop for Fluke products online at: www. .com 1.888.610.7664
-
 1
1 -
2
-
3
-
4
-
5
-
6
-
7
-
8
-
9
-
10
-
11
-
12
-
13
-
14
-
15
-
16
-
17
-
18
-
19
-
20
-
21
-
22
-
23
-
24
-
25
-
26
-
27
-
28
-
29
-
30
-
31
-
32
-
33
-
34
-
 35
35 -
 36
36 -
 37
37 -
 38
38 -
 39
39 -
 40
40 -
 41
41 -
 42
42 -
 43
43 -
 44
44 -
 45
45 -
46
-
47
-
48
-
49
-
50
-
51
-
52
-
53
-
54
-
55
-
56
-
57
-
58
-
59
-
60
-
61
-
62
-
63
-
64
-
65
-
66
-
67
-
68
-
69
-
70
-
71
-
72
-
73
-
74
-
75
-
76
-
77
-
78
-
79
-
80
-
81
-
82
-
83
-
84
-
85
-
86
-
87
-
88
-
89
-
90
-
91
-
92
-
93
-
94
-
95
-
96
-
97
-
98
-
99
-
100
-
101
-
102
-
103
-
104
-
105
-
106
-
107
-
108
-
109
-
110
-
111
-
112
-
113
-
114
-
115
-
116
-
117
-
118
-
119
-
120
-
121
-
122
-
123
-
124
-
125
-
126
-
127
-
128
-
129
-
130
-
131
-
132
-
133
-
134
-
135
 |
 |
