Fluke 1586A/2DS Product Manual - Page 56
Channel Status
 |
View all Fluke 1586A/2DS manuals
Add to My Manuals
Save this manual to your list of manuals |
Page 56 highlights
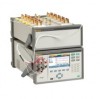
3 Input and Channel Configuration Channel Configuration Table 3-3. Channel Setup Menu (cont.) Item Function Channel status indicator. When a channel is set to ON, the channel status indicator is green. When OFF, the channel status indicator is white. Channel selection indicator. When a channel is selected, the channel information shows on the screen. Use and to move up or down one channel at a time. Use or to jump to the next module number (for example, to jump from channel Ch101 to channel Ch201). Set Channels to ON or OFF To scan, monitor, or record an input, the associated channel must be set to ON and configured. When a channel is set to ON, it is referred to as "active". The channel indicator appears green when set to ON and white when set to OFF as shown in Figure 3-6. To set a channel to ON, push then push . Push again to set the channel to OFF. Channel Status Indicators Green = ON White = OFF Figure 3-6. Channel Status Indicators hcn006.eps When a channel is set to ON, the channel loads the previous channel configuration. If the channel was not previously configured, the default channel settings are loaded. To change the or edit the channel: 1. Push . 2. Push or to highlight a channel. 3. Push to edit the channel. 4. Set the Channel Status to ON if necessary. 3-13 MyFlukeStore Shop for Fluke products online at: www. .com 1.888.610.7664
-
 1
1 -
2
-
3
-
4
-
5
-
6
-
7
-
8
-
9
-
10
-
11
-
12
-
13
-
14
-
15
-
16
-
17
-
18
-
19
-
20
-
21
-
22
-
23
-
24
-
25
-
26
-
27
-
28
-
29
-
30
-
31
-
32
-
33
-
34
-
35
-
36
-
37
-
38
-
39
-
40
-
41
-
42
-
43
-
44
-
45
-
46
-
47
-
48
-
49
-
50
-
 51
51 -
 52
52 -
 53
53 -
 54
54 -
 55
55 -
 56
56 -
 57
57 -
 58
58 -
 59
59 -
 60
60 -
 61
61 -
62
-
63
-
64
-
65
-
66
-
67
-
68
-
69
-
70
-
71
-
72
-
73
-
74
-
75
-
76
-
77
-
78
-
79
-
80
-
81
-
82
-
83
-
84
-
85
-
86
-
87
-
88
-
89
-
90
-
91
-
92
-
93
-
94
-
95
-
96
-
97
-
98
-
99
-
100
-
101
-
102
-
103
-
104
-
105
-
106
-
107
-
108
-
109
-
110
-
111
-
112
-
113
-
114
-
115
-
116
-
117
-
118
-
119
-
120
-
121
-
122
-
123
-
124
-
125
-
126
-
127
-
128
-
129
-
130
-
131
-
132
-
133
-
134
-
135
 |
 |
