Fluke 726 FE 726 Users Manual - Page 38
Zeroing with Absolute Pressure Modules, for 3 seconds
 |
View all Fluke 726 manuals
Add to My Manuals
Save this manual to your list of manuals |
Page 38 highlights
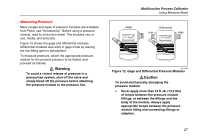
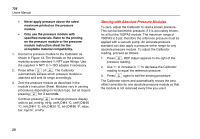
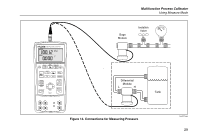
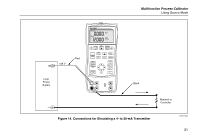
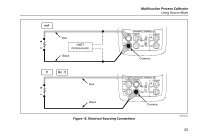
726 Users Manual • Never apply pressure above the rated maximum printed on the pressure module. • Only use the pressure module with specified materials. Refer to the printing on the pressure module or the pressure module instruction sheet for the acceptable material compatibility. 1. Connect a pressure module to the Calibrator as shown in Figure 13. The threads on the pressure modules accept standard ¼ NPT pipe fittings. Use the supplied ¼ NPT to ¼ ISO adapter if necessary. 2. Press either A or a. The Calibrator automatically senses which pressure module is attached and sets its range accordingly. 3. Zero the pressure module as described in the module's Instruction Sheet. Modules vary in zeroing procedures depending on module type, but all require pressing A for 3 seconds. Continue pressing A to change pressure display units to psi, mmHg, inHg, cmH2O@4 °C, cmH2O@20 °C, inH2O@4 °C, inH O@20 2 °C, inH O@60 2 °F, mbar, bar, kg/cm2, or kPa. Zeroing with Absolute Pressure Modules To zero, adjust the Calibrator to read a known pressure. This can be barometric pressure, if it is accurately known, for all but the 700PA3 module. The maximum range of 700PA3 is 5 psi; therefore the reference pressure must be applied with a vacuum pump. An accurate pressure standard can also apply a pressure within range for any absolute pressure module. To adjust the Calibrator reading, proceed as follows: 1. Press A, REF Adjust appears to the right of the pressure reading. 2. Use X to increase or W to decrease the Calibrator reading to equal the reference pressure. 3. Press A again to exit the zeroing procedure. The Calibrator stores and automatically reuses the zero offset correction for one absolute-pressure module so that the module is not rezeroed every time you use it. 28
-
 1
1 -
2
-
3
-
4
-
5
-
6
-
7
-
8
-
9
-
10
-
11
-
12
-
13
-
14
-
15
-
16
-
17
-
18
-
19
-
20
-
21
-
22
-
23
-
24
-
25
-
26
-
27
-
28
-
29
-
30
-
31
-
32
-
 33
33 -
 34
34 -
 35
35 -
 36
36 -
 37
37 -
 38
38 -
 39
39 -
 40
40 -
 41
41 -
 42
42 -
 43
43 -
44
-
45
-
46
-
47
-
48
-
49
-
50
-
51
-
52
-
53
-
54
-
55
-
56
-
57
-
58
-
59
-
60
-
61
-
62
-
63
-
64
-
65
-
66
-
67
-
68
-
69
-
70
-
71
-
72
-
73
-
74
-
75
-
76
-
77
-
78
-
79
-
80
 |
 |
