HP 1150c HP OfficeJet Pro 1150C - (English) User Guide - Page 16
Repeat steps 3 and 4 to install the black print cartridge into the cradle on
 |
View all HP 1150c manuals
Add to My Manuals
Save this manual to your list of manuals |
Page 16 highlights
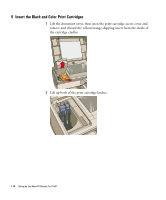
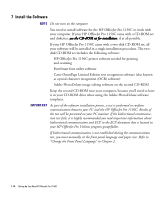
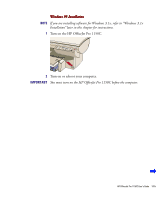
3 Remove the color print cartridge (the thicker one) from its package and, being careful to touch only the black plastic, gently remove both the green pull tab and blue tape covering the nozzles. 4 Push the color print cartridge firmly down into the cradle on the left, and close the cartridge latch. 5 Repeat steps 3 and 4 to install the black print cartridge into the cradle on the right. 6 Close the print cartridge access cover. NOTE Both print cartridges must be correctly installed for HP OfficeJet Pro 1150C to work. HP OfficeJet Pro 1150C User's Guide 1-11
-
 1
1 -
2
-
3
-
4
-
5
-
6
-
7
-
8
-
9
-
10
-
 11
11 -
 12
12 -
 13
13 -
 14
14 -
 15
15 -
 16
16 -
 17
17 -
 18
18 -
 19
19 -
 20
20 -
 21
21 -
22
-
23
-
24
-
25
-
26
-
27
-
28
-
29
-
30
-
31
-
32
-
33
-
34
-
35
-
36
-
37
-
38
-
39
-
40
-
41
-
42
-
43
-
44
-
45
-
46
-
47
-
48
-
49
-
50
-
51
-
52
-
53
-
54
-
55
-
56
-
57
-
58
-
59
-
60
-
61
-
62
-
63
-
64
-
65
-
66
-
67
-
68
-
69
-
70
-
71
-
72
-
73
-
74
 |
 |
HP OfficeJet Pro 1150C User°s Guide
1-11
3
Remove the color print cartridge (the thicker one) from its package and,
being careful to touch only the black plastic, gently remove both the green
pull tab and blue tape covering the nozzles.
4
Push the color print cartridge firmly down into the cradle on the left, and
close the cartridge latch.
5
Repeat steps 3 and 4 to install the black print cartridge into the cradle on the
right.
6
Close the print cartridge access cover.
NOTE
Both print cartridges must be correctly installed for HP OfficeJet Pro 1150C
to work.