HP 11kVA 400 Volt IEC309 16A 3-Phase Input 30xC13/3xC19 HP Monitored Power Dis - Page 16
Inspecting the Equipment, Installation Overview, Tools, Installation
 |
View all HP 11kVA 400 Volt IEC309 16A 3-Phase Input 30xC13/3xC19 manuals
Add to My Manuals
Save this manual to your list of manuals |
Page 16 highlights
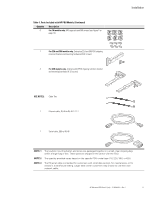
Installation l For units with circuit breakers, the circuit breaker controls whether there is output power: - If the circuit breakers are on, there is output power, the LCD display is on, and the network communications module is operational. - If the circuit breakers are off, there is no output power, but the LCD display is on, and the network communications module is operational. - To turn off the PDU, unplug it. NOTE The illustrations in this document might differ slightly from your hardware. Inspecting the Equipment If any equipment has been damaged during shipment, keep the shipping cartons and packing materials for the carrier or place of purchase, and file a claim for shipping damage. If you discover damage after acceptance, file a claim for concealed damage. To file a claim for shipping damage or concealed damage: 1) File with the carrier within 15 days of receipt of the equipment; 2) Send a copy of the damage claim within 15 days to your service representative. Installation Overview NOTE 1 Power cords for the devices that you connect to the PDU are not included. NOTE 2 Depending on your choice of installation method, some parts may not be used. NOTE 3 If a square-hole rack is used, cage nuts must be installed for horizontal installations. Tools The following tools may be needed to install the PDU in a rack cabinet (varies with round-, threaded-, or square-hole racks): l Phillips cross-head screwdriver l Flat-blade screwdriver l 8.7 mm (11/32") wrench l M6 screws and M6 cage nuts l M6 cage nut insertion tool l T-25 TORX driver HP Monitored PDU User's Guide P-164000281-Rev 1 10
-
 1
1 -
2
-
3
-
4
-
5
-
6
-
7
-
8
-
9
-
10
-
 11
11 -
 12
12 -
 13
13 -
 14
14 -
 15
15 -
 16
16 -
 17
17 -
 18
18 -
 19
19 -
 20
20 -
 21
21 -
22
-
23
-
24
-
25
-
26
-
27
-
28
-
29
-
30
-
31
-
32
-
33
-
34
-
35
-
36
-
37
-
38
-
39
-
40
-
41
-
42
-
43
-
44
-
45
-
46
-
47
-
48
-
49
-
50
-
51
-
52
-
53
-
54
-
55
-
56
-
57
-
58
-
59
-
60
-
61
-
62
-
63
-
64
-
65
-
66
-
67
-
68
-
69
-
70
-
71
-
72
-
73
-
74
-
75
-
76
-
77
-
78
-
79
-
80
-
81
-
82
-
83
-
84
-
85
-
86
-
87
-
88
-
89
-
90
-
91
-
92
-
93
-
94
-
95
-
96
-
97
-
98
-
99
-
100
-
101
-
102
-
103
-
104
-
105
-
106
-
107
-
108
-
109
-
110
-
111
-
112
-
113
-
114
-
115
-
116
-
117
-
118
-
119
-
120
 |
 |
