HP 11kVA 400 Volt IEC309 16A 3-Phase Input 30xC13/3xC19 HP Monitored Power Dis - Page 65
Trap Notification, Define the Trap Receivers
 |
View all HP 11kVA 400 Volt IEC309 16A 3-Phase Input 30xC13/3xC19 manuals
Add to My Manuals
Save this manual to your list of manuals |
Page 65 highlights
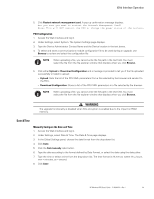
Web Interface Operation Trap Notification Define the Trap Receivers 1. Access the Web interface and log in. 2. Under Logs & Notifications, select Trap Notification. The Trap Notification page displays. 3. Click a linked Trap Receiver in the Name column to select the trap receiver to define. 4. Type the name to identify the trap receiver. This value is not used to send traps. 5. Choose one of the following protocols: l Disabled: the trap receiver is disabled. (No trap is sent to this user.) l SNMPv1: traps are sent over SNMPv1 protocol. (It must be compliant with the SNMP version defined in "Enable/Disable the SNMP Agent" on page 68.) l SNMPv3: traps are sent over SNMPv3 protocol. (It must be compliant with the SNMP version defined in"Enable/Disable the SNMP Agent" on page 68.) 6. Type the trap receiver IPv4 / IPv6 address or its host name. 7. Type the trap community. 8. Select one of the following trap sources ("On event"): l Disable: the trap receiver is disabled. l All Alarms: the trap receiver is enabled. 9. Click Save. If desired, test the configuration (see "Test Trap"). 10. Click Test. (See the"Test Trap"section that follows for more information). Test Trap NOTE To receive the test trap #53, the trap receiver must be configured with a protocol compliant with the one defined as the trap source (see "Enable/Disable the SNMP Agent" on page 68). This action consists of sending a test trap (#53) to all configured and enabled trap receivers. To achieve this action, the following requirements must be met: l The communications module is running in Normal Operation mode. l The communications module is connected to the Local Area Network (LAN). l The communications module owns a valid IP address. l The SNMP must be enabled: SNMPv1, SNMPv3, or SNMPv1&v3. The target trap receiver configuration requires a valid IP address and the trap receiver protocol must match the configured SNMP version. NOTE See "Enable/Disable the SNMP Agent" on page 68. HP Monitored PDU User's Guide P-164000281-Rev 1 59
-
 1
1 -
2
-
3
-
4
-
5
-
6
-
7
-
8
-
9
-
10
-
11
-
12
-
13
-
14
-
15
-
16
-
17
-
18
-
19
-
20
-
21
-
22
-
23
-
24
-
25
-
26
-
27
-
28
-
29
-
30
-
31
-
32
-
33
-
34
-
35
-
36
-
37
-
38
-
39
-
40
-
41
-
42
-
43
-
44
-
45
-
46
-
47
-
48
-
49
-
50
-
51
-
52
-
53
-
54
-
55
-
56
-
57
-
58
-
59
-
 60
60 -
 61
61 -
 62
62 -
 63
63 -
 64
64 -
 65
65 -
 66
66 -
 67
67 -
 68
68 -
 69
69 -
 70
70 -
71
-
72
-
73
-
74
-
75
-
76
-
77
-
78
-
79
-
80
-
81
-
82
-
83
-
84
-
85
-
86
-
87
-
88
-
89
-
90
-
91
-
92
-
93
-
94
-
95
-
96
-
97
-
98
-
99
-
100
-
101
-
102
-
103
-
104
-
105
-
106
-
107
-
108
-
109
-
110
-
111
-
112
-
113
-
114
-
115
-
116
-
117
-
118
-
119
-
120
 |
 |
