HP Brocade 8/12c Fabric OS Encryption Administrator's Guide - Page 139
Steps for connecting to an SKM or ESKM appliance, Configuring a Brocade group
 |
View all HP Brocade 8/12c manuals
Add to My Manuals
Save this manual to your list of manuals |
Page 139 highlights
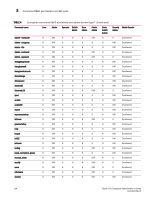
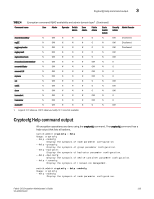
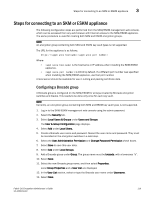
Steps for connecting to an SKM or ESKM appliance 3 Steps for connecting to an SKM or ESKM appliance The following configuration steps are performed from the SKM/ESKM management web console, which can be accessed from any web browser with Internet access to the SKM/ESKM appliance. The same procedure is used for creating both SKM and ESKM encryption groups. NOTE An encryption group containing both SKM and ESKM key vault types is not supported. The URL for the appliance is as follows: https://: Where: - is the hostname or IP address when installing the SKM/ESKM appliance. - is 9443 by default. If a different port number was specified when installing the SKM/ESKM appliance, use that port number. A local server should be available for use in cutting and pasting certificate data. Configuring a Brocade group A Brocade group is configured on the SKM/ESKM for all keys created by Brocade encryption switches and blades. This needs to be done only once for each key vault. NOTE Currently, an encryption group containing both SKM and ESKM key vault types is not supported. 1. Log in to the SKM/ESKM management web console using the admin password. 2. Select the Security tab. 3. Select Local Users & Groups under Users and Groups. The User & Group Configuration page displays. 4. Select Add under Local Users. 5. Create a Brocade user name and password. Record the user name and password. They must be recorded on the encryption switches in a later step. 6. Select the User Administration Permission and Change Password Permission check boxes. 7. Select Save to save this user data. 8. Select Add under Local Groups. 9. Add a Brocade group under Group. The group name must be brocade, with a lowercase "b". 10. Select Save. 11. Select the new Brocade group name, and then select Properties. Local Group Properties and a User List are displayed. 12. In the User List section, select or type the Brocade user name under Username. 13. Select Save. Fabric OS Encryption Administrator's Guide 119 53-1002159-03
-
 1
1 -
2
-
3
-
4
-
5
-
6
-
7
-
8
-
9
-
10
-
11
-
12
-
13
-
14
-
15
-
16
-
17
-
18
-
19
-
20
-
21
-
22
-
23
-
24
-
25
-
26
-
27
-
28
-
29
-
30
-
31
-
32
-
33
-
34
-
35
-
36
-
37
-
38
-
39
-
40
-
41
-
42
-
43
-
44
-
45
-
46
-
47
-
48
-
49
-
50
-
51
-
52
-
53
-
54
-
55
-
56
-
57
-
58
-
59
-
60
-
61
-
62
-
63
-
64
-
65
-
66
-
67
-
68
-
69
-
70
-
71
-
72
-
73
-
74
-
75
-
76
-
77
-
78
-
79
-
80
-
81
-
82
-
83
-
84
-
85
-
86
-
87
-
88
-
89
-
90
-
91
-
92
-
93
-
94
-
95
-
96
-
97
-
98
-
99
-
100
-
101
-
102
-
103
-
104
-
105
-
106
-
107
-
108
-
109
-
110
-
111
-
112
-
113
-
114
-
115
-
116
-
117
-
118
-
119
-
120
-
121
-
122
-
123
-
124
-
125
-
126
-
127
-
128
-
129
-
130
-
131
-
132
-
133
-
 134
134 -
 135
135 -
 136
136 -
 137
137 -
 138
138 -
 139
139 -
 140
140 -
 141
141 -
 142
142 -
 143
143 -
 144
144 -
145
-
146
-
147
-
148
-
149
-
150
-
151
-
152
-
153
-
154
-
155
-
156
-
157
-
158
-
159
-
160
-
161
-
162
-
163
-
164
-
165
-
166
-
167
-
168
-
169
-
170
-
171
-
172
-
173
-
174
-
175
-
176
-
177
-
178
-
179
-
180
-
181
-
182
-
183
-
184
-
185
-
186
-
187
-
188
-
189
-
190
-
191
-
192
-
193
-
194
-
195
-
196
-
197
-
198
-
199
-
200
-
201
-
202
-
203
-
204
-
205
-
206
-
207
-
208
-
209
-
210
-
211
-
212
-
213
-
214
-
215
-
216
-
217
-
218
-
219
-
220
-
221
-
222
-
223
-
224
-
225
-
226
-
227
-
228
-
229
-
230
-
231
-
232
-
233
-
234
-
235
-
236
-
237
-
238
-
239
-
240
-
241
-
242
-
243
-
244
-
245
-
246
-
247
-
248
-
249
-
250
-
251
-
252
-
253
-
254
-
255
-
256
-
257
-
258
-
259
-
260
-
261
-
262
-
263
-
264
-
265
-
266
-
267
-
268
-
269
-
270
-
271
-
272
-
273
-
274
-
275
-
276
-
277
-
278
-
279
-
280
-
281
-
282
 |
 |
