HP Brocade 8/12c Fabric OS Encryption Administrator's Guide - Page 147
Signing the Brocade encryption node KAC certificates
 |
View all HP Brocade 8/12c manuals
Add to My Manuals
Save this manual to your list of manuals |
Page 147 highlights
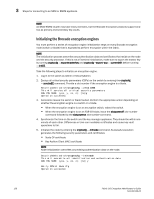
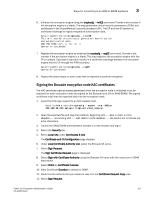
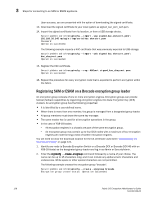
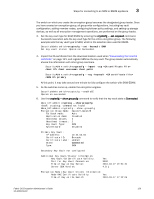
Steps for connecting to an SKM or ESKM appliance 3 6. Initialize the encryption engine using the cryptocfg --initEE command. Provide a slot number if the encryption engine is a blade. This step generates critical security parameters (CSPs) and certificates in the CryptoModule's security processor (SP). The CP and the SP perform a certificate exchange to register respective authorization data. SecurityAdmin:switch>cryptocfg --initEE This will overwrite previously generated identification and authentication data ARE YOU SURE (yes, y, no, n): y Operation succeeded. 7. Register the encryption engine by entering the cryptocfg --regEE command. Provide a slot number if the encryption engine is a blade. This step registers the encryption engine with the CP or chassis. Successful execution results in a certificate exchange between the encryption engine and the CP through the FIPS boundary. SecurityAdmin:switch>cryptocfg --regEE Operation succeeded. 8. Repeat the above steps on every node that is expected to perform encryption. Signing the Brocade encryption node KAC certificates The KAC certificate signing request generated when the encryption node is initialized must be exported for each encryption node and signed by the Brocade local CA on SKM/ESKM. The signed certificate must then be imported back into the encryption node. 1. Export the KAC sign request to an SCP-capable host. SecurityAdmin:switch>cryptocfg --export -scp -KACcsr 192.168.38.245 mylogin /tmp/certs/kac_skm.csr 2. Open the exported file and copy the contents, beginning with ---BEGIN CERTIFICATE REQUEST--- and ending with ---END CERTIFICATE REQUEST---. Be careful not to include any extra characters. 3. Launch the SKM/ESKM administration console in a web browser and log in. 4. Select the Security tab. 5. Select Local CAs under Certificates & CAs. The Certificate and CA Configuration page displays. 6. Under Local Certificate Authority List, select the Brocade CA name. 7. Select Sign Request. The Sign Certificate Request page is displayed. 8. Select Sign with Certificate Authority using the Brocade CA name with the maximum of 3649 days option. 9. Select Client as Certificate Purpose. 10. Allow Certificate Duration to default to 3649. 11. Paste the file contents that you copied in step 3 in the Certificate Request Copy area. 12. Select Sign Request. Fabric OS Encryption Administrator's Guide 127 53-1002159-03
-
 1
1 -
2
-
3
-
4
-
5
-
6
-
7
-
8
-
9
-
10
-
11
-
12
-
13
-
14
-
15
-
16
-
17
-
18
-
19
-
20
-
21
-
22
-
23
-
24
-
25
-
26
-
27
-
28
-
29
-
30
-
31
-
32
-
33
-
34
-
35
-
36
-
37
-
38
-
39
-
40
-
41
-
42
-
43
-
44
-
45
-
46
-
47
-
48
-
49
-
50
-
51
-
52
-
53
-
54
-
55
-
56
-
57
-
58
-
59
-
60
-
61
-
62
-
63
-
64
-
65
-
66
-
67
-
68
-
69
-
70
-
71
-
72
-
73
-
74
-
75
-
76
-
77
-
78
-
79
-
80
-
81
-
82
-
83
-
84
-
85
-
86
-
87
-
88
-
89
-
90
-
91
-
92
-
93
-
94
-
95
-
96
-
97
-
98
-
99
-
100
-
101
-
102
-
103
-
104
-
105
-
106
-
107
-
108
-
109
-
110
-
111
-
112
-
113
-
114
-
115
-
116
-
117
-
118
-
119
-
120
-
121
-
122
-
123
-
124
-
125
-
126
-
127
-
128
-
129
-
130
-
131
-
132
-
133
-
134
-
135
-
136
-
137
-
138
-
139
-
140
-
141
-
 142
142 -
 143
143 -
 144
144 -
 145
145 -
 146
146 -
 147
147 -
 148
148 -
 149
149 -
 150
150 -
 151
151 -
 152
152 -
153
-
154
-
155
-
156
-
157
-
158
-
159
-
160
-
161
-
162
-
163
-
164
-
165
-
166
-
167
-
168
-
169
-
170
-
171
-
172
-
173
-
174
-
175
-
176
-
177
-
178
-
179
-
180
-
181
-
182
-
183
-
184
-
185
-
186
-
187
-
188
-
189
-
190
-
191
-
192
-
193
-
194
-
195
-
196
-
197
-
198
-
199
-
200
-
201
-
202
-
203
-
204
-
205
-
206
-
207
-
208
-
209
-
210
-
211
-
212
-
213
-
214
-
215
-
216
-
217
-
218
-
219
-
220
-
221
-
222
-
223
-
224
-
225
-
226
-
227
-
228
-
229
-
230
-
231
-
232
-
233
-
234
-
235
-
236
-
237
-
238
-
239
-
240
-
241
-
242
-
243
-
244
-
245
-
246
-
247
-
248
-
249
-
250
-
251
-
252
-
253
-
254
-
255
-
256
-
257
-
258
-
259
-
260
-
261
-
262
-
263
-
264
-
265
-
266
-
267
-
268
-
269
-
270
-
271
-
272
-
273
-
274
-
275
-
276
-
277
-
278
-
279
-
280
-
281
-
282
 |
 |
