HP Brocade 8/12c Fabric OS Encryption Administrator's Guide - Page 141
Downloading the local CA certificate, Local Certificate Authority List
 |
View all HP Brocade 8/12c manuals
Add to My Manuals
Save this manual to your list of manuals |
Page 141 highlights
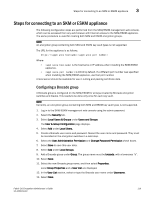
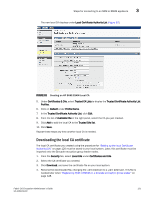
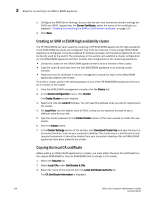
Steps for connecting to an SKM or ESKM appliance 3 The new local CA displays under Local Certificate Authority List (Figure 92). FIGURE 92 Creating an HP SKM/ESKM Local CA 5. Under Certificates & CAs, select Trusted CA Lists to display the Trusted Certificate Authority List Profiles. 6. Click on Default under Profile Name. 7. In the Trusted Certificate Authority List, click Edit. 8. From the list of Available CAs in the right panel, select the CA you just created. 9. Click Add to add the local CA to the Trusted CAs list. 10. Click Save. Repeat these steps any time another local CA is needed. Downloading the local CA certificate The local CA certificate you created using the procedure for "Setting up the local Certificate Authority (CA)" on page 120 must be saved to your local system. Later, this certificate must be imported onto the Brocade encryption group leader nodes. 1. From the Security tab, select Local CAs under Certificates and CAs. 2. Select the CA certificate you created. 3. Click Download, and save the certificate file on your local system. 4. Rename the downloaded file, changing the .cert extension to a .pem extension. This file is needed later when "Registering SKM or ESKM on a Brocade encryption group leader" on page 128. Fabric OS Encryption Administrator's Guide 121 53-1002159-03
-
 1
1 -
2
-
3
-
4
-
5
-
6
-
7
-
8
-
9
-
10
-
11
-
12
-
13
-
14
-
15
-
16
-
17
-
18
-
19
-
20
-
21
-
22
-
23
-
24
-
25
-
26
-
27
-
28
-
29
-
30
-
31
-
32
-
33
-
34
-
35
-
36
-
37
-
38
-
39
-
40
-
41
-
42
-
43
-
44
-
45
-
46
-
47
-
48
-
49
-
50
-
51
-
52
-
53
-
54
-
55
-
56
-
57
-
58
-
59
-
60
-
61
-
62
-
63
-
64
-
65
-
66
-
67
-
68
-
69
-
70
-
71
-
72
-
73
-
74
-
75
-
76
-
77
-
78
-
79
-
80
-
81
-
82
-
83
-
84
-
85
-
86
-
87
-
88
-
89
-
90
-
91
-
92
-
93
-
94
-
95
-
96
-
97
-
98
-
99
-
100
-
101
-
102
-
103
-
104
-
105
-
106
-
107
-
108
-
109
-
110
-
111
-
112
-
113
-
114
-
115
-
116
-
117
-
118
-
119
-
120
-
121
-
122
-
123
-
124
-
125
-
126
-
127
-
128
-
129
-
130
-
131
-
132
-
133
-
134
-
135
-
 136
136 -
 137
137 -
 138
138 -
 139
139 -
 140
140 -
 141
141 -
 142
142 -
 143
143 -
 144
144 -
 145
145 -
 146
146 -
147
-
148
-
149
-
150
-
151
-
152
-
153
-
154
-
155
-
156
-
157
-
158
-
159
-
160
-
161
-
162
-
163
-
164
-
165
-
166
-
167
-
168
-
169
-
170
-
171
-
172
-
173
-
174
-
175
-
176
-
177
-
178
-
179
-
180
-
181
-
182
-
183
-
184
-
185
-
186
-
187
-
188
-
189
-
190
-
191
-
192
-
193
-
194
-
195
-
196
-
197
-
198
-
199
-
200
-
201
-
202
-
203
-
204
-
205
-
206
-
207
-
208
-
209
-
210
-
211
-
212
-
213
-
214
-
215
-
216
-
217
-
218
-
219
-
220
-
221
-
222
-
223
-
224
-
225
-
226
-
227
-
228
-
229
-
230
-
231
-
232
-
233
-
234
-
235
-
236
-
237
-
238
-
239
-
240
-
241
-
242
-
243
-
244
-
245
-
246
-
247
-
248
-
249
-
250
-
251
-
252
-
253
-
254
-
255
-
256
-
257
-
258
-
259
-
260
-
261
-
262
-
263
-
264
-
265
-
266
-
267
-
268
-
269
-
270
-
271
-
272
-
273
-
274
-
275
-
276
-
277
-
278
-
279
-
280
-
281
-
282
 |
 |
