HP CP4005n HP Color LaserJet CP4005 Printer - Software Technical Reference (ex - Page 174
Job Storage tab features
 |
UPC - 882780717046
View all HP CP4005n manuals
Add to My Manuals
Save this manual to your list of manuals |
Page 174 highlights
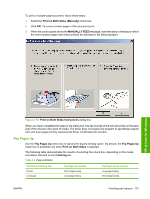
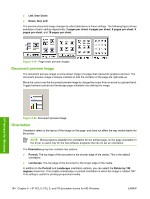
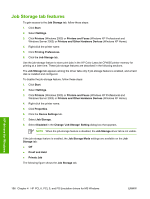
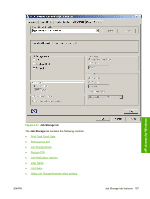
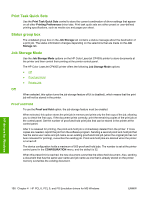
Job Storage tab features To gain access to the Job Storage tab, follow these steps: 1. Click Start. 2. Select Settings. 3. Click Printers (Windows 2000) or Printers and Faxes (Windows XP Professional and Windows Server 2003) or Printers and Other Hardware Devices (Windows XP Home). 4. Right-click the printer name. 5. Click Printing Preferences. 6. Click the Job Storage tab. Use the job-storage feature to store print jobs in the HP Color LaserJet CP4005 printer memory for printing at a later time. These job-storage features are described in the following sections. The Job Storage tab appears among the driver tabs only if job-storage feature is enabled, and a hard disk is installed and configured. To disable the job-storage feature, follow these steps: 1. Click Start. 2. Select Settings. 3. Click Printers (Windows 2000) or Printers and Faxes (Windows XP Professional and Windows Server 2003) or Printers and Other Hardware Devices (Windows XP Home). 4. Right-click the printer name. 5. Click Properties. 6. Click the Device Settings tab. 7. Select Job Storage. 8. Select Disabled in the Change 'Job Storage' Setting dialog box that appears. NOTE When the job-storage feature is disabled, the Job Storage driver tab is not visible. If the job-storage feature is enabled, the Job Storage Mode settings are available on the Job Storage tab: ● Off ● Proof and Hold ● Private Job The following figure shows the Job Storage tab. HP drivers for Windows 156 Chapter 4 HP PCL 6, PCL 5, and PS Emulation drivers for MS Windows ENWW
-
 1
1 -
2
-
3
-
4
-
5
-
6
-
7
-
8
-
9
-
10
-
11
-
12
-
13
-
14
-
15
-
16
-
17
-
18
-
19
-
20
-
21
-
22
-
23
-
24
-
25
-
26
-
27
-
28
-
29
-
30
-
31
-
32
-
33
-
34
-
35
-
36
-
37
-
38
-
39
-
40
-
41
-
42
-
43
-
44
-
45
-
46
-
47
-
48
-
49
-
50
-
51
-
52
-
53
-
54
-
55
-
56
-
57
-
58
-
59
-
60
-
61
-
62
-
63
-
64
-
65
-
66
-
67
-
68
-
69
-
70
-
71
-
72
-
73
-
74
-
75
-
76
-
77
-
78
-
79
-
80
-
81
-
82
-
83
-
84
-
85
-
86
-
87
-
88
-
89
-
90
-
91
-
92
-
93
-
94
-
95
-
96
-
97
-
98
-
99
-
100
-
101
-
102
-
103
-
104
-
105
-
106
-
107
-
108
-
109
-
110
-
111
-
112
-
113
-
114
-
115
-
116
-
117
-
118
-
119
-
120
-
121
-
122
-
123
-
124
-
125
-
126
-
127
-
128
-
129
-
130
-
131
-
132
-
133
-
134
-
135
-
136
-
137
-
138
-
139
-
140
-
141
-
142
-
143
-
144
-
145
-
146
-
147
-
148
-
149
-
150
-
151
-
152
-
153
-
154
-
155
-
156
-
157
-
158
-
159
-
160
-
161
-
162
-
163
-
164
-
165
-
166
-
167
-
168
-
 169
169 -
 170
170 -
 171
171 -
 172
172 -
 173
173 -
 174
174 -
 175
175 -
 176
176 -
 177
177 -
 178
178 -
 179
179 -
180
-
181
-
182
-
183
-
184
-
185
-
186
-
187
-
188
-
189
-
190
-
191
-
192
-
193
-
194
-
195
-
196
-
197
-
198
-
199
-
200
-
201
-
202
-
203
-
204
-
205
-
206
-
207
-
208
-
209
-
210
-
211
-
212
-
213
-
214
-
215
-
216
-
217
-
218
-
219
-
220
-
221
-
222
-
223
-
224
-
225
-
226
-
227
-
228
-
229
-
230
-
231
-
232
-
233
-
234
-
235
-
236
-
237
-
238
-
239
-
240
-
241
-
242
-
243
-
244
-
245
-
246
-
247
-
248
-
249
-
250
-
251
-
252
-
253
-
254
-
255
-
256
-
257
-
258
-
259
-
260
-
261
-
262
-
263
-
264
-
265
-
266
-
267
-
268
-
269
-
270
-
271
-
272
-
273
-
274
-
275
-
276
-
277
-
278
-
279
-
280
-
281
-
282
-
283
-
284
-
285
-
286
-
287
-
288
-
289
-
290
-
291
-
292
-
293
-
294
-
295
-
296
-
297
-
298
-
299
-
300
-
301
-
302
-
303
-
304
-
305
-
306
 |
 |
