HP CP4005n HP Color LaserJet CP4005 Printer - Software Technical Reference (ex - Page 216
Printer setup, Set up a printer with Mac OS X V10.4 or later), Installing, Finish Up, Continue - color laserjet troubleshooting
 |
UPC - 882780717046
View all HP CP4005n manuals
Add to My Manuals
Save this manual to your list of manuals |
Page 216 highlights
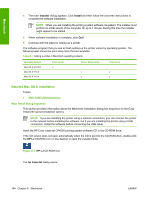
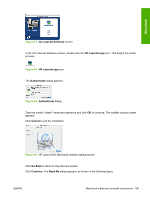
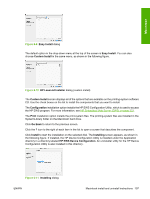
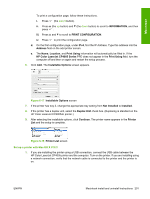
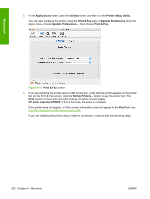
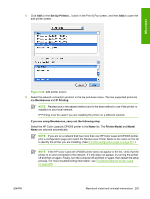
Macintosh The Installing dialog shows installation progress. No action is required unless you want to stop the installation. Click Stop to interrupt the install file copy process. The Finish Up dialog appears, stating that the installation was successful, as shown in the following figure. Figure 6-12 Finish Up dialog Click Quit to exit the installer. Click Continue to return to the HP LaserJet Installer. Printer setup After installing the printing-system software in Macintosh operating systems, the printer must be set up. Topics: ● Set up a printer with Mac OS X V10.4 or later) ● Set up a printer with Mac OS X V10.3 ● Set up a printer with Mac OS X V10.2.8 ● Troubleshooting the printer setup Set up a printer with Mac OS X V10.4 or later) Carry out these steps after the software installation is complete. 1. If you are installing the printer using a USB connection, connect the USB cable between the HP Color LaserJet CP4005 printer and the computer. Turn on the printer. If you are installing using a network connection, verify that the network cable is connected to the printer and the printer is on. 198 Chapter 6 Macintosh ENWW
-
 1
1 -
2
-
3
-
4
-
5
-
6
-
7
-
8
-
9
-
10
-
11
-
12
-
13
-
14
-
15
-
16
-
17
-
18
-
19
-
20
-
21
-
22
-
23
-
24
-
25
-
26
-
27
-
28
-
29
-
30
-
31
-
32
-
33
-
34
-
35
-
36
-
37
-
38
-
39
-
40
-
41
-
42
-
43
-
44
-
45
-
46
-
47
-
48
-
49
-
50
-
51
-
52
-
53
-
54
-
55
-
56
-
57
-
58
-
59
-
60
-
61
-
62
-
63
-
64
-
65
-
66
-
67
-
68
-
69
-
70
-
71
-
72
-
73
-
74
-
75
-
76
-
77
-
78
-
79
-
80
-
81
-
82
-
83
-
84
-
85
-
86
-
87
-
88
-
89
-
90
-
91
-
92
-
93
-
94
-
95
-
96
-
97
-
98
-
99
-
100
-
101
-
102
-
103
-
104
-
105
-
106
-
107
-
108
-
109
-
110
-
111
-
112
-
113
-
114
-
115
-
116
-
117
-
118
-
119
-
120
-
121
-
122
-
123
-
124
-
125
-
126
-
127
-
128
-
129
-
130
-
131
-
132
-
133
-
134
-
135
-
136
-
137
-
138
-
139
-
140
-
141
-
142
-
143
-
144
-
145
-
146
-
147
-
148
-
149
-
150
-
151
-
152
-
153
-
154
-
155
-
156
-
157
-
158
-
159
-
160
-
161
-
162
-
163
-
164
-
165
-
166
-
167
-
168
-
169
-
170
-
171
-
172
-
173
-
174
-
175
-
176
-
177
-
178
-
179
-
180
-
181
-
182
-
183
-
184
-
185
-
186
-
187
-
188
-
189
-
190
-
191
-
192
-
193
-
194
-
195
-
196
-
197
-
198
-
199
-
200
-
201
-
202
-
203
-
204
-
205
-
206
-
207
-
208
-
209
-
210
-
 211
211 -
 212
212 -
 213
213 -
 214
214 -
 215
215 -
 216
216 -
 217
217 -
 218
218 -
 219
219 -
 220
220 -
 221
221 -
222
-
223
-
224
-
225
-
226
-
227
-
228
-
229
-
230
-
231
-
232
-
233
-
234
-
235
-
236
-
237
-
238
-
239
-
240
-
241
-
242
-
243
-
244
-
245
-
246
-
247
-
248
-
249
-
250
-
251
-
252
-
253
-
254
-
255
-
256
-
257
-
258
-
259
-
260
-
261
-
262
-
263
-
264
-
265
-
266
-
267
-
268
-
269
-
270
-
271
-
272
-
273
-
274
-
275
-
276
-
277
-
278
-
279
-
280
-
281
-
282
-
283
-
284
-
285
-
286
-
287
-
288
-
289
-
290
-
291
-
292
-
293
-
294
-
295
-
296
-
297
-
298
-
299
-
300
-
301
-
302
-
303
-
304
-
305
-
306
 |
 |
