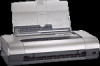
HP Deskjet 450 HP Deskjet 450 - User Guide - Page 45
Close the front access cover., sure it is seated flat on the cartridge.
 |
UPC - 844844844303
View all HP Deskjet 450 manuals
Add to My Manuals
Save this manual to your list of manuals |
Page 45 highlights
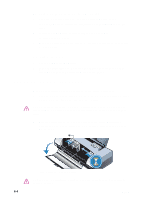
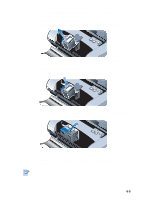
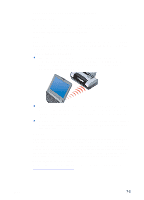
3 Lift the print cartridge latch open and gently remove the print cartridge from its socket at the angle shown below. Check the number on the latch against the number on the new print cartridge to make sure you are removing the correct print cartridge. 57 56 4 Insert the new print cartridge into its socket at the same angle at which you removed the old print cartridge. Check the number on the latch against the number on the print cartridge to make sure you are inserting the correct print cartridge. 57 56 5 Close the print cartridge latch. If the cartridge is inserted correctly, closing the latch gently pushes the cartridge into its socket. Press the latch to make sure it is seated flat on the cartridge. 57 56 58 ENWW 6 Close the front access cover. 7 Wait for the carriage to complete the print cartridge initialization routine and return to the home position at the right side of the printer before using the printer. Do not open the front access cover until the print cartridge initialization is complete. After the print cartridge is replaced, you need to align the print cartridges. See Aligning the print cartridges. 6-5
-
 1
1 -
2
-
3
-
4
-
5
-
6
-
7
-
8
-
9
-
10
-
11
-
12
-
13
-
14
-
15
-
16
-
17
-
18
-
19
-
20
-
21
-
22
-
23
-
24
-
25
-
26
-
27
-
28
-
29
-
30
-
31
-
32
-
33
-
34
-
35
-
36
-
37
-
38
-
39
-
 40
40 -
 41
41 -
 42
42 -
 43
43 -
 44
44 -
 45
45 -
 46
46 -
 47
47 -
 48
48 -
 49
49 -
 50
50 -
51
-
52
-
53
-
54
-
55
-
56
-
57
-
58
-
59
-
60
-
61
-
62
-
63
-
64
-
65
-
66
-
67
-
68
-
69
-
70
-
71
-
72
-
73
-
74
-
75
-
76
-
77
-
78
-
79
-
80
-
81
-
82
-
83
-
84
-
85
-
86
-
87
-
88
-
89
-
90
-
91
 |
 |
