HP Deskjet 450 HP Deskjet 450 - User Guide - Page 50
Step 7: Check the LEDs, Step 6: Check the print media
 |
UPC - 844844844303
View all HP Deskjet 450 manuals
Add to My Manuals
Save this manual to your list of manuals |
Page 50 highlights
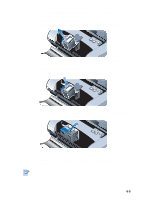
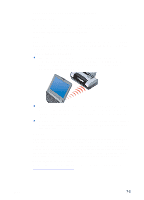
CompactFlash™ If the Resume LED does not blink after inserting the CompactFlash™ (CF) card, this means there are no DPOF files created on the CF card. To print from the CF card, you need to specify your print settings in a DPOF file so that the printer can print out images specified in the DPOF file. See Printing digital camera photographs. Step 4: Check the printer selection Make sure your printer is selected as the current or default printer. If you are running Windows, make sure Pause Printing is not selected. For Macintosh, make sure Stop Print Queue is not selected. Step 5: Check the print settings Make sure the print settings (such as paper type, paper size, margins, and color) in the printer driver are correct. For Windows, print settings are typically available by selecting File > Print > Properties in an application. For Macintosh, they are typically available by selecting File > Page Setup in an application. Step 6: Check the print media Make sure media is loaded correctly in the input tray or card slot with the print side up and that the media is not jammed in the printer. For information about loading media, see Selecting print media. For information about clearing and preventing jams, refer to Solving media feed problems. Step 7: Check the LEDs If any LED turns on or blinks, see LED Reference for the list of printer LED combinations you may encounter, what they indicate and how to solve the problem. Step 8: Check the print cartridges Make sure the print cartridges are properly installed and that the protective film covering the ink nozzles has been removed. Make sure the print cartridges are not empty. If one print cartridge is empty, you can still print with the other print cartridge. See Single-cartridge printing mode. For information about maintaining print cartridges, see Maintaining the Printer. 7-3 ENWW
-
 1
1 -
2
-
3
-
4
-
5
-
6
-
7
-
8
-
9
-
10
-
11
-
12
-
13
-
14
-
15
-
16
-
17
-
18
-
19
-
20
-
21
-
22
-
23
-
24
-
25
-
26
-
27
-
28
-
29
-
30
-
31
-
32
-
33
-
34
-
35
-
36
-
37
-
38
-
39
-
40
-
41
-
42
-
43
-
44
-
 45
45 -
 46
46 -
 47
47 -
 48
48 -
 49
49 -
 50
50 -
 51
51 -
 52
52 -
 53
53 -
 54
54 -
 55
55 -
56
-
57
-
58
-
59
-
60
-
61
-
62
-
63
-
64
-
65
-
66
-
67
-
68
-
69
-
70
-
71
-
72
-
73
-
74
-
75
-
76
-
77
-
78
-
79
-
80
-
81
-
82
-
83
-
84
-
85
-
86
-
87
-
88
-
89
-
90
-
91
 |
 |