HP FAX-750 Service Manual - Page 45
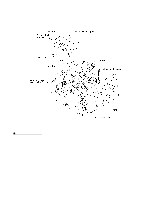
ROM Cover, Battery ASSY* and Ribbon Shaft Stopper, To replace the battery ASSY Ni-MH battery
 |
View all HP FAX-750 manuals
Add to My Manuals
Save this manual to your list of manuals |
Page 45 highlights
1.1 ROM Cover, Battery ASSY* and Ribbon Shaft Stopper (*FAX870MC/FAX-930/FAX-931/MFC970MC) (1) Open the control panel ASSY to the front. (2) Pull up the lock levers and open the recording paper cover ASSY to the rear. (3) As shown below, insert the tip of the spring hook at the center or right half of the locking arm (when viewed from the front), then lift up the hook to release and move the ROM cover to the right. (4) FAX870MC/FAX-930/FAX-931/MFC970MC: To replace the battery ASSY (Ni-MH battery), plug the power cord of the facsimile equipment into a wall socket, disconnect the battery harness from the main PCB, and take out the battery ASSY from the main frame. Set a new battery ASSY and unplug the power cord. Disconnecting the battery harness with the power cord unplugged will lose the settings (e.g., calendar clock, voice messages, and received FAX data) stored in the RAM. If you do not need to replace the battery ASSY, take out the battery ASSY from the main frame and put it on the main PCB with the battery harness being connected. IV - 5
-
 1
1 -
2
-
3
-
4
-
5
-
6
-
7
-
8
-
9
-
10
-
11
-
12
-
13
-
14
-
15
-
16
-
17
-
18
-
19
-
20
-
21
-
22
-
23
-
24
-
25
-
26
-
27
-
28
-
29
-
30
-
31
-
32
-
33
-
34
-
35
-
36
-
37
-
38
-
39
-
 40
40 -
 41
41 -
 42
42 -
 43
43 -
 44
44 -
 45
45 -
 46
46 -
 47
47 -
 48
48 -
 49
49 -
 50
50 -
51
-
52
-
53
-
54
-
55
-
56
-
57
-
58
-
59
-
60
-
61
-
62
-
63
-
64
-
65
-
66
-
67
-
68
-
69
-
70
-
71
-
72
-
73
-
74
-
75
-
76
-
77
-
78
-
79
-
80
-
81
-
82
-
83
-
84
-
85
-
86
-
87
-
88
-
89
-
90
-
91
-
92
-
93
-
94
-
95
-
96
-
97
-
98
-
99
-
100
-
101
-
102
-
103
-
104
-
105
-
106
-
107
-
108
-
109
-
110
-
111
-
112
-
113
-
114
-
115
-
116
-
117
-
118
-
119
-
120
-
121
-
122
-
123
-
124
-
125
-
126
-
127
-
128
-
129
-
130
-
131
-
132
-
133
-
134
-
135
-
136
-
137
-
138
-
139
-
140
-
141
-
142
-
143
-
144
-
145
-
146
-
147
-
148
-
149
-
150
-
151
-
152
-
153
-
154
-
155
-
156
-
157
-
158
-
159
-
160
-
161
-
162
-
163
-
164
-
165
-
166
-
167
-
168
-
169
-
170
-
171
-
172
-
173
-
174
-
175
-
176
-
177
-
178
-
179
-
180
-
181
-
182
-
183
-
184
-
185
-
186
-
187
-
188
-
189
-
190
-
191
-
192
-
193
-
194
-
195
-
196
-
197
-
198
-
199
-
200
-
201
-
202
-
203
-
204
-
205
-
206
-
207
-
208
-
209
-
210
-
211
-
212
-
213
-
214
-
215
-
216
-
217
-
218
 |
 |
