HP FAX-750 Service Manual - Page 67
ASSY is installed, the platen frame ASSY and the recording head ASSY will be locked
 |
View all HP FAX-750 manuals
Add to My Manuals
Save this manual to your list of manuals |
Page 67 highlights
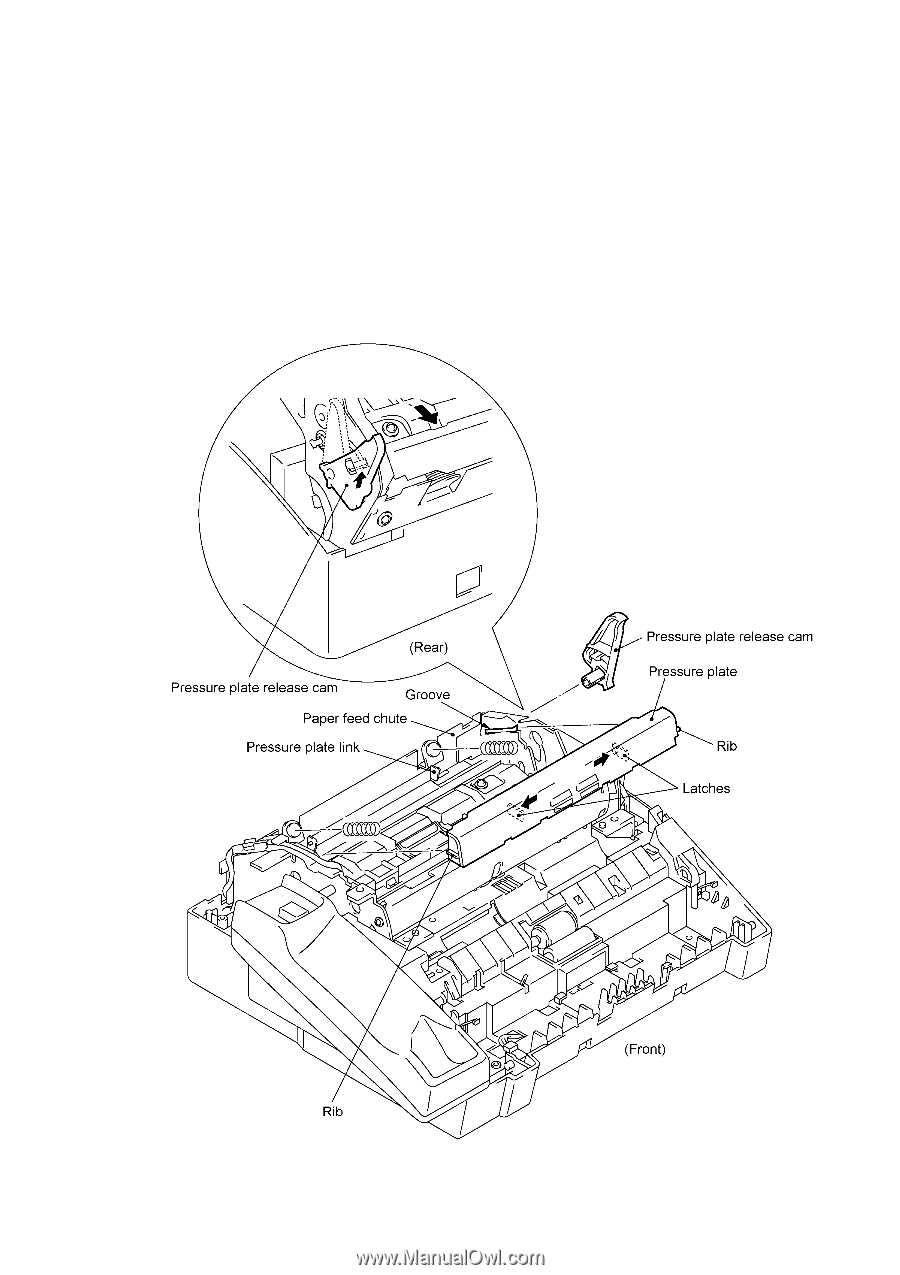
(9) Make sure that the platen is set in place, and then close the platen frame ASSY. NOTE: If you close the platen frame ASSY when no platen is set and the recording head ASSY is installed, the platen frame ASSY and the recording head ASSY will be locked together. (10) Fully turn the pressure plate release cam to the rear and pull it up and outwards to unhook from the platen frame. (11) Pull the latches provided on the pressure plate outwards and lift it up. The two springs also come off. IV - 27
-
 1
1 -
2
-
3
-
4
-
5
-
6
-
7
-
8
-
9
-
10
-
11
-
12
-
13
-
14
-
15
-
16
-
17
-
18
-
19
-
20
-
21
-
22
-
23
-
24
-
25
-
26
-
27
-
28
-
29
-
30
-
31
-
32
-
33
-
34
-
35
-
36
-
37
-
38
-
39
-
40
-
41
-
42
-
43
-
44
-
45
-
46
-
47
-
48
-
49
-
50
-
51
-
52
-
53
-
54
-
55
-
56
-
57
-
58
-
59
-
60
-
61
-
 62
62 -
 63
63 -
 64
64 -
 65
65 -
 66
66 -
 67
67 -
 68
68 -
 69
69 -
 70
70 -
 71
71 -
 72
72 -
73
-
74
-
75
-
76
-
77
-
78
-
79
-
80
-
81
-
82
-
83
-
84
-
85
-
86
-
87
-
88
-
89
-
90
-
91
-
92
-
93
-
94
-
95
-
96
-
97
-
98
-
99
-
100
-
101
-
102
-
103
-
104
-
105
-
106
-
107
-
108
-
109
-
110
-
111
-
112
-
113
-
114
-
115
-
116
-
117
-
118
-
119
-
120
-
121
-
122
-
123
-
124
-
125
-
126
-
127
-
128
-
129
-
130
-
131
-
132
-
133
-
134
-
135
-
136
-
137
-
138
-
139
-
140
-
141
-
142
-
143
-
144
-
145
-
146
-
147
-
148
-
149
-
150
-
151
-
152
-
153
-
154
-
155
-
156
-
157
-
158
-
159
-
160
-
161
-
162
-
163
-
164
-
165
-
166
-
167
-
168
-
169
-
170
-
171
-
172
-
173
-
174
-
175
-
176
-
177
-
178
-
179
-
180
-
181
-
182
-
183
-
184
-
185
-
186
-
187
-
188
-
189
-
190
-
191
-
192
-
193
-
194
-
195
-
196
-
197
-
198
-
199
-
200
-
201
-
202
-
203
-
204
-
205
-
206
-
207
-
208
-
209
-
210
-
211
-
212
-
213
-
214
-
215
-
216
-
217
-
218
 |
 |
IV
- 27
(9)
Make sure that the platen is set in place, and then close the platen frame ASSY.
NOTE:
If you close the platen frame ASSY when no platen is set and the recording head
ASSY is installed, the platen frame ASSY and the recording head ASSY will be locked
together.
(10) Fully turn the pressure plate release cam to the rear and pull it up and outwards to unhook from
the platen frame.
(11) Pull the latches provided on the pressure plate outwards and lift it up.
The two springs also
come off.