HP FAX-750 Service Manual - Page 62
Recording Paper Cover ASSY and Paper Guides, Reassembling Notes, To reinstall the paper guides*
 |
View all HP FAX-750 manuals
Add to My Manuals
Save this manual to your list of manuals |
Page 62 highlights
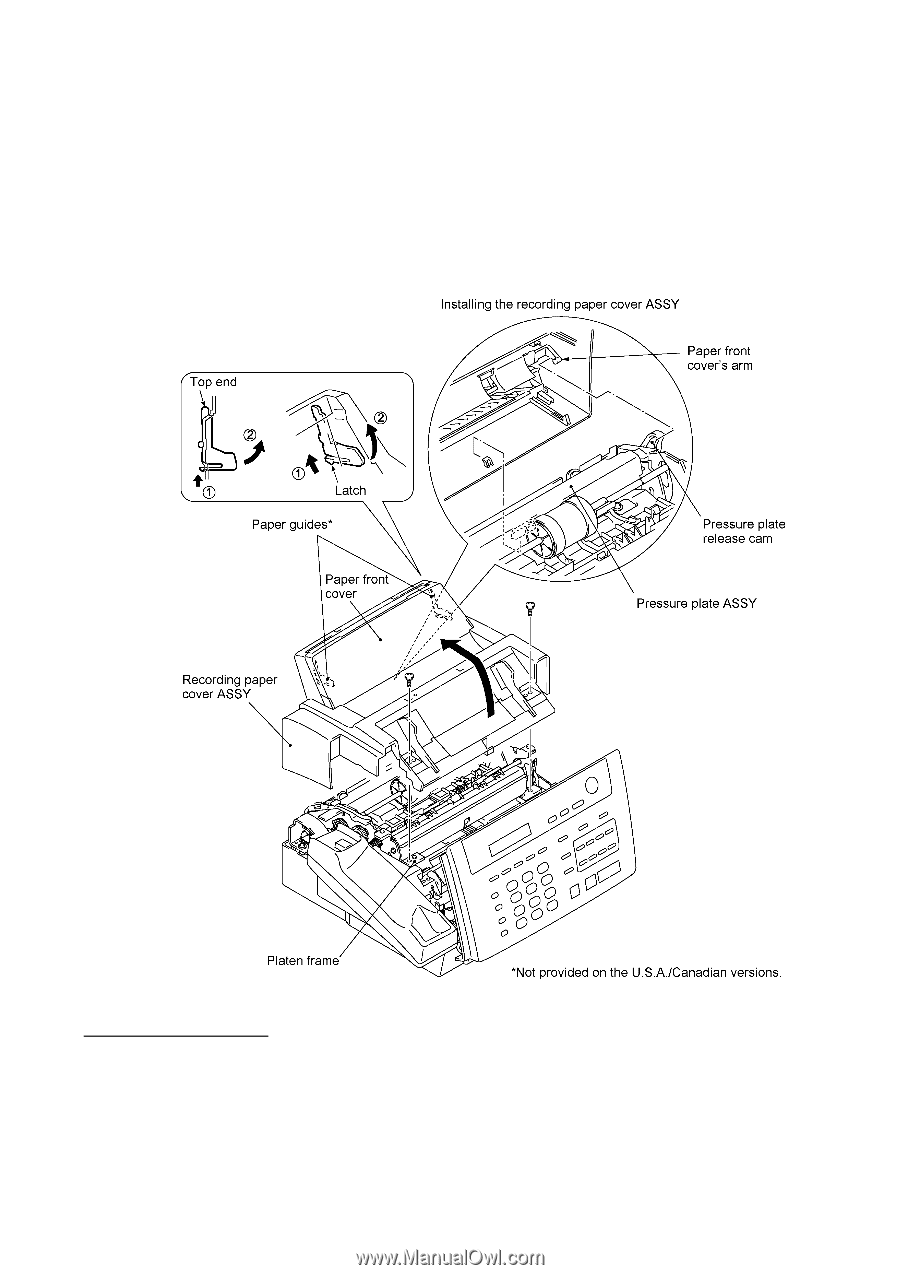
1.6 Recording Paper Cover ASSY and Paper Guides* (*Not provided on the U.S.A. and Canadian versions.) (1) To remove the paper guides*, open the paper front cover towards you, then pull up the latch (in the direction of arrow • in the illustration below) and pull the paper guide in the direction of arrow ,. (2) Remove the two screws. (3) Lift up the front of the recording paper cover ASSY and take it out to the rear. n Reassembling Notes • To reinstall the paper guides*, first insert its top end and then push the guide into place. • When reinstalling the recording paper cover ASSY, slightly slant it to the right and hook the paper front cover's arm onto the pressure plate release cam as shown above while keeping the paper front cover closed, then put the ASSY onto the platen frame. After installation, open and close the paper front cover to check that the paper front cover is interlocked with the pressure plate ASSY. IV - 22
-
 1
1 -
2
-
3
-
4
-
5
-
6
-
7
-
8
-
9
-
10
-
11
-
12
-
13
-
14
-
15
-
16
-
17
-
18
-
19
-
20
-
21
-
22
-
23
-
24
-
25
-
26
-
27
-
28
-
29
-
30
-
31
-
32
-
33
-
34
-
35
-
36
-
37
-
38
-
39
-
40
-
41
-
42
-
43
-
44
-
45
-
46
-
47
-
48
-
49
-
50
-
51
-
52
-
53
-
54
-
55
-
56
-
 57
57 -
 58
58 -
 59
59 -
 60
60 -
 61
61 -
 62
62 -
 63
63 -
 64
64 -
 65
65 -
 66
66 -
 67
67 -
68
-
69
-
70
-
71
-
72
-
73
-
74
-
75
-
76
-
77
-
78
-
79
-
80
-
81
-
82
-
83
-
84
-
85
-
86
-
87
-
88
-
89
-
90
-
91
-
92
-
93
-
94
-
95
-
96
-
97
-
98
-
99
-
100
-
101
-
102
-
103
-
104
-
105
-
106
-
107
-
108
-
109
-
110
-
111
-
112
-
113
-
114
-
115
-
116
-
117
-
118
-
119
-
120
-
121
-
122
-
123
-
124
-
125
-
126
-
127
-
128
-
129
-
130
-
131
-
132
-
133
-
134
-
135
-
136
-
137
-
138
-
139
-
140
-
141
-
142
-
143
-
144
-
145
-
146
-
147
-
148
-
149
-
150
-
151
-
152
-
153
-
154
-
155
-
156
-
157
-
158
-
159
-
160
-
161
-
162
-
163
-
164
-
165
-
166
-
167
-
168
-
169
-
170
-
171
-
172
-
173
-
174
-
175
-
176
-
177
-
178
-
179
-
180
-
181
-
182
-
183
-
184
-
185
-
186
-
187
-
188
-
189
-
190
-
191
-
192
-
193
-
194
-
195
-
196
-
197
-
198
-
199
-
200
-
201
-
202
-
203
-
204
-
205
-
206
-
207
-
208
-
209
-
210
-
211
-
212
-
213
-
214
-
215
-
216
-
217
-
218
 |
 |