HP Indigo WS6000 Indigo High Quality Color Control HQCC Process for PSPs and B - Page 27
Print Settings, Inline Measurement, Quit now and Continue Later, Properties, Magenta1 Separation
 |
View all HP Indigo WS6000 manuals
Add to My Manuals
Save this manual to your list of manuals |
Page 27 highlights
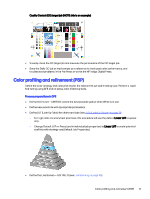
Offline measurement procedure (Profile) Follow the wizard instructions to create a profile: - Leave the following options to their default settings: Chart Size, Layout Type and Patch Set. - Select "2 sets" for repetition of patches. NOTE: Repetition of printed patches - Careful consideration should be given when deciding on how many printed patches to measure. - Select the option Randomize Patches' (recommended - see note below). Click Next to proceed with the wizard. NOTE: Randomize Patches - This setting 'scrambles' the patches instead of printing them in order. When printing multiple sets, the whole series is randomized through the entire print run. This allows for better color averaging in the profile. - Click the Settings link (blue text) to open the Print Settings window, and set the following: ○ Select Mirror Image if color accuracy is required for reading through a clear substrate. Mirror Image is not supported in the Inline Measurement procedure (Inline workflow). ○ It is recommended to select Add White Underprint if print requires white ink with the finished product. Not necessarily substrate-dependent. ○ Select Generate an Extra Magenta Separation for a quicker and more accurate refinement of colors. Refer to Magenta1 Separation on page 40. ○ Choose the Appropriate Layout option - This option allows the charts to be rotated for printing on substrates narrower than 12 inches in width. - Click OK to close the Print Settings window. - Click the Print Overprint Chart button to print charts to the DFE software where the files will be ripped and made ready to be sent to the HP Indigo Press. (This is a good spot to 'Quit now and Continue Later' - see note below). NOTE: Taking breaks - At any time, the user may click on the 'Quit Now and Continue Later' button to close the window. Upon reopening, the wizard will pick up where it left off. - Send charts to the press and print 5 sets. The Press operator should take the last one to verify that the correct LUT is being used at the press. NOTE: Lookup Tables (LUTs) - The Profile is based on a preferred LUT. Verify the correct LUT and Line Screen are set in the Job Properties for each chart file sent to the press (Job Properties on press). Note: Charts are automatically sent to the press using the Linear LUT. If a different LUT is preferred, the desired LUT must be set at the press before printing. Refer to LUTs (Look-Up Tables) on page 39 and Line Screens on page 39. - Click Next to proceed with the wizard. - Measure charts according to the wizard instructions - Refer to Color profiling and refinement on page 22. Color profiling and refinement 23
-
 1
1 -
2
-
3
-
4
-
5
-
6
-
7
-
8
-
9
-
10
-
11
-
12
-
13
-
14
-
15
-
16
-
17
-
18
-
19
-
20
-
21
-
 22
22 -
 23
23 -
 24
24 -
 25
25 -
 26
26 -
 27
27 -
 28
28 -
 29
29 -
 30
30 -
 31
31 -
 32
32 -
33
-
34
-
35
-
36
-
37
-
38
-
39
-
40
-
41
-
42
-
43
-
44
-
45
-
46
-
47
-
48
-
49
-
50
-
51
-
52
-
53
-
54
 |
 |
