HP Indigo WS6000 Indigo High Quality Color Control HQCC Process for PSPs and B - Page 33
Spot Colors, Patch Size, Print Settings, Inline Measurement, Visually
 |
View all HP Indigo WS6000 manuals
Add to My Manuals
Save this manual to your list of manuals |
Page 33 highlights
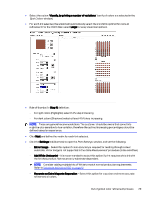
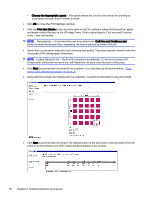
● Select the option "Visually, by printing a number of variations" (verify all colors are selected in the Spot Colors window). ● For each tint selected, the wizard will automatically select the ink Matrix optimal for manual refinement. For the Patch Size select Large for easy visual comparison. ● Rule of thumbs for Step % definition: - For light colors (Highlights) select 1-2% step increasing. - For dark colors (Shadows) select at least 4-5% step increasing. NOTE: These are general recommendations. The customer should be aware that some tints might be also sensitive to hue variation, therefore the optimal increasing percentages should be defined based on experience. ● Click Next and define the matrix for each tint selected. ● Click the Settings link (blue text) to open the Print Settings window, and set the following: - Mirror Image - Select this option if color accuracy is required for reading through a clear substrate. Mirror Image is not supported in the Inline Measurement procedure (Inline workflow). - Add White Underprint - It is recommended to select this option if print requires white ink with the finished product. Not necessarily substrate-dependent. NOTE: Consider adding multiple hits of White to match normal production requirements. Refer to Substrate definition (PSP) on page 18. - Generate an Extra Magenta Separation - Select this option for a quicker and more accurate refinement of colors. Out of gamut color refinement process 29
-
 1
1 -
2
-
3
-
4
-
5
-
6
-
7
-
8
-
9
-
10
-
11
-
12
-
13
-
14
-
15
-
16
-
17
-
18
-
19
-
20
-
21
-
22
-
23
-
24
-
25
-
26
-
27
-
 28
28 -
 29
29 -
 30
30 -
 31
31 -
 32
32 -
 33
33 -
 34
34 -
 35
35 -
 36
36 -
 37
37 -
 38
38 -
39
-
40
-
41
-
42
-
43
-
44
-
45
-
46
-
47
-
48
-
49
-
50
-
51
-
52
-
53
-
54
 |
 |
