HP LaserJet 9000 HP LaserJet 9000 series printer User Guide - Page 200
Installing memory, Appendix C, Printer memory and expansion - formatter board removal
 |
View all HP LaserJet 9000 manuals
Add to My Manuals
Save this manual to your list of manuals |
Page 200 highlights
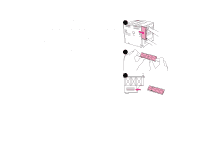
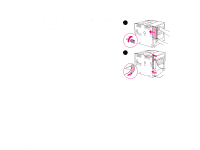
Appendix C Printer memory and expansion 200 Installing memory Use this procedure to install additional memory. Before you begin, print a configuration page by pressing 22 on the numeric keypad to find out how much memory is installed in the printer before adding more memory. The table lists the maximum amount of memory allowed for each DIMM slot. Note To obtain 384 MB of memory, you need to remove the 64 MB that came with the printer and replace it with 128 MB. Slot label on the Configuration page Slot 1 Slot 2 Slot 3 Slot 4 Total Slot label on the Formatter board Description J1 Flash firmware J2 64 MB J3 128 MB J4 128 MB 384 MB Installing memory
-
 1
1 -
2
-
3
-
4
-
5
-
6
-
7
-
8
-
9
-
10
-
11
-
12
-
13
-
14
-
15
-
16
-
17
-
18
-
19
-
20
-
21
-
22
-
23
-
24
-
25
-
26
-
27
-
28
-
29
-
30
-
31
-
32
-
33
-
34
-
35
-
36
-
37
-
38
-
39
-
40
-
41
-
42
-
43
-
44
-
45
-
46
-
47
-
48
-
49
-
50
-
51
-
52
-
53
-
54
-
55
-
56
-
57
-
58
-
59
-
60
-
61
-
62
-
63
-
64
-
65
-
66
-
67
-
68
-
69
-
70
-
71
-
72
-
73
-
74
-
75
-
76
-
77
-
78
-
79
-
80
-
81
-
82
-
83
-
84
-
85
-
86
-
87
-
88
-
89
-
90
-
91
-
92
-
93
-
94
-
95
-
96
-
97
-
98
-
99
-
100
-
101
-
102
-
103
-
104
-
105
-
106
-
107
-
108
-
109
-
110
-
111
-
112
-
113
-
114
-
115
-
116
-
117
-
118
-
119
-
120
-
121
-
122
-
123
-
124
-
125
-
126
-
127
-
128
-
129
-
130
-
131
-
132
-
133
-
134
-
135
-
136
-
137
-
138
-
139
-
140
-
141
-
142
-
143
-
144
-
145
-
146
-
147
-
148
-
149
-
150
-
151
-
152
-
153
-
154
-
155
-
156
-
157
-
158
-
159
-
160
-
161
-
162
-
163
-
164
-
165
-
166
-
167
-
168
-
169
-
170
-
171
-
172
-
173
-
174
-
175
-
176
-
177
-
178
-
179
-
180
-
181
-
182
-
183
-
184
-
185
-
186
-
187
-
188
-
189
-
190
-
191
-
192
-
193
-
194
-
 195
195 -
 196
196 -
 197
197 -
 198
198 -
 199
199 -
 200
200 -
 201
201 -
 202
202 -
 203
203 -
 204
204 -
 205
205 -
206
-
207
-
208
-
209
-
210
-
211
-
212
-
213
-
214
-
215
-
216
-
217
-
218
-
219
-
220
-
221
-
222
-
223
-
224
-
225
-
226
-
227
-
228
-
229
-
230
-
231
-
232
-
233
-
234
-
235
-
236
-
237
-
238
-
239
-
240
-
241
-
242
-
243
-
244
-
245
-
246
-
247
-
248
-
249
-
250
 |
 |

Appendix C
Printer memory and expansion
200
Installing memory
Installing memory
Use this procedure to install additional memory. Before you begin, print a configuration page by pressing
22
on the numeric keypad to find out how much memory is installed in the printer before adding more memory.
The table lists the maximum amount of memory allowed for each DIMM slot.
Note
To obtain 384 MB of memory, you need to remove the 64 MB that came with the printer and replace it
with 128 MB.
Slot label on the
Configuration page
Slot label on the
Formatter board
Description
Slot 1
J1
Flash firmware
Slot 2
J2
64 MB
Slot 3
J3
128 MB
Slot 4
J4
128 MB
Total
384 MB