HP LaserJet 9000 HP LaserJet 9000 series printer User Guide - Page 201
To install memory
 |
View all HP LaserJet 9000 manuals
Add to My Manuals
Save this manual to your list of manuals |
Page 201 highlights
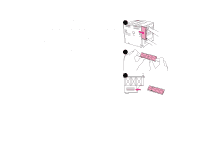
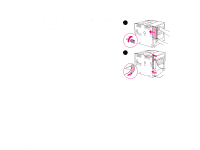
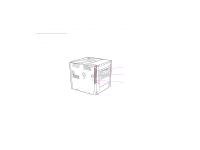
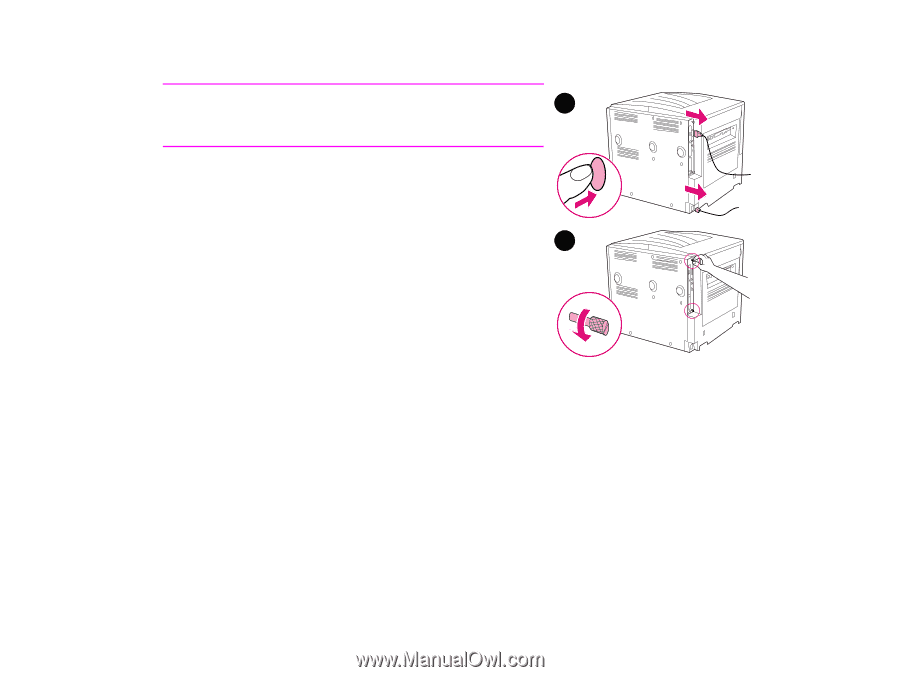
Appendix C Printer memory and expansion 201 CAUTION Static electricity can damage DIMMs. When handling DIMMs, either 2 wear an antistatic wrist strap or frequently touch the surface of the DIMM antistatic package, then touch bare metal on the printer. To install memory 1 If you have not already done so, print a configuration page to find out how much memory is installed in the printer before adding more memory. (Press 22 on the numeric keypad when the 3 printer is idle.) 2 Turn the printer off. Disconnect the power cord and any cables. 3 Loosen the two captive thumb screws on the back of the printer. Installing memory
-
 1
1 -
2
-
3
-
4
-
5
-
6
-
7
-
8
-
9
-
10
-
11
-
12
-
13
-
14
-
15
-
16
-
17
-
18
-
19
-
20
-
21
-
22
-
23
-
24
-
25
-
26
-
27
-
28
-
29
-
30
-
31
-
32
-
33
-
34
-
35
-
36
-
37
-
38
-
39
-
40
-
41
-
42
-
43
-
44
-
45
-
46
-
47
-
48
-
49
-
50
-
51
-
52
-
53
-
54
-
55
-
56
-
57
-
58
-
59
-
60
-
61
-
62
-
63
-
64
-
65
-
66
-
67
-
68
-
69
-
70
-
71
-
72
-
73
-
74
-
75
-
76
-
77
-
78
-
79
-
80
-
81
-
82
-
83
-
84
-
85
-
86
-
87
-
88
-
89
-
90
-
91
-
92
-
93
-
94
-
95
-
96
-
97
-
98
-
99
-
100
-
101
-
102
-
103
-
104
-
105
-
106
-
107
-
108
-
109
-
110
-
111
-
112
-
113
-
114
-
115
-
116
-
117
-
118
-
119
-
120
-
121
-
122
-
123
-
124
-
125
-
126
-
127
-
128
-
129
-
130
-
131
-
132
-
133
-
134
-
135
-
136
-
137
-
138
-
139
-
140
-
141
-
142
-
143
-
144
-
145
-
146
-
147
-
148
-
149
-
150
-
151
-
152
-
153
-
154
-
155
-
156
-
157
-
158
-
159
-
160
-
161
-
162
-
163
-
164
-
165
-
166
-
167
-
168
-
169
-
170
-
171
-
172
-
173
-
174
-
175
-
176
-
177
-
178
-
179
-
180
-
181
-
182
-
183
-
184
-
185
-
186
-
187
-
188
-
189
-
190
-
191
-
192
-
193
-
194
-
195
-
 196
196 -
 197
197 -
 198
198 -
 199
199 -
 200
200 -
 201
201 -
 202
202 -
 203
203 -
 204
204 -
 205
205 -
 206
206 -
207
-
208
-
209
-
210
-
211
-
212
-
213
-
214
-
215
-
216
-
217
-
218
-
219
-
220
-
221
-
222
-
223
-
224
-
225
-
226
-
227
-
228
-
229
-
230
-
231
-
232
-
233
-
234
-
235
-
236
-
237
-
238
-
239
-
240
-
241
-
242
-
243
-
244
-
245
-
246
-
247
-
248
-
249
-
250
 |
 |
Appendix C
Printer memory and expansion
201
Installing memory
CAUTION
Static electricity can damage DIMMs. When handling DIMMs, either
wear an antistatic wrist strap or frequently touch the surface of the
DIMM antistatic package, then touch bare metal on the printer.
To install memory
1
If you have not already done so, print a configuration page to
find out how much memory is installed in the printer before
adding more memory. (Press
22
on the numeric keypad when the
printer is idle.)
2
Turn the printer off. Disconnect the power cord and any cables.
3
Loosen the two captive thumb screws on the back of the printer.
3
2