| Section |
Page |
| Product basics |
15 |
| Quick access to product information |
16 |
| Product comparison |
17 |
| HP LaserJet P4014 models |
17 |
| HP LaserJet P4015 models |
18 |
| HP LaserJet P4515 models |
19 |
| Product features |
20 |
| Product walkaround |
22 |
| Front view |
22 |
| Rear view |
22 |
| Interface ports |
24 |
| Model and serial-number label location |
25 |
| Supported operating systems |
26 |
| Supported product software |
27 |
| Software included with the product |
27 |
| Software for Windows |
27 |
| HP Web Jetadmin |
27 |
| Embedded Web server |
27 |
| HP Easy Printer Care |
28 |
| Software for Macintosh |
28 |
| HP Printer Utility |
28 |
| Open the HP Printer Utility |
28 |
| HP Printer Utility features |
30 |
| Supported printer drivers |
30 |
| Supported printer drivers for Windows |
30 |
| Supported printer drivers for Macintosh |
30 |
| Software for other operating systems |
31 |
| Connectivity |
32 |
| Supported network protocols |
32 |
| Control panel |
33 |
| Control-panel layout |
34 |
| Use the control-panel menus |
36 |
| Show Me How menu |
37 |
| Retrieve Job menu |
38 |
| Information menu |
39 |
| Paper Handling menu |
40 |
| Configure Device menu |
41 |
| Printing submenu |
41 |
| Print Quality submenu |
44 |
| System Setup submenu |
47 |
| Stapler Stacker submenu |
51 |
| MBM-5 (multi-bin mailbox) submenu |
51 |
| I/O submenu |
52 |
| Resets submenu |
58 |
| Diagnostics menu |
59 |
| Service menu |
60 |
| Paper and print media |
61 |
| Supported paper and print media sizes |
62 |
| Supported paper and print media types |
64 |
| Supported paper types for input options |
64 |
| Supported paper types for output options |
65 |
| Tray and bin capacity |
66 |
| Special paper or print media guidelines |
67 |
| Load trays |
68 |
| Paper orientation for loading trays |
68 |
| Load letterhead, preprinted, or prepunched paper |
68 |
| Load envelopes |
69 |
| Load Tray 1 |
70 |
| Load Tray 2 or an optional 500-sheet tray |
71 |
| Load an optional 1,500-sheet tray |
73 |
| Configure trays |
75 |
| Configure a tray when loading paper |
75 |
| Configure a tray to match print job settings |
75 |
| Configure a tray by using the Paper Handling menu |
76 |
| Select the paper by source, type, or size |
76 |
| Source |
76 |
| Type and size |
76 |
| Use paper output options |
77 |
| Print to the top (standard) output bin |
77 |
| Print to the rear output bin |
77 |
| Print to the optional stacker or stapler/stacker |
78 |
| Print to the 5-bin mailbox |
78 |
| Manage and maintain the product |
79 |
| Print the information and show-me-how pages |
80 |
| Use the HP Easy Printer Care software |
82 |
| Open the HP Easy Printer Care software |
82 |
| HP Easy Printer Care software sections |
82 |
| Use the embedded Web server |
85 |
| Open the embedded Web server by using a network connection |
85 |
| Embedded Web server sections |
86 |
| Use HP Web Jetadmin software |
88 |
| Use security features |
89 |
| IP Security |
89 |
| Secure the embedded Web server |
89 |
| Secure stored jobs |
89 |
| Lock the control panel menus |
90 |
| Lock the formatter cage |
91 |
| Manage supplies |
92 |
| Supplies life |
92 |
| Approximate print-cartridge replacement intervals |
92 |
| Manage the print cartridge |
92 |
| Print-cartridge storage |
92 |
| Use genuine HP print cartridges |
92 |
| HP policy on non-HP print cartridges |
92 |
| Print-cartridge authentication |
93 |
| HP fraud hotline and Web site |
93 |
| Replace supplies and parts |
93 |
| Supply replacement guidelines |
93 |
| Change the print cartridge |
94 |
| Load staples |
96 |
| Perform preventive maintenance |
97 |
| Reset the maintenance-kit counter |
97 |
| Install memory, internal USB devices, and external print server cards |
98 |
| Overview |
98 |
| Install memory |
98 |
| Install product memory |
98 |
| Check DIMM installation |
102 |
| Save resources (permanent resources) |
102 |
| Enable memory for Windows |
103 |
| Install internal USB devices |
104 |
| Install HP Jetdirect print server cards |
107 |
| Install an HP Jetdirect print server card |
107 |
| Remove an HP Jetdirect print server card |
108 |
| Clean the product |
109 |
| Clean the exterior |
109 |
| Clean the paper path |
109 |
| Clean the paper path automatically |
109 |
| Upgrade the firmware |
110 |
| Determine the current firmware version |
110 |
| Download new firmware from the HP Web site |
110 |
| Transfer the new firmware to the product |
110 |
| Use FTP to upload the firmware through a browser |
110 |
| Use FTP to upgrade the firmware on a network connection |
111 |
| Use HP Web Jetadmin to upgrade the firmware |
112 |
| Use Microsoft Windows commands to upgrade the firmware |
112 |
| Upgrade the HP Jetdirect firmware |
112 |
| Theory of operation |
115 |
| Basic operation |
116 |
| Major print systems |
116 |
| Internal components |
117 |
| Operating sequence |
120 |
| Engine-control system |
121 |
| DC controller PCA |
121 |
| Motors and fans |
122 |
| Failure detection |
123 |
| Motor failure |
123 |
| Fan motor failure |
123 |
| Engine power supply |
123 |
| Fuser-control circuit |
123 |
| Low-voltage power supply |
125 |
| High-voltage power supply |
125 |
| Overcurrent/overvoltage protection |
126 |
| Laser/scanner system |
127 |
| Laser failure detection |
128 |
| Image-formation system |
129 |
| Image-formation process |
129 |
| Block 1: Latent image formation |
130 |
| Step 1: Primary charging |
130 |
| Step 2: Laser-beam exposure |
131 |
| Block 2: Developing |
131 |
| Step 3: Developing |
131 |
| Block 3: Transfer |
131 |
| Step 4: Transfer |
132 |
| Step 5: Separation |
132 |
| Block 4: Fusing |
132 |
| Step 6: Fusing |
133 |
| Block 5: Drum cleaning |
133 |
| Step 7: Drum cleaning |
133 |
| Step 8: Drum charge elimination |
133 |
| Pickup, feed, and delivery system |
135 |
| Pickup-and-feed block |
136 |
| Fuser/delivery block |
137 |
| Paper trays |
137 |
| Printing from Tray 1 |
137 |
| Printing from Tray 2 |
137 |
| Formatter system |
137 |
| Sleep mode |
138 |
| Resolution Enhancement technology |
138 |
| EconoMode |
138 |
| Input/output |
139 |
| USB |
139 |
| Embedded print server |
139 |
| Expanded I/O |
139 |
| Hard-disk accessory |
139 |
| CPU |
139 |
| Product memory |
139 |
| Read-only memory |
139 |
| Random-access memory |
139 |
| DIMM slot |
139 |
| Nonvolatile memory |
140 |
| Memory Enhancement technology |
140 |
| PJL overview |
140 |
| PML |
140 |
| Control panel |
140 |
| Removal and replacement |
141 |
| Removal and replacement strategy |
142 |
| Warnings, cautions, notes, and tips |
142 |
| Electrostatic discharge |
142 |
| Required tools |
143 |
| Service approach |
144 |
| Before performing service |
144 |
| After performing service |
144 |
| Post-service tests |
145 |
| Test 1 (print-quality test) |
145 |
| Types of screws |
146 |
| Parts removal order |
147 |
| Product input trays and cabinet wheel locks |
148 |
| DC controller diagram |
149 |
| User-replaceable parts |
151 |
| Print cartridge |
151 |
| Memory DIMM |
153 |
| Tray 2 |
154 |
| Tray 2 separation, pickup, and feed rollers |
155 |
| Transfer roller |
157 |
| Top-accessory cover |
158 |
| Envelope feed accessory covers |
159 |
| Duplex accessory or cover |
160 |
| Tray 2 extension door |
161 |
| Rear output bin |
162 |
| Fuser |
163 |
| Formatter cover, formatter cage, and formatter PCA |
164 |
| Reinstallation notes, formatter |
165 |
| Installing a new formatter and a new DC controller |
165 |
| Service replaceable parts |
166 |
| Tray 1 pickup and feed rollers |
166 |
| Tray 1 separation roller |
169 |
| Registration assembly |
171 |
| Top cover |
173 |
| Right-side cover |
175 |
| Reinstall the right cover |
176 |
| Left-side cover |
178 |
| Right-front cover |
180 |
| Rear-upper cover |
183 |
| Control-panel assembly |
184 |
| Front cover |
186 |
| Fan FN102 |
188 |
| Fan FN103 |
190 |
| Pickup-motor assembly (M101) |
192 |
| Drum-motor assembly (M102) |
194 |
| Lifter-motor assembly (M103) |
197 |
| DC controller PCA |
200 |
| Reinstallation tip |
203 |
| Installing a new formatter and a new DC controller |
203 |
| Pickup-drive assembly |
204 |
| Reinstall the pickup-drive assembly |
208 |
| Fuser-motor assembly (M299) |
209 |
| Drum-drive assembly |
211 |
| Reinstall the drum-drive assembly |
213 |
| Fan FN101 |
214 |
| Fan FN301 |
216 |
| Environmental sensor (TH3) |
218 |
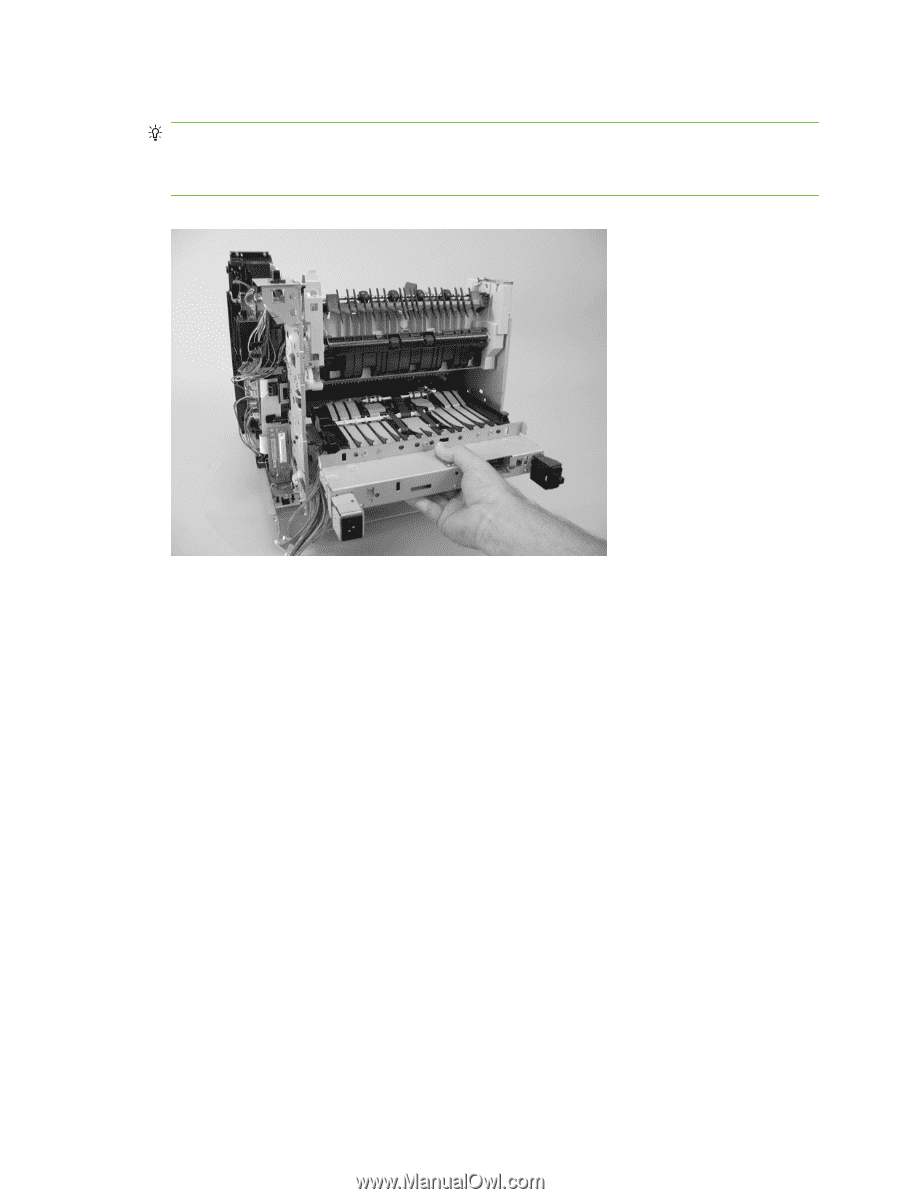
| High voltage power supply |
220 |
| Feed-guide assembly |
225 |
| Reinstall the feed-guide assembly |
226 |
| Tray 1 paper-pickup assembly |
228 |
| Feed-roller assembly |
230 |
| Laser/scanner assembly |
231 |
| Paper-delivery assembly |
233 |
| Reinstall the paper-delivery assembly |
236 |
| 1,500-sheet feeder assembly |
237 |
| 1,500-sheet feeder feed rollers |
237 |
| 1,500-sheet feeder separation roller |
238 |
| 1,500-sheet feeder rear cover |
239 |
| 1,500-sheet feeder right-side cover |
240 |
| 1,500-sheet feeder left-side cover |
241 |
| 1,500-sheet feeder door |
244 |
| 1,500-sheet feeder motor |
246 |
| 1,500-sheet feeder driver PCA |
247 |
| 1,500-sheet feeder lift-drive assembly |
248 |
| Solve problems |
251 |
| Troubleshooting checklist |
252 |
| Menu map |
253 |
| Troubleshooting process |
254 |
| Power-on checks |
254 |
| Overview |
254 |
| Troubleshooting tools |
257 |
| Individual component diagnostics |
257 |
| LED diagnostics |
257 |
| Understand lights on the formatter |
257 |
| HP Jetdirect LEDs |
257 |
| Heartbeat LED |
257 |
| Formatter test |
258 |
| Engine diagnostics |
258 |
| Engine test |
258 |
| Half self test |
259 |
| Drum rotation test |
259 |
| Paper path sensors test |
260 |
| Paper path test |
262 |
| Sensor test (interactive) |
262 |
| Manual sensor test (special mode test) |
262 |
| Manual sensor test 2 (special mode test) |
270 |
| Print/stop test |
271 |
| Component tests |
273 |
| Diagrams |
274 |
| Block diagrams |
274 |
| Main assemblies |
274 |
| Main parts |
275 |
| Motors and fans |
276 |
| PCAs |
277 |
| 500-sheet feeder |
277 |
| 1,500-sheet feeder |
278 |
| Connectors |
280 |
| DC controller PCA connectors |
280 |
| Product base connectors |
282 |
| 500-sheet paper tray connectors |
283 |
| 1,500-sheet paper tray connectors |
283 |
| Duplexer connectors |
284 |
| Envelope feeder connectors |
284 |
| General timing chart |
285 |
| Circuit diagrams |
286 |
| Print quality troubleshooting tools |
292 |
| Repetitive image defect ruler |
292 |
| Cleaning page |
292 |
| Control-panel messages |
294 |
| Event log messages |
314 |
| Print an event log |
314 |
| Show an event log |
314 |
| Sample event log |
315 |
| Paper-handling problems |
316 |
| Jams |
316 |
| Common causes of jams |
316 |
| Jam locations |
318 |
| Clear jams |
319 |
| Clear jams from the top-cover and print-cartridge areas |
319 |
| Clear jams from the optional envelope feeder |
321 |
| Clear jams from the trays |
323 |
| Clear jams from Tray 1 |
323 |
| Clear jams from Tray 2 or an optional 500-sheet tray |
323 |
| Clear jams from the optional 1,500-sheet tray |
324 |
| Clear jams from the optional duplexer |
326 |
| Clear jams from the fuser area |
327 |
| Clear jams from the output areas |
332 |
| Clear jams from the rear output bin |
332 |
| Clear jams from the optional stacker or stapler/stacker |
333 |
| Clear paper jams from the optional stacker or stapler/stacker |
333 |
| Clear staple jams from the optional stapler/stacker |
334 |
| Clear jams from the optional 5-bin mailbox |
335 |
| Jam recovery |
337 |
| Product feeds incorrect page size |
338 |
| Output is curled or wrinkled |
339 |
| Product will not duplex or duplexes incorrectly |
340 |
| Solve image quality problems |
341 |
| Image defects |
341 |
| Solve performance problems |
346 |
| Solve connectivity problems |
347 |
| Solve direct-connect problems |
347 |
| Solve network connectivity problems |
347 |
| Solve network printing problems |
347 |
| Ping test |
348 |
| Service mode functions |
349 |
| Service menu |
349 |
| Product resets |
350 |
| Restore factory-set defaults |
350 |
| Hard disk initialization |
350 |
| NVRAM initialization |
350 |
| Cold reset |
351 |
| Service ID |
351 |
| Restore the service ID |
351 |
| Convert the service ID to an actual date |
351 |
| Reset page counts |
352 |
| Cold reset paper |
352 |
| Parts |
353 |
| Order parts, accessories, and supplies |
354 |
| Order directly from HP |
354 |
| Order through service or support providers |
354 |
| Order directly through the HP Easy Printer Care software |
354 |
| Order replacement parts |
354 |
| Paper-handling accessories |
355 |
| Print cartridges |
356 |
| Maintenance kits |
356 |
| Memory |
357 |
| Cables and interfaces |
357 |
| Paper |
358 |
| How to use the parts lists and diagrams |
361 |
| Customer/field-replaceable units |
362 |
| Assembly locations |
364 |
| Covers |
368 |
| Internal components |
370 |
| PCAs |
398 |
| Input devices |
404 |
| Output devices |
428 |
| Alphabetical parts list |
437 |
| Numerical parts list |
472 |
| Service and support |
507 |
| Hewlett-Packard limited warranty statement |
507 |
| Print cartridge limited warranty statement |
508 |
| Customer self-repair warranty service |
509 |
| Customer support |
510 |
| HP maintenance agreements |
511 |
| On-site service agreements |
511 |
| Next-day on-site service |
511 |
| Weekly (volume) on-site service |
511 |
| Repacking the device |
511 |
| Extended warranty |
512 |
| Specifications |
513 |
| Physical specifications |
514 |
| Electrical specifications |
514 |
| Acoustic specifications |
516 |
| Operating environment |
516 |
| Regulatory information |
517 |
| FCC regulations |
518 |
| Declaration of conformity |
519 |
| Declaration of conformity |
519 |
| Safety statements |
520 |
| Laser safety |
520 |
| Canadian DOC regulations |
520 |
| VCCI statement (Japan) |
520 |
| Power cord statement (Japan) |
520 |
| EMI statement (Korea) |
520 |
| Laser statement for Finland |
521 |
| Substances table (China) |
522 |

 1
1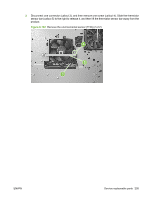 219
219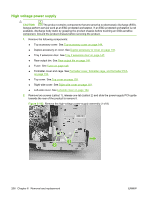 220
220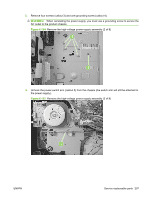 221
221 222
222 223
223 224
224 225
225 226
226 227
227 228
228 229
229