HP LaserJet P4510 Service Manual - Page 263
MANUAL SENSOR TEST 1, EXIT DIAGNOSTICS, Menus cannot be opened during this test, so
 |
View all HP LaserJet P4510 manuals
Add to My Manuals
Save this manual to your list of manuals |
Page 263 highlights
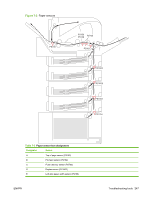
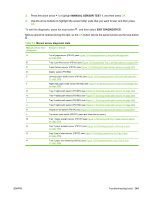
3. Press the down arrow to highlight MANUAL SENSOR TEST 1, and then press OK. 4. Use the arrow buttons to highlight the sensor letter code that you want to test, and then press OK. To exit this diagnostic, press the stop button , and then select EXIT DIAGNOSTICS. Menus cannot be opened during this test, so the OK button serves the same function as the stop button . Table 7-4 Manual sensor diagnostic tests Manual sensor test designator Sensor or switch A Top of page sensor (PS103) (see Figure 7-8 Checking sensors in the print-cartridge area on page 255) B Tray 2 pre-feed sensor (PS102) (see Figure 7-6 Checking the Tray 2 pre-feed sensor on page 253) C Fuser delivery sensor (PS700) (see Figure 7-5 Checking the fuser delivery sensor on page 252) D Duplex sensor (PS1502) E Left-side paper width sensor (PS106) (see Figure 7-8 Checking sensors in the print-cartridge area on page 255) F Right-side paper width sensor (PS108) (see Figure 7-8 Checking sensors in the print-cartridge area on page 255) G Tray 3 media path sensor (PS1603) (see Figure 7-7 Checking media path sensors on page 254) H Tray 4 media path sensor (PS1603) (see Figure 7-7 Checking media path sensors on page 254) I Tray 5 media path sensor (PS1603) (see Figure 7-7 Checking media path sensors on page 254) J Tray 6 media path sensor (PS1704) (see Figure 7-7 Checking media path sensors on page 254) K Output bin full sensor (PS104) (see Figure 7-3 Checking the output bin full sensor on page 250) L Top cover open switch (SW101) (open and close the top cover) M Tray 1 paper present sensor (PS105) (see Figure 7-4 Checking the Tray 1 paper present sensor on page 251) N Tray 2 paper present sensor (PS101) (see Figure 7-9 Checking sensors in the Tray 2 area on page 256) O Tray 2 top of stack sensor (PS107) (see Figure 7-9 Checking sensors in the Tray 2 area on page 256) P Tray 2 paper size switches (SW102) (see Figure 7-9 Checking sensors in the Tray 2 area on page 256) ENWW Troubleshooting tools 249
-
 1
1 -
2
-
3
-
4
-
5
-
6
-
7
-
8
-
9
-
10
-
11
-
12
-
13
-
14
-
15
-
16
-
17
-
18
-
19
-
20
-
21
-
22
-
23
-
24
-
25
-
26
-
27
-
28
-
29
-
30
-
31
-
32
-
33
-
34
-
35
-
36
-
37
-
38
-
39
-
40
-
41
-
42
-
43
-
44
-
45
-
46
-
47
-
48
-
49
-
50
-
51
-
52
-
53
-
54
-
55
-
56
-
57
-
58
-
59
-
60
-
61
-
62
-
63
-
64
-
65
-
66
-
67
-
68
-
69
-
70
-
71
-
72
-
73
-
74
-
75
-
76
-
77
-
78
-
79
-
80
-
81
-
82
-
83
-
84
-
85
-
86
-
87
-
88
-
89
-
90
-
91
-
92
-
93
-
94
-
95
-
96
-
97
-
98
-
99
-
100
-
101
-
102
-
103
-
104
-
105
-
106
-
107
-
108
-
109
-
110
-
111
-
112
-
113
-
114
-
115
-
116
-
117
-
118
-
119
-
120
-
121
-
122
-
123
-
124
-
125
-
126
-
127
-
128
-
129
-
130
-
131
-
132
-
133
-
134
-
135
-
136
-
137
-
138
-
139
-
140
-
141
-
142
-
143
-
144
-
145
-
146
-
147
-
148
-
149
-
150
-
151
-
152
-
153
-
154
-
155
-
156
-
157
-
158
-
159
-
160
-
161
-
162
-
163
-
164
-
165
-
166
-
167
-
168
-
169
-
170
-
171
-
172
-
173
-
174
-
175
-
176
-
177
-
178
-
179
-
180
-
181
-
182
-
183
-
184
-
185
-
186
-
187
-
188
-
189
-
190
-
191
-
192
-
193
-
194
-
195
-
196
-
197
-
198
-
199
-
200
-
201
-
202
-
203
-
204
-
205
-
206
-
207
-
208
-
209
-
210
-
211
-
212
-
213
-
214
-
215
-
216
-
217
-
218
-
219
-
220
-
221
-
222
-
223
-
224
-
225
-
226
-
227
-
228
-
229
-
230
-
231
-
232
-
233
-
234
-
235
-
236
-
237
-
238
-
239
-
240
-
241
-
242
-
243
-
244
-
245
-
246
-
247
-
248
-
249
-
250
-
251
-
252
-
253
-
254
-
255
-
256
-
257
-
 258
258 -
 259
259 -
 260
260 -
 261
261 -
 262
262 -
 263
263 -
 264
264 -
 265
265 -
 266
266 -
 267
267 -
 268
268 -
269
-
270
-
271
-
272
-
273
-
274
-
275
-
276
-
277
-
278
-
279
-
280
-
281
-
282
-
283
-
284
-
285
-
286
-
287
-
288
-
289
-
290
-
291
-
292
-
293
-
294
-
295
-
296
-
297
-
298
-
299
-
300
-
301
-
302
-
303
-
304
-
305
-
306
-
307
-
308
-
309
-
310
-
311
-
312
-
313
-
314
-
315
-
316
-
317
-
318
-
319
-
320
-
321
-
322
-
323
-
324
-
325
-
326
-
327
-
328
-
329
-
330
-
331
-
332
-
333
-
334
-
335
-
336
-
337
-
338
-
339
-
340
-
341
-
342
-
343
-
344
-
345
-
346
-
347
-
348
-
349
-
350
-
351
-
352
-
353
-
354
-
355
-
356
-
357
-
358
-
359
-
360
-
361
-
362
-
363
-
364
-
365
-
366
-
367
-
368
-
369
-
370
-
371
-
372
-
373
-
374
-
375
-
376
-
377
-
378
-
379
-
380
-
381
-
382
-
383
-
384
-
385
-
386
-
387
-
388
-
389
-
390
-
391
-
392
-
393
-
394
-
395
-
396
-
397
-
398
-
399
-
400
-
401
-
402
-
403
-
404
-
405
-
406
-
407
-
408
-
409
-
410
-
411
-
412
-
413
-
414
-
415
-
416
-
417
-
418
-
419
-
420
-
421
-
422
-
423
-
424
-
425
-
426
-
427
-
428
-
429
-
430
-
431
-
432
-
433
-
434
-
435
-
436
-
437
-
438
-
439
-
440
-
441
-
442
-
443
-
444
-
445
-
446
-
447
-
448
-
449
-
450
-
451
-
452
-
453
-
454
-
455
-
456
-
457
-
458
-
459
-
460
-
461
-
462
-
463
-
464
-
465
-
466
-
467
-
468
-
469
-
470
-
471
-
472
-
473
-
474
-
475
-
476
-
477
-
478
-
479
-
480
-
481
-
482
-
483
-
484
-
485
-
486
-
487
-
488
-
489
-
490
-
491
-
492
-
493
-
494
-
495
-
496
-
497
-
498
-
499
-
500
-
501
-
502
-
503
-
504
-
505
-
506
-
507
-
508
-
509
-
510
-
511
-
512
-
513
-
514
-
515
-
516
-
517
-
518
-
519
-
520
-
521
-
522
-
523
-
524
-
525
-
526
-
527
-
528
-
529
-
530
-
531
-
532
 |
 |