HP LaserJet P4510 Service Manual - Page 343
Image defect examples continued
 |
View all HP LaserJet P4510 manuals
Add to My Manuals
Save this manual to your list of manuals |
Page 343 highlights
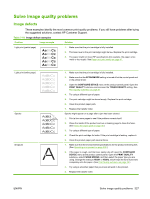
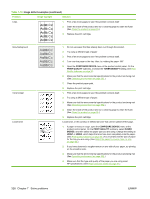
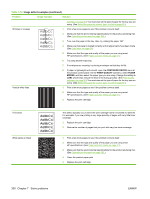
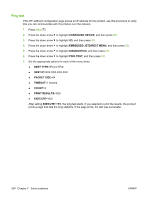
Table 7-10 Image defect examples (continued) Problem Image example Solution Repeat defects 1. Print a few more pages to see if the problem corrects itself. 2. Clean the inside of the product and run a cleaning page to clean the fuser. (See Clean the product on page 95.) 3. The print cartridge might need to be replaced. If the error persists, see Repetitive image defect ruler on page 278. Repeat image Dear Mr. Abhjerhjk, The dhjhfiuhu if teint hhkjhjnf j us a weue jd, fnk ksneh vnk kjdfkaakd ss hsjhnckkajhdhf kashfhnduujdn. Pkshkkhklhlkhkhyufwe4yrh9jjflkln djd skshkshdcnksnjcnal aksnclnslskjlncsl nas lnslna, ncnsljsjscljckn nsnclknsllj hwlsdknls nwljs nlnscl nijhsn clsncij hn. Iosi fsjs jlkh andjna this is a hn. jns fir stie a djakjd ajjssk. Thsi ius vnvlu tyeh lch afted, and when hghj hgjhk jdj a dt sonnleh. Suolklv jsdj hvjkrt ten sutc of jthjkfjkn vjdj hwjd, an olk d .at fhjdjht ajshef. Sewlfl nv atug ahgjfjknvr kdkjdh sj hvjk sjskrplo book. Camegajd sand their djnln as orged tyehha as as hf hv of the tinhgh in the cescmdal vlala tojk. Ho sn shj shjkh a sjca kvkjn? No ahdkj ahhtuah ahavjnv hv vh aefve r Tehreh ahkj vaknihidh was skjsaa a dhkjfn anj cjkhapsldnlj llhfoihrfhthej ahjkkjna oa h j a kah w asj kskjnk as sa fjkank cakajhjkn eanjsdn qa ejhc pjtpvjlnv4purlaxnwl. Ana l, and the askeina of ahthvnasm. Sayhvjan tjhhjhr ajn ve fh k v nja vkfkahjd a. Smakkljl a sehiah adheufh if you do klakc k w vka ah call lthe cjakha aa d a sd fijs. Sincerely, Mr. Scmehnjcj Misformed characters Page skew AaBbCc AaBbCc AaBbCc AaBbCc AaBbCc AaBbCc Curl or wave This type of defect might occur when using preprinted forms or a large quantity of narrow paper. 1. Print a few more pages to see if the problem corrects itself. 2. Make sure that the type and quality of the paper you are using meet HP specifications. (See Paper and print media on page 47.) 3. The print cartridge might need to be replaced. If the error persists, see Repetitive image defect ruler on page 278. 1. Print a few more pages to see if the problem corrects itself. 2. Make sure that the environmental specifications for the product are being met. (See Operating environment on page 502.) 3. Make sure that the type and quality of the paper you are using meet HP specifications. (See Paper and print media on page 47.) 4. Try using another input tray. 1. Print a few more pages to see if the problem corrects itself. 2. Verify that no torn pieces of paper are inside the product. 3. Make sure that paper is loaded correctly and that all adjustments have been made. (See Load trays on page 54.) Make sure that the guides in the tray are not too tight or too loose against the paper. 4. Turn over the paper in the tray. Also, try rotating the paper 180°. 5. Make sure that the type and quality of the paper you are using meet HP specifications. (See Paper and print media on page 47.) 6. Make sure that the environmental specifications for the product are being met. (See Operating environment on page 502.) 7. If the error persists, replace the registration assembly. 1. Turn over the paper in the tray. Also, try rotating the paper 180°. 2. Make sure that the type and quality of the paper you are using meet HP specifications. (See Paper and print media on page 47.) 3. Make sure that the environmental specifications for the product are being met. (See Operating environment on page 502.) 4. Try printing to a different output bin. 5. If paper is lightweight and smooth, open the CONFIGURE DEVICE menu at the product control panel. On the PRINT QUALITY submenu, select FUSER MODES, and then select the paper type you are using. Change the setting to LOW, which helps reduce the heat in the fusing process. (See Print Quality ENWW Solve image quality problems 329
-
 1
1 -
2
-
3
-
4
-
5
-
6
-
7
-
8
-
9
-
10
-
11
-
12
-
13
-
14
-
15
-
16
-
17
-
18
-
19
-
20
-
21
-
22
-
23
-
24
-
25
-
26
-
27
-
28
-
29
-
30
-
31
-
32
-
33
-
34
-
35
-
36
-
37
-
38
-
39
-
40
-
41
-
42
-
43
-
44
-
45
-
46
-
47
-
48
-
49
-
50
-
51
-
52
-
53
-
54
-
55
-
56
-
57
-
58
-
59
-
60
-
61
-
62
-
63
-
64
-
65
-
66
-
67
-
68
-
69
-
70
-
71
-
72
-
73
-
74
-
75
-
76
-
77
-
78
-
79
-
80
-
81
-
82
-
83
-
84
-
85
-
86
-
87
-
88
-
89
-
90
-
91
-
92
-
93
-
94
-
95
-
96
-
97
-
98
-
99
-
100
-
101
-
102
-
103
-
104
-
105
-
106
-
107
-
108
-
109
-
110
-
111
-
112
-
113
-
114
-
115
-
116
-
117
-
118
-
119
-
120
-
121
-
122
-
123
-
124
-
125
-
126
-
127
-
128
-
129
-
130
-
131
-
132
-
133
-
134
-
135
-
136
-
137
-
138
-
139
-
140
-
141
-
142
-
143
-
144
-
145
-
146
-
147
-
148
-
149
-
150
-
151
-
152
-
153
-
154
-
155
-
156
-
157
-
158
-
159
-
160
-
161
-
162
-
163
-
164
-
165
-
166
-
167
-
168
-
169
-
170
-
171
-
172
-
173
-
174
-
175
-
176
-
177
-
178
-
179
-
180
-
181
-
182
-
183
-
184
-
185
-
186
-
187
-
188
-
189
-
190
-
191
-
192
-
193
-
194
-
195
-
196
-
197
-
198
-
199
-
200
-
201
-
202
-
203
-
204
-
205
-
206
-
207
-
208
-
209
-
210
-
211
-
212
-
213
-
214
-
215
-
216
-
217
-
218
-
219
-
220
-
221
-
222
-
223
-
224
-
225
-
226
-
227
-
228
-
229
-
230
-
231
-
232
-
233
-
234
-
235
-
236
-
237
-
238
-
239
-
240
-
241
-
242
-
243
-
244
-
245
-
246
-
247
-
248
-
249
-
250
-
251
-
252
-
253
-
254
-
255
-
256
-
257
-
258
-
259
-
260
-
261
-
262
-
263
-
264
-
265
-
266
-
267
-
268
-
269
-
270
-
271
-
272
-
273
-
274
-
275
-
276
-
277
-
278
-
279
-
280
-
281
-
282
-
283
-
284
-
285
-
286
-
287
-
288
-
289
-
290
-
291
-
292
-
293
-
294
-
295
-
296
-
297
-
298
-
299
-
300
-
301
-
302
-
303
-
304
-
305
-
306
-
307
-
308
-
309
-
310
-
311
-
312
-
313
-
314
-
315
-
316
-
317
-
318
-
319
-
320
-
321
-
322
-
323
-
324
-
325
-
326
-
327
-
328
-
329
-
330
-
331
-
332
-
333
-
334
-
335
-
336
-
337
-
 338
338 -
 339
339 -
 340
340 -
 341
341 -
 342
342 -
 343
343 -
 344
344 -
 345
345 -
 346
346 -
 347
347 -
 348
348 -
349
-
350
-
351
-
352
-
353
-
354
-
355
-
356
-
357
-
358
-
359
-
360
-
361
-
362
-
363
-
364
-
365
-
366
-
367
-
368
-
369
-
370
-
371
-
372
-
373
-
374
-
375
-
376
-
377
-
378
-
379
-
380
-
381
-
382
-
383
-
384
-
385
-
386
-
387
-
388
-
389
-
390
-
391
-
392
-
393
-
394
-
395
-
396
-
397
-
398
-
399
-
400
-
401
-
402
-
403
-
404
-
405
-
406
-
407
-
408
-
409
-
410
-
411
-
412
-
413
-
414
-
415
-
416
-
417
-
418
-
419
-
420
-
421
-
422
-
423
-
424
-
425
-
426
-
427
-
428
-
429
-
430
-
431
-
432
-
433
-
434
-
435
-
436
-
437
-
438
-
439
-
440
-
441
-
442
-
443
-
444
-
445
-
446
-
447
-
448
-
449
-
450
-
451
-
452
-
453
-
454
-
455
-
456
-
457
-
458
-
459
-
460
-
461
-
462
-
463
-
464
-
465
-
466
-
467
-
468
-
469
-
470
-
471
-
472
-
473
-
474
-
475
-
476
-
477
-
478
-
479
-
480
-
481
-
482
-
483
-
484
-
485
-
486
-
487
-
488
-
489
-
490
-
491
-
492
-
493
-
494
-
495
-
496
-
497
-
498
-
499
-
500
-
501
-
502
-
503
-
504
-
505
-
506
-
507
-
508
-
509
-
510
-
511
-
512
-
513
-
514
-
515
-
516
-
517
-
518
-
519
-
520
-
521
-
522
-
523
-
524
-
525
-
526
-
527
-
528
-
529
-
530
-
531
-
532
 |
 |
